When a heading is clicked, a list of menu options displays. The menu options are the same for all personas; however, they can be customized by your system administrator.
The following table lists the menu options available for each icon:
Heading |
Menu Options |
|---|---|
Favorites
|
Add to Favorites – when clicked, it allows you to add the active screen currently open to your Favorites list for quick access later.
The Favorites heading also lists all screens added to your Favorites list. Select the screen name in order to open the page. You can remove the screen name from the Favorites list by right-clicking the screen name and clicking "Remove 'x' from Favorites." |
Home Page
|
Opens the Home Page assigned to the logged-in persona as set up on the Persona Maintenance (PSM004) screen. |
Development Tools
|
Studio Suite – allows you to work with the developer designers and is comprised of the following: · Application Designer – opens Application Designer. · Database Designer – opens Personify360 Database Designer. · Visual Style Designer – opens Infragistics App Styler. · Web Forms Designer – opens Web Forms Designer. · Web Services Designer – opens Web Services Designer.
Debug Tool – allows you to debug the application and is compromised of the following: · Command Prompt – another method for accessing a screen. Rather than navigating to a screen, you can simply open the Command Prompt, enter the screen name, and click "Go." For example, CallCenter, MBR000, or FAR001. · Debug Trace – allows you to see what the client PC is doing behind the scenes. This is helpful when trying to identify system errors. · SQL Trace – opens the SQL Trace screen where you can view the SQL code associated with the open screen. · Form Codebehind – displays the code behind the open screen. This code is read-only. This code can only be modified using the Application Designer. · Form XML – displays the XML code behind the open screen. This XML code is read-only. This XML code can only be modified using the Application Designer. · Form Context – combines the user’s context and the context of the record displayed on the screen. You can track where in the API structure a screen is coming from and what values are set for it. This information is read-only. · Form Issues – displays a list of required fields that the user did not enter. This task can also be performed by clicking Save on an open screen. The Form Issues screen is another way to verify all fields were entered.
Screen Alias Maintenance – opens the PSMScreenAlias screen to create a new persona security screen alias.
Design This Form – opens Application Designer where you can edit the screen you are currently in.
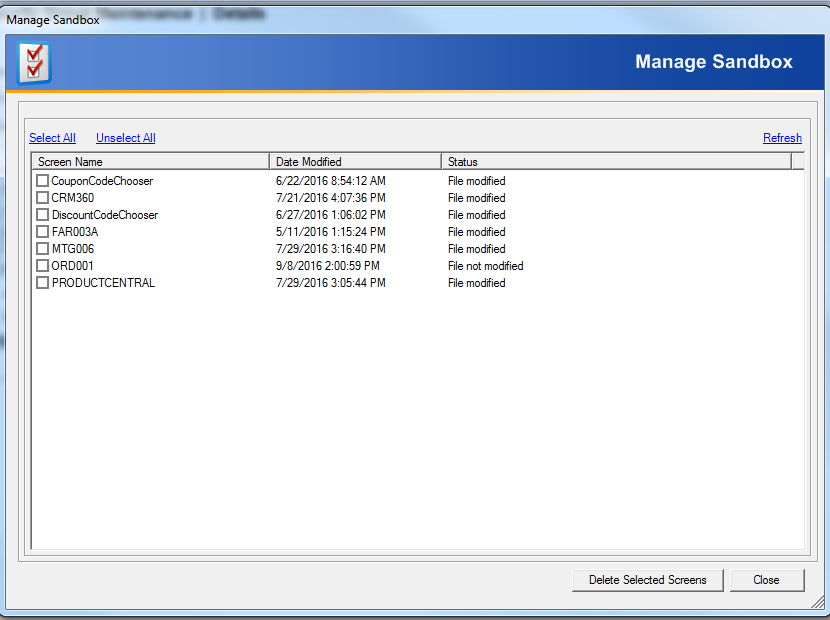
Clear Sandbox – opens the Manage Sandbox screen, shown below, which displays any customized forms that have not yet been published and allows you to delete any screens from your Sandbox.
|
Reports
|
Operational Reports – opens the Online Reports Submission screen with the reports displayed that are related to the active Personify screen. Data Analyzer – opens the Personify Data Analyzer screen. |
My Preferences
|
Change Password – allows you to change the password associated with your username. Configure Email Alerts – allows you to disable/enable your email alerts connected to your Contact Tracking records. See Alerts for more information. |
Window
|
View Screen Tasks – displays the Task Bar on the screens. This is needed if you selected to close the Task Bar using the magnifying glass icon. View Product Research – opens the Product Research screen in the task bar. The Product Research screen is usually used with Order Entry screen. Close All Windows – closes all the open screens. The Window heading also lists all open screens. The check mark next to the screen indicates that screen is open. Select another screen from the list to open it. |
Help
|
Contents – opens the Online Help. [PersonifyCare] – depending on the configuration in the Container.xml file by your system administrator, this link will named differently and should be configured to open your association's help desk. About Personify – displays the product components. |
See Also:
· Overview: Understanding the Layout of Personify360
· Viewing and Accessing Recent Items
· Opening Screens from the Command Line
· Viewing Contact Tracking Alerts
· Changing the Organization-Organization Unit
· Using the Personify360 Home Page
· Workarounds for Screens not Meeting Minimum Resolution Requirements