Alternatively, you can enter "PSMScreenAlias" into the command bar.
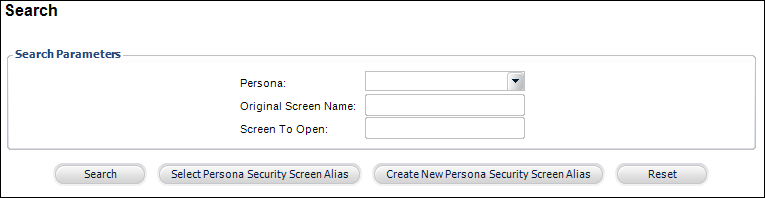
The Search screen displays, as shown below.
With the 7.3.0 release, specific personas can be defined to open an alternative screen when the user accesses the original screen.
As of 7.3.0 SP2, you have the ability to use that same persona-based screen alias concept for all screens active in the Personify360 application. This means, that whenever a user in a specific persona attempts to access a specific screen, whether it be through the menu buttons, task lists, screen elements, etc., you can set the persona to have an entirely different screen open instead.
Setup for new screen alias entries occurs via the Screen Alias (PSMScreenAlias) screen. You can access the Screen Alias screen by its screen name (PSMScreenAlias) or by adding it to your menu via the Personify360 Menu Designer. The application does not limit you from the number of alias entries each persona can have.
To assign a screen alias to a person:
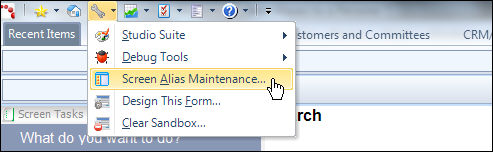
1. From the Personify360 menu bar, select Development Tools > Screen Alias Maintenance, as shown below.
Alternatively, you can enter "PSMScreenAlias" into the command bar.
The Search screen displays, as shown below.
2. Click Create New Persona Security Screen Alias.
The Details screen displays, as shown below.
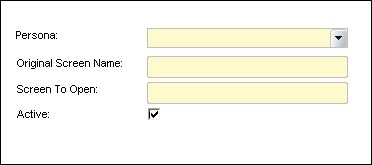
3. Select the Persona you want to apply the alias to from the drop-down.
Values are populated based on the personas defined on the Persona Maintenance screen for the org/org unit of the logged in user. For more information, please see Defining Personas.
4. Enter the Original Screen Name.
Please note that this is the screen name, which can be found in the bottom, right-hand side of the Personify360 application (e.g., ORD001, not Order Entry).
5. Enter the name of the Screen To Open.
Please note that this is the screen name, which can be found in the bottom, right-hand side of the Personify360 application (e.g., ORD001, not Order Entry).
6. By default, the Active checkbox is checked, meaning if you saved the screen alias now, it would automatically take affect for that persona. If necessary, uncheck this checkbox.
7. Click Save.
Please note that you must restart the Personify360 application in order for the changes to take effect.