Creating an Order
 The
steps in this section are meant to be a generic, overview of an order
workflow. For specific instructions on how to create an order for a subsystem
product, please see Creating
an Insertion Order, Creating
an Order for an Exhibition Product, Creating
an Order for an Inventoried Product, Creating
an Order for a Meeting Product, Creating
a Membership Order, Creating
an Order for a Miscellaneous Product, Creating
an Order for a Package or Creating
an Order for a Subscription Product.
The
steps in this section are meant to be a generic, overview of an order
workflow. For specific instructions on how to create an order for a subsystem
product, please see Creating
an Insertion Order, Creating
an Order for an Exhibition Product, Creating
an Order for an Inventoried Product, Creating
an Order for a Meeting Product, Creating
a Membership Order, Creating
an Order for a Miscellaneous Product, Creating
an Order for a Package or Creating
an Order for a Subscription Product.
From the Order Entry screen, the first step to creating a product order
is to add the product to the order. Next, you define the necessary shipping
information. Finally, you create a receipt for the order.
 The
system does not support orders with more than 100 order lines.
The
system does not support orders with more than 100 order lines.
To create an order:
1. Order
the products.
2. Enter
the shipping information.
3. Enter
the payment information.
Step 1: ordering the products:
1. Access
the Order Entry screen by performing one of the following:
· From
the Home Page, click Add a new order from the
Orders section.
· From
the toolbar, using the Order Entry Operator or System Administrator persona,
select CRM/Orders > Order Entry > Order Entry.
· From
the CRM360® screen,
click Order from the Quick Create task category.
The Order Entry search screen displays.
2. From the Create
a New Order tab, search for the appropriate customer and click
Create New Order.
The Order Entry screen displays.
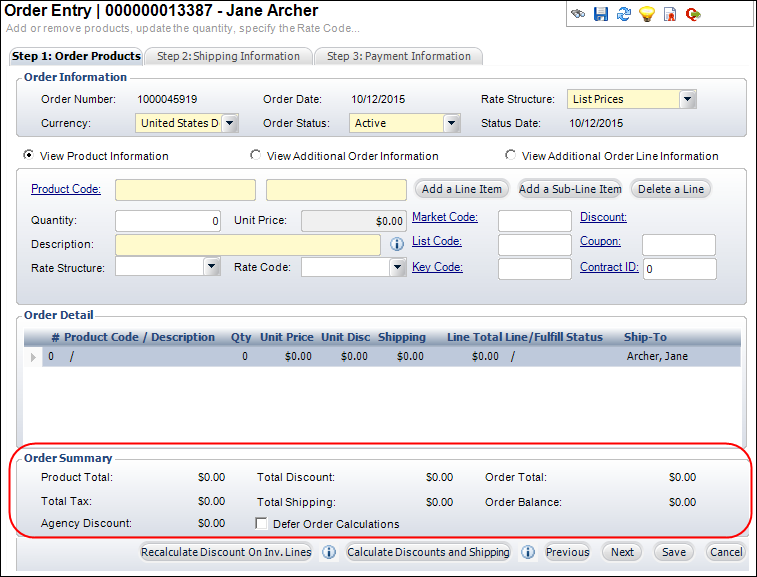
3. If necessary, update
the Order Information section,
as highlighted below:
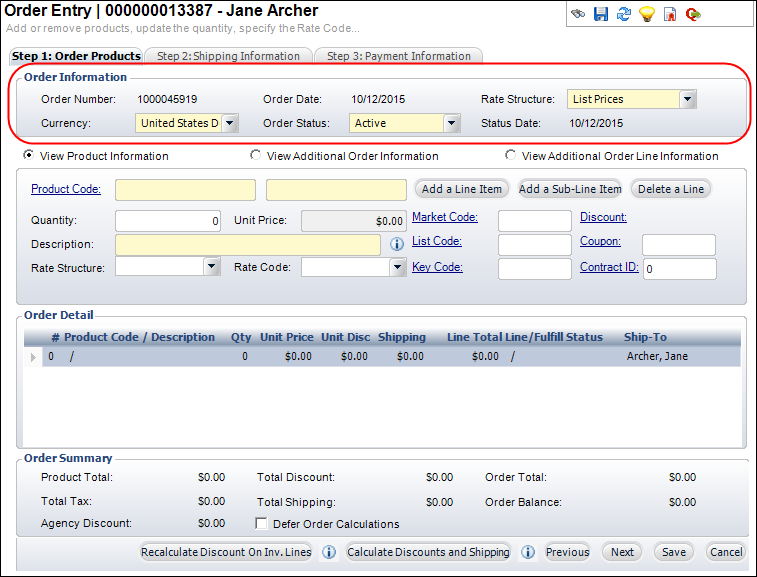
a. Change
the Currency.
As of the 7.1.3 release, the system supports multi-currency. Currencies
(including the base currency) are defined using the Currency
Exchange Rate Maintenance screen. The values available in the drop-down
are populated from the APP_EXCHANGE_RATE table.
b. The system
automatically populates the rate structure based on the rate structure
for which the customer qualifies. If necessary, select a different Rate Structure from the drop-down.
This applies to the entire order.
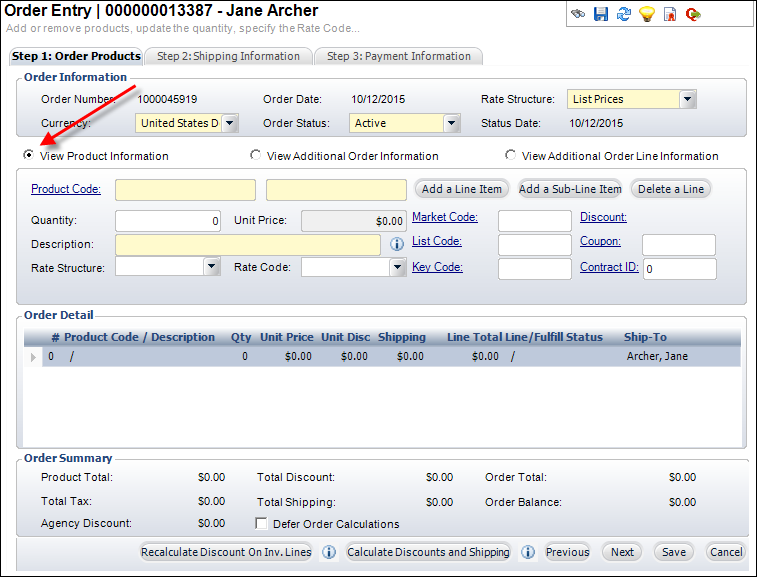
4. Add a
master product to the order using one of the following ways:
a. Select
the View Product Information radio
button and either click the Product Code link
to search for and select a product from the Product Chooser or manually
enter the parent product code. If the Product Code field is disabled,
click Add a Line Item.
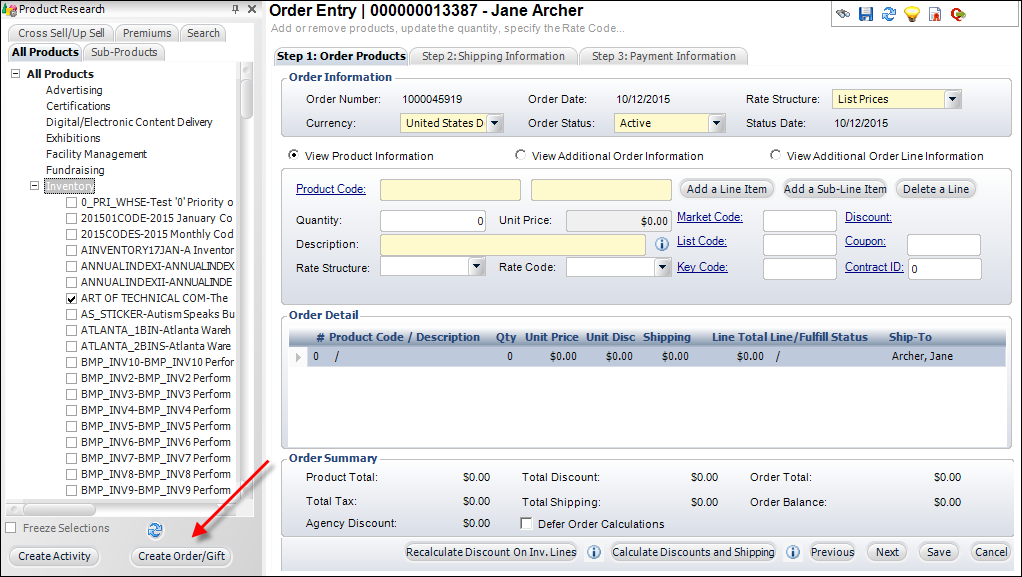
b. From the
Product Chooser tab, select the
appropriate product from the All Products
sub-tab and click Create Order/Gift
to add the product to the order.
The Line
Status of an order line is not only governed by the default line status
on the Organizational
Unit Maintenance Line Status Defaults for New Orders screen
and the Short Pay field on the
Product Maintenance Rates and Pricing screen, but also by the Allow
Price Update checkbox on the Product Maintenance screen. For example,
if you set the default line status as "Active" on the at the
Organizational Unit Maintenance
Line Status Defaults for New Orders screen, from the "Short
Pay" drop-down select "AR" on the Product Maintenance screen,
and do NOT check the "Allow Price Update" checkbox on the at
the Organizational
Unit Maintenance Line Status Defaults for New Orders screen, the
order line status for the product will be "Active" and you will
not have to update the price to active it. However, if you set the default
line status as "Active" on the at the Organizational
Unit Maintenance Line Status Defaults for New Orders screen, from
the "Short Pay" drop-down select "AR" on the Product
Maintenance screen, and do NOT check the "Allow Price Update"
checkbox on the Organizational Unit
Maintenance Line Status Defaults for New Orders screen, the order
line status of this product will be "Proforma" and you have
to update the price in order for the line status of the order to become
"Active" and the unit price becomes uneditable.
5. If necessary,
click Add a Sub-line Item.
If the order line ship-to customer is the same as the order master ship-to
customer, then order line ship-to address will default to the order master
ship-to address.
6. To delete
a line item, click Delete a Line. However, if
an order line has a Far_Txn record with a Txn Type Code of 1, 3 or 9,
it cannot be deleted.
7. To increase
the order line quantity, change the Quantity.
8. If necessary,
change the Unit Price.
This field is only enabled if the “Allow Price Update” checkbox was selected
during the creation of the product.
9. If necessary,
change the Description.
10. The Rate Structure and Rate Code
values default based on the customer’s status and apply to the highlighted
line item. If necessary, change these values.
As of 7.5.0,
if the rate structure is manually changed, the system will set the Order_Detail.MANUAL_RATE_OVERRIDE_FLAG
to "Y".
11. If necessary,
add the following information to the selected order line:
· Market Code – Identifies the source of an order
if it is based on a promotion created for a marketing campaign. Market
codes are validated against the order detail date. To apply a market code
to the entire order, proceed to the next step. For more information
on market codes, please see Defining
a Market Code.
If you select
an active market code that qualifies the order for free shipping, if the
market code is linked to an active free-shipping definition, that FREE_SHIPPING_ID
is used; otherwise “MARKET_CODE” is set as the FREE_SHIPPING_ID. If you
next enter a coupon that is also linked to free-shipping rule, the system
will ignore the coupon because the order has already qualified for free
shipping. If the order qualifies for free shipping based on order amount
before the market code or coupon is entered on the order, then that FREE_SHIPPING_ID
will be used as the free-shipping qualification, and the system will ignore
rules associated with the market code or coupon if the market code or
coupon are later added.
· List Code – Identifies the mailing list from which
the customer was solicited. To apply a list code to the entire order,
proceed to the next step. For more information on list codes, please see
Creating a New
Marketing List.
· Key Code – Identifies the combination of the marketing
piece (e.g., brochure, mailing, etc.) and list code used to solicit the
customer. Selecting a value automatically populates the Market Code and
List Code. To apply a key code to the entire order, proceed to the next
step. For more information on key codes, please see Processing
a New List.
· Discount Code – The discount code associated with
the line item. If there is an automated discount, the discount code will
appear and a discount amount will be displayed in the Unit Disc. column.
If necessary, a manual discount can also be added here. Please note that
the line item will no longer be considered for an automatic discount once
you apply a manual discount. For more information on discount codes, please
see Creating
a New Discount. To remove a discount code, right-click the Discount
ID and select Clear.
· Coupon – The code for the coupon used for the
selected order line. To apply a coupon code to the entire order, see the
next step. For more information on coupon codes, please see Creating
a New Coupon.
· Contract ID – This is only
applicable for advertising line items.
12. Select
the View Additional Order Information
radio button and add the following information to the entire order, as
necessary:
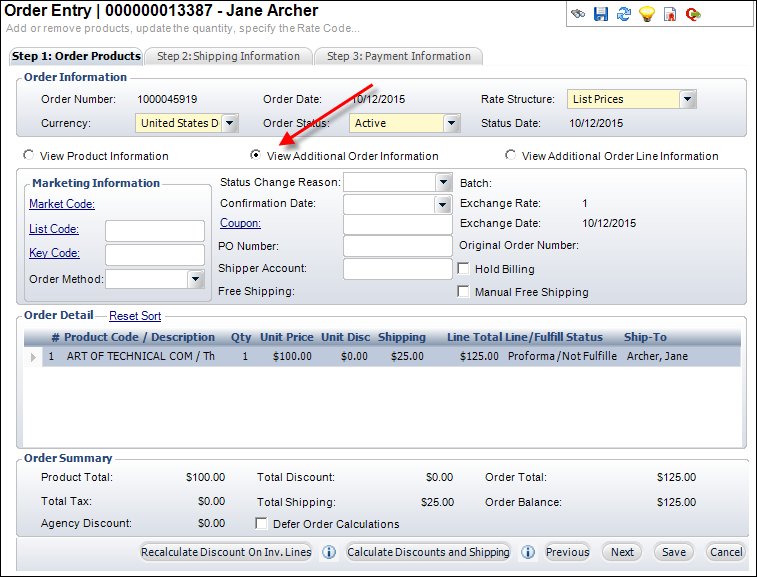
· Market Code – Identifies the source of an
order if it is based on a promotion created for a marketing campaign.
Market codes are validated against the order detail date. Please note
that the market code selected here will be applied to each applicable
line item in the order. To apply a market code to a single line item,
see the previous step. For more information on market codes, please see
Defining a Market Code.
If you select
an active market code that qualifies the order for free shipping, if the
market code is linked to an active free-shipping definition, that FREE_SHIPPING_ID
is used; otherwise “MARKET_CODE” is set as the FREE_SHIPPING_ID. If you
next enter a coupon that is also linked to free-shipping rule, the system
will ignore the coupon because the order has already qualified for free
shipping. If the order qualifies for free shipping based on order amount
before the market code or coupon is entered on the order, then that FREE_SHIPPING_ID
will be used as the free-shipping qualification, and the system will ignore
rules associated with the market code or coupon if the market code or
coupon are later added.
· List Code – Identifies the mailing list from
which the customer was solicited. Please note that the list code selected
here will be applied to each applicable line item in the order. To apply
a list code to a single line item, see the previous step. For more information,
please see Creating
a New Marketing List.
· Key Code – Identifies the combination of
the marketing piece (e.g., brochure, mailing, etc.) and list code used
to solicit the customer. Selecting a value automatically populates the
Market Code and List Code. Please note that the key code selected here
will be applied to each applicable line item in the order. To apply a
key code to a single line litem, see the previous step. For more information
on key codes, please see Processing
a New List.
· Order Method – User-defined code that identifies
how the order was placed. For example, Web, Mail, Phone, Fax, Walk-In.
 If an order
has the Order Method set as WEB, back office staff cannot manually activate
the order line. This will happen most often when the Order Method is RETAINED
via the ORD650 during the
membership renewal of a prior membership order that originated from the
eBusiness controls. There are three options for the staff: (1) activate
the order line via some other means (e.g., receipt creation), (2) if you
DO NOT want to RETAIN the Order Method of WEB, change the Order Method
to NULL, save, and then manually activate the order line, and (3) if you
DO want to RETAIN the Order Method of WEB, change the Order Method to
NULL, save, manually activate the order line, save, change the Order Method
to WEB, and then save.
If an order
has the Order Method set as WEB, back office staff cannot manually activate
the order line. This will happen most often when the Order Method is RETAINED
via the ORD650 during the
membership renewal of a prior membership order that originated from the
eBusiness controls. There are three options for the staff: (1) activate
the order line via some other means (e.g., receipt creation), (2) if you
DO NOT want to RETAIN the Order Method of WEB, change the Order Method
to NULL, save, and then manually activate the order line, and (3) if you
DO want to RETAIN the Order Method of WEB, change the Order Method to
NULL, save, manually activate the order line, save, change the Order Method
to WEB, and then save.
· Status Change Reason – User-defined code that
identifies the reason for the order status being changed.
· Confirmation Date – The date the confirmation
batch process was run for a Meeting or Exhibition order.
· Coupon – The code for the coupon used for the
order. To apply a coupon code to a single line item, see the previous
step. For more information on coupon codes, please see Creating
a New Coupon.
· PO Number – An alphanumeric code assigned to an
order placed by a vendor. This is considered a legal contract for payment.
The Line Status will automatically change to Active and will be picked
up for shipping.
Entering
a PO Number for a Proforma order will automatically change the Line Status
to Active.
· Shipper Account – The account number for the shipping
vendor. This is added if the customer requests that shipping be charged
to his or her existing shipping vendor account. This field is used for
reference only and it does not clear the shipping charges when it is populated.
· Free Shipping – The free shipping ID field is
populated if the user checks the Manual
Free Shipping checkbox. For more information, please see Manually
Adding Free Shipping to an Order.
· Batch – The batch number associated with the order.
· Exchange Rate – The exchange rate of the currency.
If the currency used for the order is the base currency, the rate is “1.”
If the currency used for the order is not the base currency, the rate
is set based on the Exchange Rate table maintained in the system.
· Exchange Date – The start date of the exchange
rate for a non-base currency.
· Original Order Number – For orders that are created
as a renewal from a previous order, this number identifies the order number
of the order line from which the order line was renewed.
· Hold Billing – This checkbox indicates that for
some reason, you do not want to include this order in billing processes.
Perhaps, you have made an agreement on a past due order and don’t want
the next day’s running notices to include the order. If this checkbox
is checked, ORD660 will not generate
an invoice for this order.
· Manual Free Shipping – Check this
checkbox to manually apply free shipping to the order. For more information,
please see Manually
Adding Free Shipping to an Order.
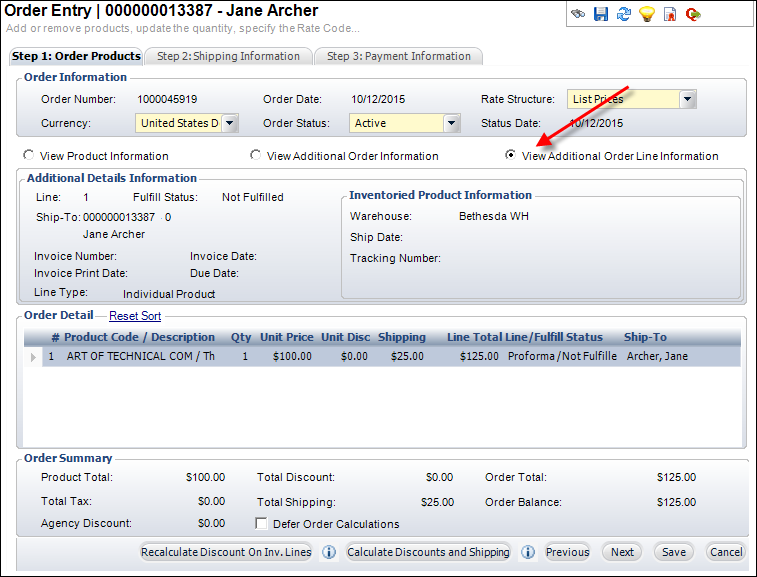
13. Select
the View Additional Order Line Information
to view additional line item information. The information in this section
will change depending on the type of order line selected. For example,
if the order line selected is an inventoried product, the Inventoried
Product Information section displays, as shown below.
14. Update
the Order Summary section, as highlighted below:
a. If you
are creating an order that is over 30 lines, check the Defer
Order Calculations checkbox to speed data entry.
When checked, the application does not calculate the order summary until
you save the information or click Calculate
Discounts and Shipping.
b. If necessary,
click Calculate Discounts and Shipping.
Please note that as of 7.4.2, if a discount is applied to an order after
a "Manual" payment schedule has been created, the system will
update the order line total and scheduled payment amount accordingly,
but will not update the scheduled payment percentages. For more information
on applying discounts to a product, please see the Linking
Coupons to Products.
c. As of
7.5.0, click Recalculate Discount on Inv. Line
to re-evaluate all invoiced and proforma order lines for qualification
for existing discounts and qualification for better discounts. This button
is only enabled if the order has at least one invoiced order line and
if the ORD "ALLOW_DISCOUNT_RECALC_ON_INVOICED_LINES" application
parameter is set to "Y".
For more
information on the fields in this section and how Personify calculates
a price on an order, please see Price
Calculations.
15. Click
Save.
Step 2: entering the shipping
information:
1. Access
the Step 2: Shipping Information tab.
2. From the
Shipping Address section (as highlighted below), change the shipping information,
if necessary:
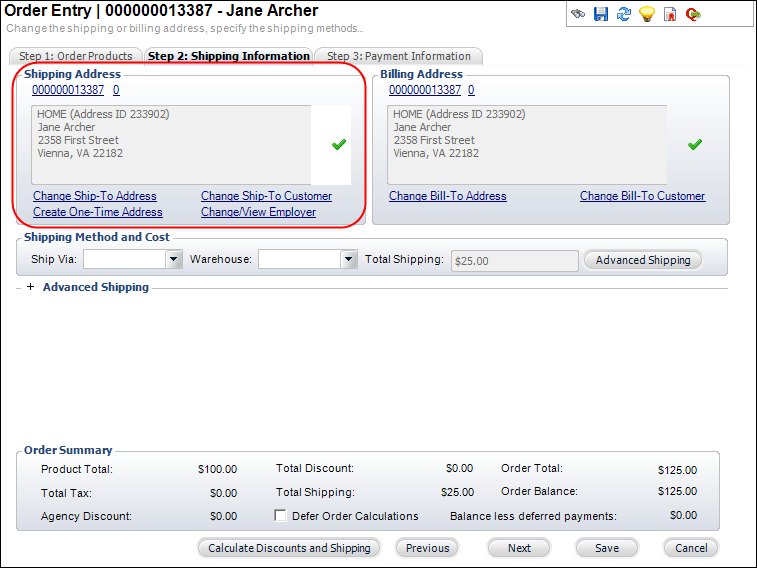
a. Click
the Change Ship-To Address link to display the
Address Chooser from which to select a different ship-to address for the
order or create
a new address.
b. Click
the Change Ship-To Customer link to displays
the Customer Chooser to search for and select a different ship-to customer
for the order.
If the Billing
Method on the Rate
Structure Maintenance screen is "Ship-To", then changing
the ship-to customer on the order line will result in the system recalculating
the rate structure, which may result in a change to the rate structure.
For example, if the new customer does NOT qualify for the "Member"
rate structure, the system will change the rate structure to "List".
However, if the “Member” rate structure had been manually set before the
ship-to customer was changed (i.e., Order_Detail.MANUAL_RATE_OVERRIDE_FLAG
= ‘Y’), if the customer is changed to a customer who doesn’t qualify for
the MEMBER rate structure but only qualifies for the LIST rate structure,
the system will not change the rate structure to LIST, because the MANUAL_RATE_OVERRID_FLAG
= Y.
c. Click
the Create One-Time Address link to display
the Create a one-time
address screen to create an address that will only be used once for
this order.
d. As of
7.6.0, click Change/View Employer
to view or change the customer's employer on the order. This is used when
engagement scores for companies includes employee points rolled up to
the employer company. For more information, please see Changing
the Employer on an Order.
3. From the
Billing Address section (as highlighted below), change the billing information,
if necessary:
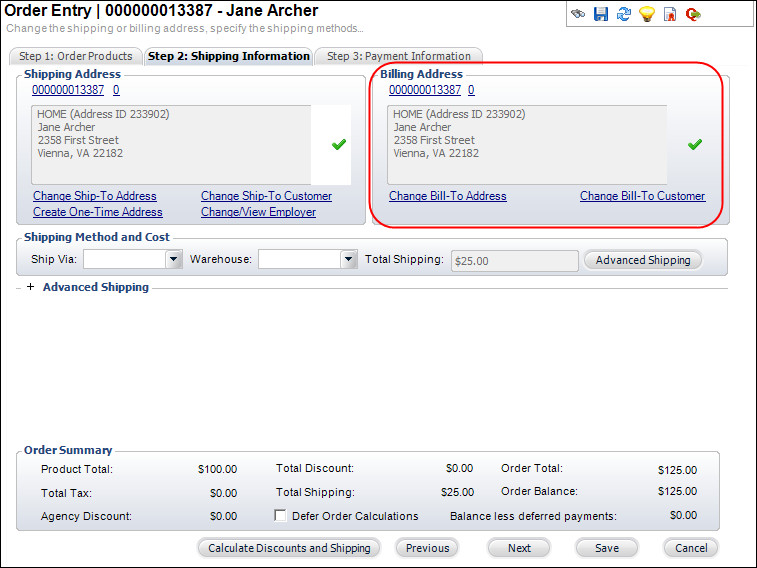
a. Change Bill-To Address - displays the Address
Chooser from which to select a different bill-to address for the order
or create
a new address.
b. Change Bill-To Customer - displays the Customer
Chooser to search for and select a different bill-to customer for the
order.
4. From the
Shipping Method and Cost section (as highlighted below), perform the following:
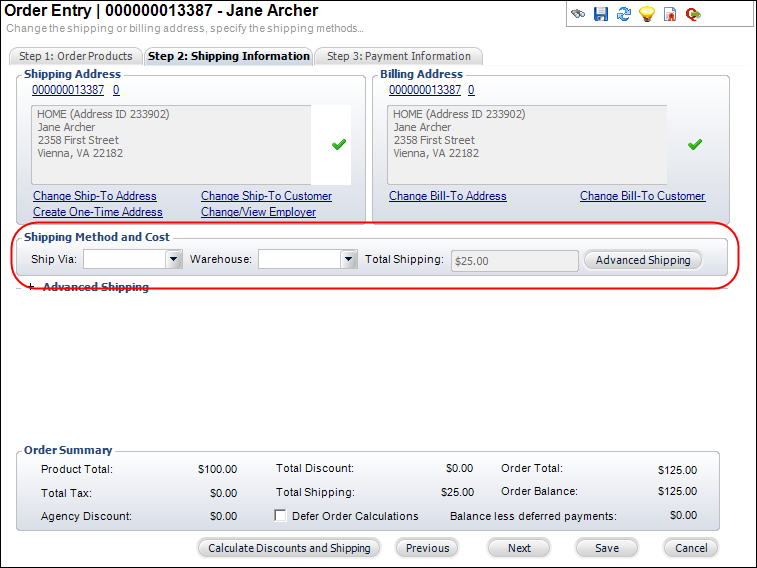
a. Select
the Ship Via method to apply to all lines.
The Ship
Via can only be changed if the order is "Not Fulfilled"; you
cannot change the Ship Via for cancelled, shipped, or returned order lines.
Changing the Ship Via may result in a recalculation of shipping charges.
Make sure to only select a Ship Via that has been defined for your organization
unit and GL account for the country of the selected ship-to customer.
b. As of
7.5.2, select the Warehouse to
apply to all INV lines. If you select a different warehouse from this
drop-down, the system will update the new warehouse to all order lines
that have products that have inventory in that warehouse.
If you do not want to ship all the products from the same warehouse, select
the Advanced Shipping
button and select the warehouse for each line item.
5. To apply a different
ship-via, warehouse, or shipping charge for each item, perform the following:
a. Click
Advanced Shipping to display the Advanced Shipping
section (as highlighted below) to add shipping information for each line
item:
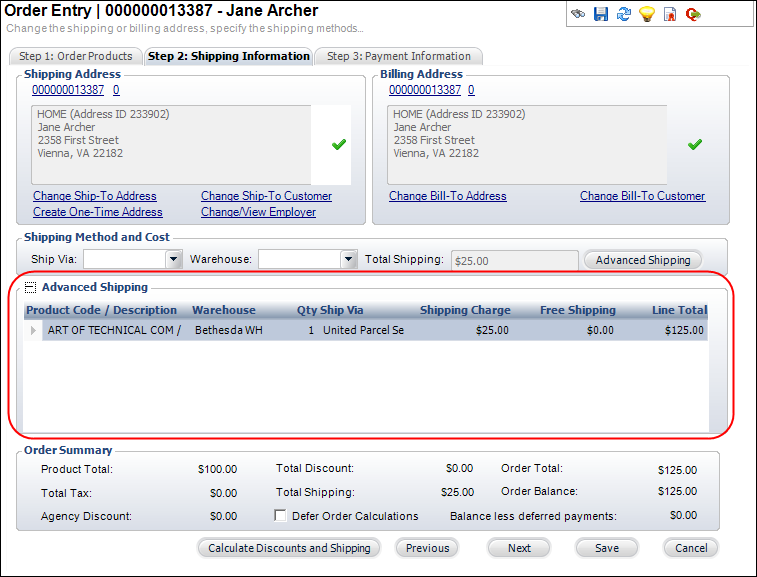
b. In the Advanced Shipping table, select the Warehouse
from the drop-down in the cell for each line item.
All order lines that have non-POS warehouse
will be charged shipping charges; if you change back to a POS warehouse,
the shipping charges will be removed.
c. If necessary,
select the Ship Via method from the drop-down
in the cell for each line item.
This will override the Ship Via selected in the Shipping Method and Cost
section above.
In a multi-line
order, changing the Ship Via on one line item will subsequently change
the Shipping Charges on the other line items if the Shipping
Calculation method is By Schedule by Price or By Weight. Make sure
to only select a Ship Via that has been defined for your organization
unit and GL account for the country of the selected ship-to customer.
d. If necessary,
manually override shipping charge by entering a different Shipping
Charge.
Alternatively, you can manually change the shipping amount on the Line
Item Details screen by selecting the Add Shipping Manually
checkbox and entering the Ship Amount. Either
way, the system will automatically select the Add Shipping
Manually checkbox on the Line Item Details screen.
6. Click
Save.
Step 3: entering the payment information:
1. Access
the Step 3: Payment Information tab, as shown
below.
If a batch is not currently open, you are prompted to open a batch for
processing. Click Yes and select
the batch from the list. If no batches display in the list, you must access
the Batch Control screen and create
a new batch.
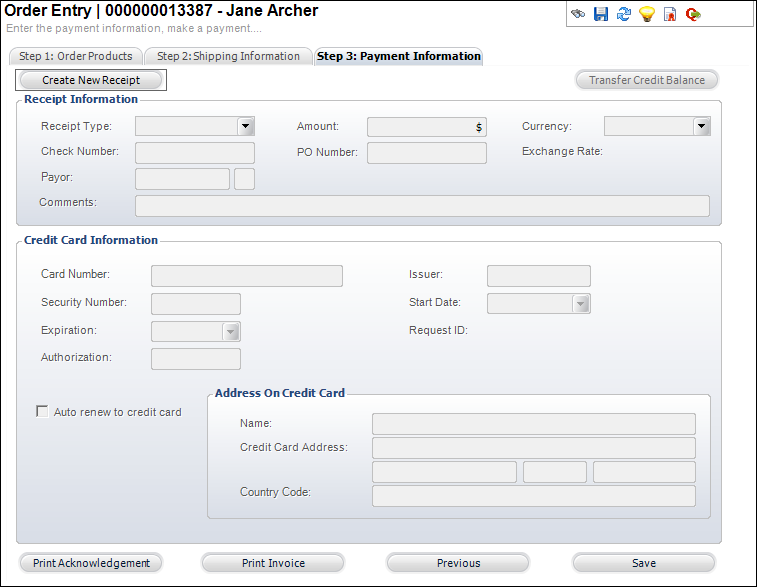
2. Click
Create New Receipt.
As of 7.5.2,
if there is a credit balance on the order, the system will ask if you
want to transfer the credit balance along with this payment. If you select
"No", at least one of the order lines will have a balance due.
As of 7.4.0SP1,
if your order contains multiple line items and there is more
than one FND cash order line or if
there is only one FND cash order line but it has a price of
$0, the Receipt Entry screen will display when you click Create
New Receipt. Additionally, as of 7.5.2, if there is a credit balance
on the order, the system will display the following message: "There
is a credit balance on the order from a previous order line. If you want
to transfer this credit balance along with this payment, click the “Auto
Transfer Order Overpayment” button. Once the credit is distributed, then
apply the payment." For more information on the Receipt Entry (FAR002)
screen, please see Entering
a Receipt.
3. From the
Receipt Information section, enter the appropriate information:
a. Select
the Receipt Type from the drop-down.
Available receipt type options are defined for the org unit of the logged
in user. For more information, please see Defining
Organization Unit Receipt Types and Cash Accounts.
b. Enter
the appropriate Amount.
Please note that as of 7.5.0, if you enter an amount that results in a
credit balance on the order, if you add an additional line item to the
order and apply payment, the system will automatically perform an auto-adjustment
to transfer the credits to the debit balance on the new order line.
c. Change
the Currency, if necessary.
Please note that changing the Currency may result in a change to the Amount.
d. If you
selected “Check”, enter the Check Number.
e. If you
selected “Check” or “Cash”, enter the PO Number.
f. Enter
the Payor or click the link and search for a
payor.
The payor is the individual, customer, company, or committee who pays for
the order, who may not necessarily be the customer. Once the receipt is
processed you cannot change the payor. If the payor on the check is not
a customer in the system and you chose not to create a customer record
for that payor, if a refund is needed you will not be able to change the
payor to the correct name on the check.
You
can change the bill-to customer on the Step 2: Shipping Information tab
instead. This changes the Payor automatically.
g. Enter
any Comments as necessary.
4. If a credit card was
selected as the Receipt Type,
enter payment information in the Credit Card Information section:
As of 7.6.2,
if a magnetic stripe reader device is hooked up, place your cursor in
the Card Number field, swipe the credit card, and the system will read
and process the credit card number. This functionality is available for
all payment gateways. Additionally, a new Vantiv
merchant parameter has been added in 7.6.2. If this parameter is enabled,
the system will send the track data from the credit card to Vantiv, letting
them know that the credit card is physically present, which will qualify
the transaction for a better transaction rate.
a. Verify
that the appropriate credit card is selected as the Receipt
Type in the Receipt Information section above.
b. Enter
the Card Number
or click the link to select a saved
credit card.
c. Enter
the Issuer.
d. Enter
the Security Number.
This number is typically three digits and is located on the back of the
credit card.
As of 7.6.0,
if the IGNORE_CVV parameter
for your payment handler is set to "N" and you want to require
the security number (CVV) in the back office, you MUST add the "NULL"
value to the REJECT_CVV_RESULT_CODES parameter
for your payment handler. If so, if the credit card security number
is NOT entered in the back office, the following error message will display:
Your credit card cannot be charged at
this time. You may have left the CVV2 number blank. Please try again making
sure you entered the correct CVV2 number.
e. Select
the Start Date and Expiration
date from the drop-downs.
f. Enter
the Authorization number.
g. Verify
the Address on Credit Card is
correct. If not, then modify it.
5. If an
electronic check was selected as the Receipt
Type, enter payment information in the Bank Account Information
section:
a. Enter
the Routing Number.
b. Enter
the Account Number.
c. Enter
the Check Number.
d. Select
the Personal Identifier from the
drop-down.
e. If you
selected "Social Security Number" as the Personal Identifier,
enter the SSN or
Date of Birth.
f. If you
selected "Driver's License" as the Personal Identifier, enter
the Drivers License No and State Issued.
g. Change
the Name on Account, if necessary.
h. Change
the CC Address, if necessary.
i. Enter
a Email address.
j. Enter
a Phone Number.
6. Click Save.
A message is displayed that the payment has been applied to the order and
the order becomes Active, if applicable.
7. If necessary,
click Print Acknowledgement or
Print Invoice. For more information,
please see Printing an
Acknowledgement Letter or Printing
an Invoice.
These buttons
can be used to print invoices/acknowledgement letters for cancelled orders.