As
of 7.5.2, Personify360 no longer supports EXPOCAD.
As
of 7.5.2, Personify360 no longer supports EXPOCAD.This section details setting up an “Exhibition” product, but please see Defining Other Exhibition Products for more information on the other product types.
As
of 7.5.2, Personify360 no longer supports EXPOCAD.
To setup an exhibition:
1. From the
Personify360 main toolbar, select Products > Product
Central.
The Product Maintenance search screen displays.
2. Click
Create New Product.
The Product Maintenance screen displays.
3. Click
Exhibitions, as shown below.

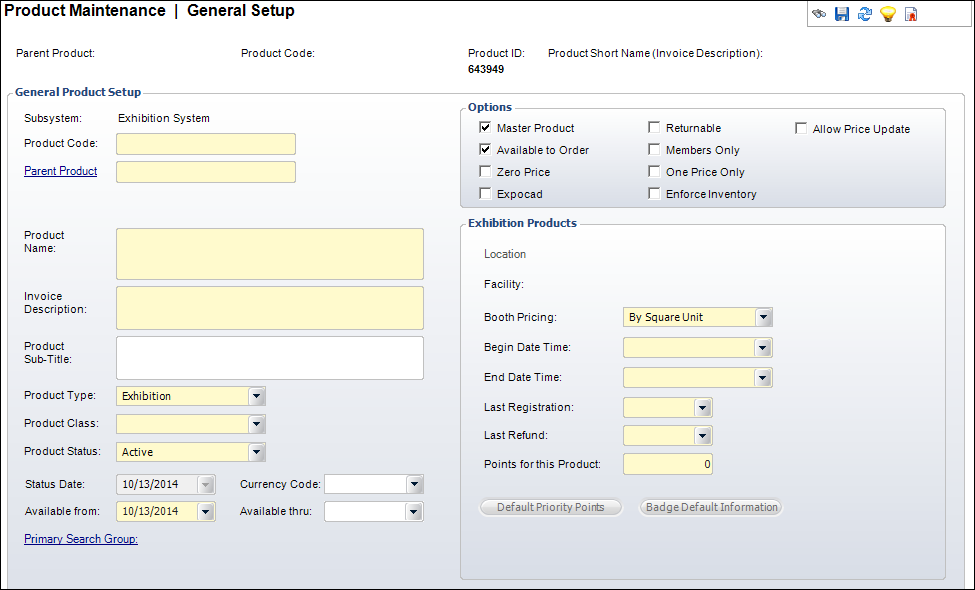
The General Setup screen displays, as shown below.
4. Enter
the Product Code.
The Parent Product defaults to the value entered as the Parent Code.
5. If applicable, click the Parent Product link and to search for a parent product associated with the exhibition.
6. Enter
the Product Name.
The Invoice Description defaults to the same
but can be changed.
7. Enter the Product Sub-Title.
8. Select the Product Type from the drop-down.
 The Product
Type you select determines what information you can edit in the Exhibitor
Level Information/Exhibition Products section. This section details setting
up an “Exhibition” product, but please see Defining
Other Exhibition Products for more information on the other product
types.
The Product
Type you select determines what information you can edit in the Exhibitor
Level Information/Exhibition Products section. This section details setting
up an “Exhibition” product, but please see Defining
Other Exhibition Products for more information on the other product
types.
9. Select the Product Class from the drop-down.
10. Select the Product Status from the drop-down.
11. If your organization uses multi-currency, then select the appropriate Currency Code.
12. Select the Available from date from the drop-down.
The Available
From date cannot be changed if orders have already been created for it.
13. Select the Available thru date from the drop-down.
14. If necessary, click the Primary Search Group link and search for a Primary Search Group to link to the product.
15. Check the checkboxes that apply:
· Master Product
· Available to Order
· Zero Price
· Returnable
· Members Only
· One Price Only
· Enforce Inventory
· Allow Price Update
You must
save the exhibition product to enable the Location
and Facility links. See Adding
Exhibition Locations for more information.
16. Select the Booth Pricing from the drop-down.
17. Select the Begin Date Time from the drop-down.
18. Select the End Date Time from the drop-down.
19. Select the Last Registration date from the drop-down.
20. Select the Last Refund date from the drop-down.
21. Enter the Points for this Product.
See Defining
Exhibition Product Priority Points and Defining
Exhibition Product Badge Default Information for more information
on the Default Priority Points and Badge Default Information buttons.
22. Click Save.
Screen Elements |
Description |
|---|---|
General Product Setup |
|
Parent Product |
Read-only. Populated based on the value that you enter for the Parent Product. |
Product Code |
Read-only. Populated based on the value that you enter for the Product Code. |
Product ID |
Read-only. As of 7.6.0, the unique product ID number assigned to the product displays. You can use the Product ID to leverage oData queries in the Online Store, Shopping Cart, and Checkout pages. See SVC Clients for more information. |
Product Short Name (Invoice Description) |
Read-only. Populated based on the value that you enter for the Invoice Description. |
General Product Setup |
|
Subsystem |
Read-only. The area, or subsystem, with which the product is associated. |
Product Code |
Text box. The actual Product Code used. For the main exhibition, the Product Code and Parent Product are identical. For booth and other exhibition products, the Product Code describes the actual product and cannot be the same as the Parent Product. However, the Product Code for one exhibition can be the same for another exhibition. When creating new records, the Product Code will default the Parent Product to the same code but can be changed. |
Parent Product |
Text box. The Parent Product associated with the product. It duplicates the Product Code for exhibitions and holds the show code for other exhibition product definitions within that show. Defaults from the Product Code for new records. This code will be used for all booths, badges, and other XBT subproducts related to the exhibition. |
Product Name |
Text box. The name of the product. This is an alphanumeric field with approximately 120 characters. |
Invoice Description |
Text box. Defaults to the Product Name. If your Product Name is extraordinary long, you can edit the Invoice Description to 50 characters. If the Invoice Description is longer than 50 characters, it will be cropped off the invoice. |
Product Sub-Title |
Text box. This is an optional field that allows you to enter in an additional description (sub-title) that can be used for reporting purposes. |
Product Type |
Drop-down. The type of products include: · Badges. This defines badge fees for an organization. · Booth. This defines booth subproducts, that are typically defined by size and type. This is the only product type that allows booth inventory definitions and booth rentals. Booths are unique by Show, Location, and Booth Number. · Exhibition. This defines the show itself with optional registration fees. GL accounts and payment schedules can be copied easily from one show product to another. This can only be used with the Parent Product. · Share. This indicates that the ship-to of this record is sharing the booth. The share product may or may not have an associated cost. The Booth Products screen must be available to record products of the second company. The original company holding the booth is responsible for the money of the share. No booth number will be stored with the share record since it will automatically follow that of the original record. · Special Charges. This follows the same rules as sponsorships and can cover anything from banners to mailing labels. There can be as many of these products as desired. · Sponsorship. This defines the sponsorship(s) or sponsor(s) in an exhibition or show. This is used if the organization is not using advertising to track XBT sponsors.
Values in the drop-down are populated based on the codes defined for the fixed XBT "PRODUCT_TYPE" system type. |
Product Class |
Drop-down. This provides further classification of the product. For example, Show, Sponsor, Exposition, or Technology Show. This field is used for reporting purposes only. Values in the drop-down are populated based on the codes defined for the non-fixed XBT "PRODUCT_CLASS" system type. |
Product Status |
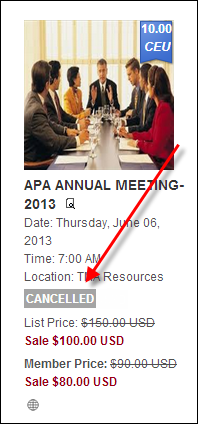
Drop-down. The status of the product. For example, Active, Cancelled, or Discontinued.
If the product has been defined to display on the web and this status is set to "Cancelled" (C), the "CANCELLED" product alert will display on the Product Listing and Product Detail pages on the web for this product, as shown below.
|
Currency Code |
Drop-down. If your company uses multi-currency, then select the currency the product will use from this field. The rates and pricing will be set up in this currency. |
Status Date |
Read-only. This is a read-only field that displays the date the product was created. Defaults to today’s date when creating a new product. |
Drop-down. Defaults to the system date, but it can be overridden. The date from which the product is available.
|
|
Available thru |
Drop-down. The last date the product is available. |
Primary Search Group |
Link. This is an optional feature that allows organizations to assign a search group code to products and customers, so that back office staff assigned to that primary search group can optionally pre-filter searches for customers or products by their assigned primary search group. Primary search group codes are defined on subgroup customer records and mapped to zip codes. An organization can have customers be automatically assigned to a primary search group based on the zip code of their primary address by setting the APP AUTOMATIC_SEARCH_GROUP_ASSIGNMENT application parameter to "Y". For more information on primary search groups, please see Creating a Primary Search Group Mapping. |
Options |
|
Master Product |
Checkbox. When checked, it indicates this product can stand alone, meaning the product can be purchased without the requirement that another product be purchased first. When unchecked, it implies that the product cannot be entered directly without already having another product with the same parent product but different product code. A subproduct of an exhibition would be unchecked. The checkbox defaults to checked when the product code and parent product code are identical. |
Available to Order |
Checkbox. When checked, it indicates that the product can be ordered and that the product is available for independent sale. Some products may only exist as components of other products. |
Zero Price |
Checkbox. When checked, indicates this product is available for $0, so you can validate the product without entering pricing and GL account information. You still must enter a default rate code.
As of 7.5.2, if this checkbox is checked, the Waive Shipping checkbox is checked and disabled on the Rates Pricing screen.
|
Expocad |
|
Returnable |
Checkbox. When checked, indicates this product can be returned. |
Members Only |
Checkbox. When checked, it sets that only members can buy this product. Only pertains to current active members.
|
One Price Only |
Checkbox. When checked, indicates pricing cannot be targeted solely to one rate structure and all rate structures receive the same price. Processing time is quicker when the product is available to all purchasers and this checkbox is checked. When unchecked, indicates the rate structures apply to the price of the product. |
Enforce Inventory |
Checkbox. When checked, indicates this product is inventoried and the booth numbers are known. When unchecked, indicates this product is non-inventoried and the booth numbers will be created ad-hoc. This field is only necessary if the Product Type is “Exhibition” because all subproducts are automatically populated based on the parent product’s value. If the EXPOCAD checkbox is selected, this checkbox must be unchecked. If you change this field from inventoried to non-inventoried, you receive a message asking if you want to delete all the unassigned booths. This checkbox must be checked to add booths using the Booth Inventory screen. |
Checkbox. This checkbox should ONLY be checked for BOOTH RENTAL products in which the user should manually enter the price of the booth at the time of the order creation. Hence, the automatic booth price calculation based on the booth dimensions and price is NOT applicable. When checked, the Unit Price field on the Order Entry screen will be available for editing until invoice. Please note that the price of the booth should be set BEFORE assigning the booth. |
|
Exhibition Products |
|
Location |
Link. The exhibition hall in the facility where the booths are located. This link only becomes enabled after the product is saved. See Adding Exhibition Locations for more information. |
Facility |
Read-only. The primary facility for the exhibition. |
Booth Pricing |
Drop-down. Identifies whether the price for the exhibition product will be calculated based on the flat amount price defined for the product or whether the defined price is a square unit price (where the total price is calculated by multiplying the square unit price by the total number of square units of booth). Values in the drop-down are populated based on the fixed codes defined for the XBT "BOOTH_PRICING" system type.
|
Begin Date Time |
Drop-down. The beginning date and time of the exhibition. This date is set for the exhibition product and then populates automatically for all of the exhibition’s subproducts (except for badges). |
End Date Time |
Drop-down. The end date and time of the exhibition. This date is set for the exhibition product and then populates automatically for all of the exhibition’s subproducts (except for badges). This date is also the last registration date and the last refund date. |
Last Registration |
Drop-down. The date the registration period ends. This defaults to the end date of the exhibition, but it can be changed. This date is set for the exhibition product and then populates automatically for all of the exhibition’s subproducts (except for badges). This date is compared to the order date when the exhibition registration is entered. If a batch is open when the registration is entered, the order date is set to the batch date, not the system date. |
Last Refund |
Drop-down. The last date on which refunds can be generated for this exhibition. This defaults to the end date of the exhibition, but it can be changed. This date is set for the exhibition product and then populates automatically for all of the exhibition’s subproducts (except for badges). If a batch is open when the refund is being generated, the system compares the Last Refund Date to the batch date. |
Points for this Product |
Text box. Exhibitors can be awarded priority points for signing up for an exhibition. Enter the number of points that will be awarded for those who rent or share this booth. |
Default Priority Points |
Button. When clicked, the Priority Points screen displays. Exhibitors can be awarded priority points for signing up for an exhibition. They can accrue points per booth, square unit, or dollar, and use these points for additional benefits. Some associations use the accumulated priority points to determine which company receives the best space in subsequent shows. This button only becomes enabled after the product is saved. See Defining Exhibition Product Priority Points for more information. |
Badge Default Information |
Button. When clicked, the Free Badge Maintenance screen displays. You can define the number of free badges that will be provided for each booth or per total square area of space. This button only becomes enabled after the product is saved. See Defining Exhibition Product Badge Default Information for more information. |
See Also:
· Defining Exhibition Product Priority Points
· Defining Exhibition Product Badge Default Information