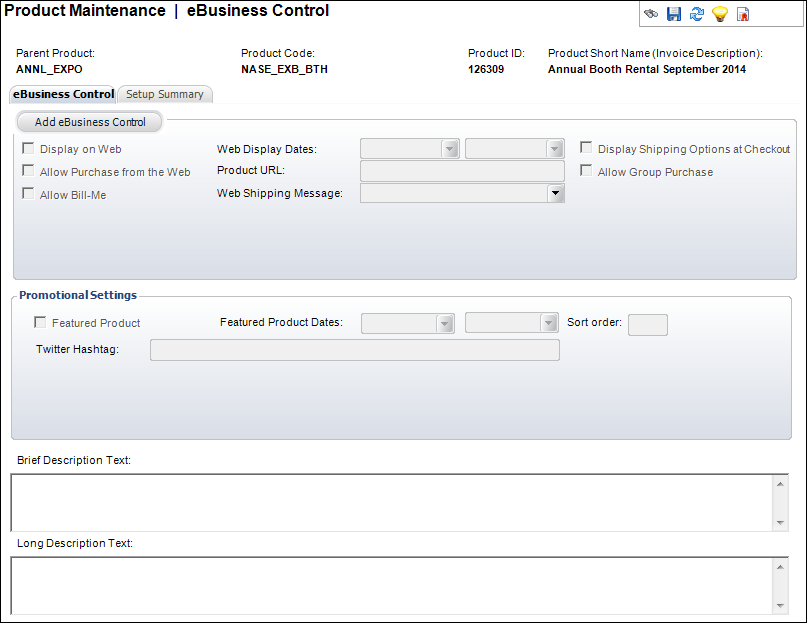
The eBusiness Control screen displays, as shown below.

If your organization wants to make an exhibition product available on the web, the only thing that the web users can do from the web is buy the product. Currently, the system does not support the ability for a web user to “register” for an exhibition registration product. Although the system will allow you to web-enable an exhibition product and allow the web user to add the product to their cart (via the “Allow Purchase from the Web” checkbox), Personify recommends this NOT be done because e-Business currently does not support an exhibition registration process.
However, you may want to web-enable the exhibition registration product so that information about the exhibition can be displayed on your website, with information about contacting the organization to rent a booth. In that setup, you would uncheck the “Allow Purchase from the Web” checkbox.
To set up the eBusiness controls:
1. From the Personify360 main toolbar, select Products > Product Central.
The Product Maintenance search screen displays.
2. Click Search to find a product or click Create New Product.
3. From the eBusiness Links task category, click eBusiness Control.
The eBusiness Control screen displays, as shown below.

4. Click Add eBusiness Control.
5. From the Display Settings section, define the following information:
a. By default, when you click "Add eBusiness Control", the Display on Web checkbox is checked. Uncheck this checkbox if you do NOT want this product to display on the web.
 Although the system will allow you to web-enable an exhibition product and allow the web user to add the product to their cart, it is NOT recommended that you check this checkbox because e-Business currently does not support an exhibition registration process.
b. By default, when you click "Add eBusiness Control", the Allow Purchase from the Web checkbox is checked. If you want to display the product on the web, but not allow customers to add the product to their shopping cart, uncheck this checkbox. See Configuring the Cart and Checkout Controls for more information.
 If your organization wants to make an exhibition product available on the web, the only thing that the web users can do from the web is buy the product. Currently, the system does not support the ability for a web user to “register” for an exhibition registration product. Additionally, you should provide information in the long web description to inform web customers about the actual cost of exhibiting at the exhibition, because only the cost of registering for the exhibition will be visible to web customers, not the cost of booths. Finally, exhibitors are never required to pay the full cost of the exhibition up front; typically they only pay half the registration fee at time of registration and then they pay the remaining amount after booths are assigned. However, until an exhibitor workflow is implemented in e-business, the registration price that will be displayed to customers will be 100% of the registration price.
c. Check the Allow Bill-Me checkbox if you would like to enable the “Bill-Me” feature, which allows web users to buy a product and not pay for it before logging out. If checked, the web user will receive an invoice for payment.
d. Select the dates in which you want the product to display on the web from the Web Display Dates drop-downs. From the first drop-down, specify the date on which you would like the product to begin displaying on the web. Optionally, from the second drop-down, specify the date on which you would like the product to stop displaying on the web.
e. If necessary, enter the organization’s optional product-specific URL in the Product URL field.
The maximum number of characters that you can enter for this field is 150. If you enter more than 150 characters for this field, it will NOT display on the web. If you need to increase the limit, in your installation in the URL user defined data type, increase the varchar limit. Please note that when you upgrade, the altered user defined data type may revert back to 150.
When defined, on the web, when a web user clicks a product's hyperlink, depending on what page he/she is on, the following occurs:
· If the web user is on the Checkout page, Shopping Cart page, or Order Summary page and clicks a product's hyperlink or image, a new tab opens in your web user's browser with the URL defined in this field.
· If the web user is on the Full Product Listing page and clicks a product's hyperlink, he/she is redirected to the Product Detail page.
f. Select the Web Shipping Message that will display to your customers to indicate the estimated shipping time.
Values in the drop-down are populated based on the codes defined for the non-fixed INV "WEB_SHIPPING_MESSAGE" system type.
g. Check the Display Shipping Options at Checkout checkbox if on the web you want your customers to be able to see their different shipping options. See Configuring the Cart and Checkout Controls for more information.
h. By default, when you click "Add eBusiness Control", the Allow Group Purchase checkbox is checked. Uncheck this checkbox if you do NOT want to give a group manager the ability to purchase this product for a group.
6. From the Promotional Settings section, define the following information:
a. Check the Featured Product checkbox if you want to feature this product on the web.
Featured products display in the Promotional Products Featured control, as shown below. For more information, please see Configuring the Promotional Products Featured Control.

b. Select the dates in which you want the product to display as a featured product on the web from the Featured Product Dates drop-down. From the first drop-down, specify the date on which you would like the product to begin displaying as a featured product on the web. Optionally, from the second drop-down, specify the date on which you would like the product to stop displaying as a featured product on the web.
c. If this product is part of an umbrella product, enter the Sort Order in which you want this product to display. Products with the lowest sort order will display first.
7. The Brief Description Text field is read-only. For more information, please see Adding an Exhibition Product Brief Web Description.
8. The Long Description Text field is read-only. For more information, please see Adding an Exhibition Product Long Web Description.
To view your product setup summary:
1. Click the Setup Summary tab.
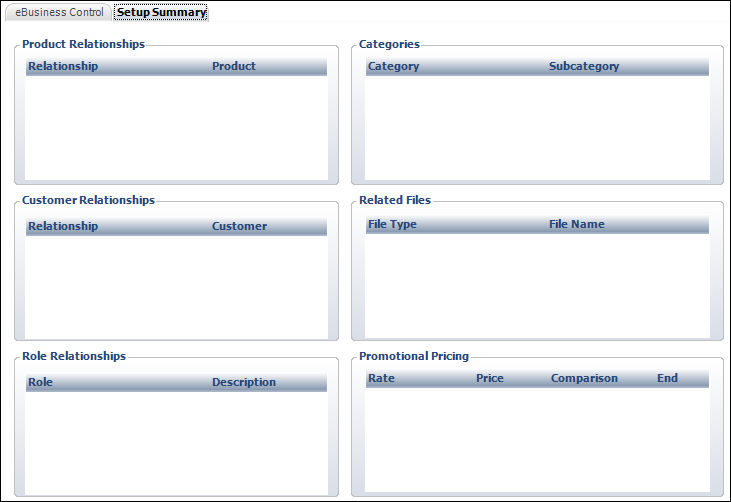
The following screen will display:

2. This screen will display the following relationships:
3. Additionally, the following items will display: