The following is a list of the back office configurations necessary in order to display different features on the Pay Now control:
See Also:
· For a broad summary of the Pay Now control, refer to Overview: Pay Now Control.
· To add the Pay Now control to a page on the web, refer to Web Settings for the Pay Now Control.
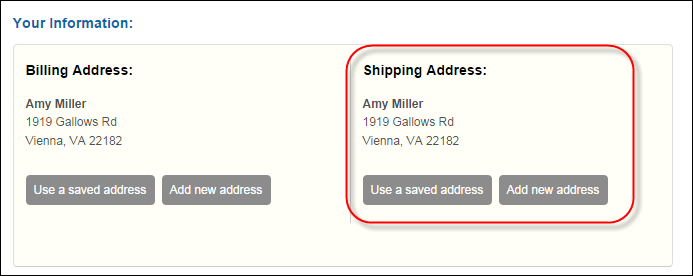
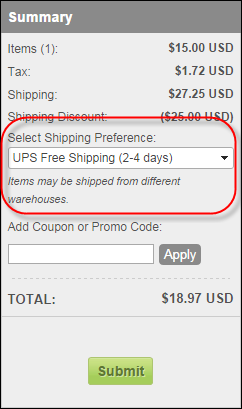
On the e-Business Control screen in Product Maintenance, check the Display Shipping Options at Checkout checkbox to enable the following items on the Pay Now control:
· The shipping
address section, as shown below.
· Select
Shipping Preference and warehouse message, as highlighted below
For more information, please see:
· Defining a Certification Product to Display on the Web
· Defining a DCD Product to Display on the Web
· Defining an Exhibition Product to Display on the Web
· Defining a Fundraising Gift to Display on the Web
· Defining an Inventoried Product to Display on the Web
· Defining a Meeting Product to Display on the Web
· Defining a Membership Product to Display on the Web
· Defining a Miscellaneous Product to Display on the Web
· Defining a Package Product to Display on the Web
· Defining a Subscription Product to Display on the Web
· Defining a Transcript Product to Display on the Web
· Defining an Umbrella Product to Display on the Web
Web users can apply a market code (promo) or coupon code that may result
in savings for their order. Coupon and market codes are configured in
the back office. On the web, market codes are known as promo codes. Your
configurations in the back office will determine if your web user can
apply multiple discounts to his/her order, one discount to his/her order,
or if he/she applies multiple discounts, but you only accept one discount
per order, the best discount is applied.
You can also send out mass email with a market (promo) code using the following
format: [websiteURL]?promo=[code]. In order for the market (promo) code
to apply, the website URL has to be a product listing or a product details
page. It will not work for any page in the web site. For example, "http://apa3.personifycloud.com/personifyecommerce/Store/NewReleases.aspx?promo=BOOKS2013".
If the web user clicks this link and adds product(s) to his/her cart,
the promotion is added.
 The
promotional code is specific to a browser session until it is attached
to a product that is added to the cart. This promotion does not need to
relate to discounts and can be used for tracking purposes only to monitor
how effective your marketing campaign is.
The
promotional code is specific to a browser session until it is attached
to a product that is added to the cart. This promotion does not need to
relate to discounts and can be used for tracking purposes only to monitor
how effective your marketing campaign is.
In addition, if you create a discount for a specific product (i.e., a meeting)
and the web user adds other products to his/her cart, the discount will
ONLY be applied to the specific product.
The following are some key points to keep in mind when working with coupons and market codes:
· A different market code can be applied to each line item in a multiline order; it is not limited to one market code for the entire order.
· Market code rules will be honored, limited by subsystem or product, but discount rules will not be considered. Discounts are calculated separately as a by-product of the market code and there is no attempt to find the "best" market code based on which discount it will trigger.
· If a single market code ties to more than one discount code, then the standard API logic will be used (the better discount will be applied).
· If more than one market code was entered and the line qualifies for either, the latest market code will be applied. This means a URL passed market code can be overwritten by a manually entered market code.
· Web users will see the market codes that are applied to their order in any line in the buy box; if one market code is replaced by another, it will no longer be displayed.
· Single use coupons will not be "used up" until checkout. If a user applies the coupon, but never checks out, it will still be available for future use.
 As
of 7.5.2, you can define a market code and/or coupon code that qualifies
the web user for free
shipping. If the web user applies BOTH a free
shipping coupon AND a free
shipping market code to his/her order, if he/she removes the market
code, the system will remove the free shipping even though the coupon
is still applicable. This is a known issue. The web user must remove the
coupon and re-add it in order for the free shipping to be applied.
As
of 7.5.2, you can define a market code and/or coupon code that qualifies
the web user for free
shipping. If the web user applies BOTH a free
shipping coupon AND a free
shipping market code to his/her order, if he/she removes the market
code, the system will remove the free shipping even though the coupon
is still applicable. This is a known issue. The web user must remove the
coupon and re-add it in order for the free shipping to be applied.
For more information refer to:
· On how to create a market (promo) code: Defining a Market Code.
· On how to create a create a coupon: Creating a New Coupon.
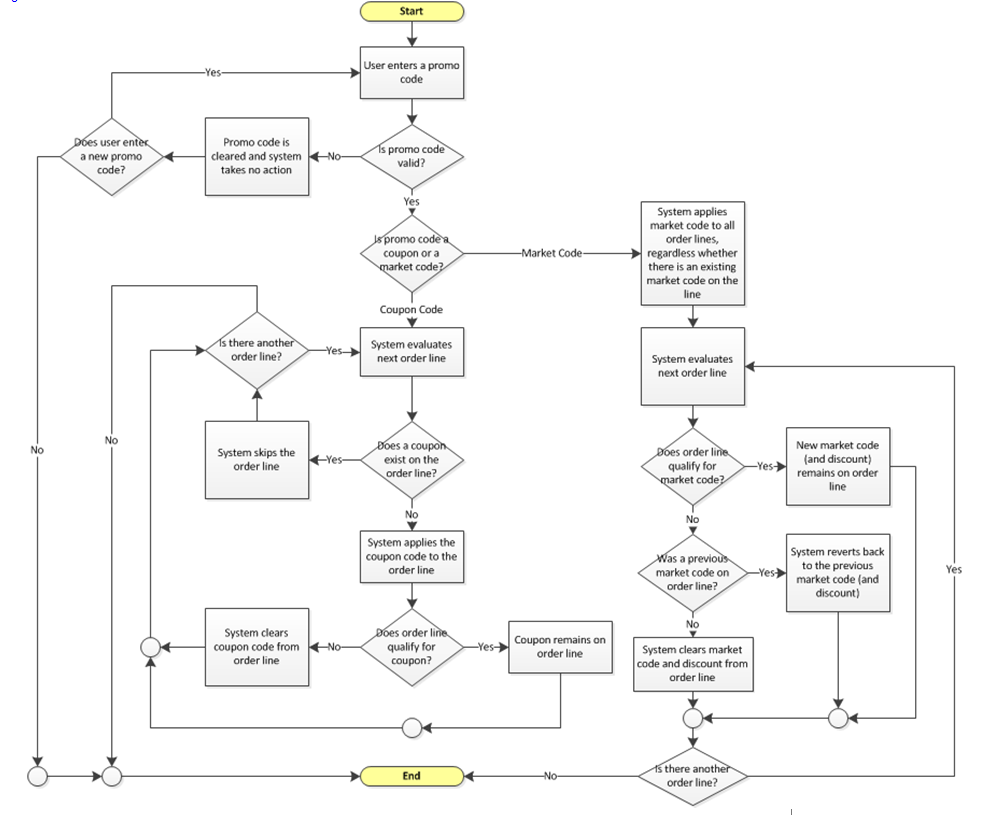
The following flow chart is the logic flow for how discounts and coupons are applied for products in a web user's order:
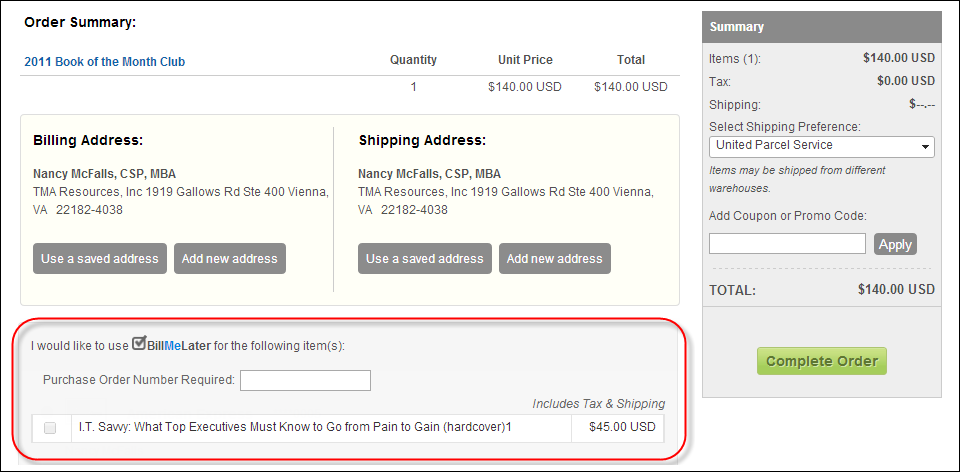
Bill-me later has very specific requirements in order for web users to defer payment until a later date. For more information on the setup that must be completed in order for web users to be able to select the bill-me later option, please see the Bill-Me Later Overview.
The following system types and codes need to be configured in order for the address information to display on the e-Business website. See Enabling System Types and Codes for the Web for more information how to web enable system types and codes.
· ADDRESS_STATUS
This system type is the status of the address related to the user. For
example, Good or Bad. The address status values are populated based on
the codes defined for the non-fixed CUS "ADDRESS_STATUS" system
type. See Customer
System Types and Codes for more information. All the codes listed
in the "ADDRESS_STATUS" system type must be web-enabled in order
to display on this control.
Although
the ADDRESS_STATUS system type is non-fixed, the system will not allow
you to select any value other than "Good" or "Bad"
when creating or updating an address. Therefore, you should not define
any other codes.
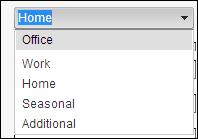
· ADDRESS_TYPE
This system type is the fields that are used to define the type of address
related to the customer. For example, Home, Work, or Blank. If you select
the “Blank” value, the application ignores the required fields from the
CUS_ADDRESS_STRUCTURE table set up for the country selected, and allows
the user to save an address with no data populating the Address fields.
See Customer System
Types and Codes for more information. The address status values
are populated based on the codes defined for the non-fixed CUS "ADDRESS_TYPE"
system type. All the codes listed in the "ADDRESS_TYPE" system
type must be web-enabled in order to display as options for your user
to choose from on this control, as shown below.
· COMM_LOCATION
COMM_LOCATION is the system type that identifies where the contact information
is located (e.g., home or work). Use this to setup where you want the
code (e.g., home, business, cell, etc.) to display on the web. If you
do not setup where you want the code to display, by default it will show
up in all categories (i.e., web, phone, email, and fax). To add additional
options to COMM_LOCATION or make changes to the default settings see Changing the
Options in COMM_LOCATION and Adding
New Code(s) to the "COMM_LOCATION" System Type for
more information.
· COMM_TYPE
COMM_TYPE is the system type that identifies whether a communication method
will be grouped under one of the following categories: phone, fax, email,
or the web. These are fixed codes that cannot be changed (See Customer System
Types and Codes for more Information). To change the communication
location, see Configuring
the Options in COMM_TYPE for more information.
 If
system type and code are not displaying on my web page even though they
are web-enabled it in the back office, you must check the data cache.
The data is cached in the Data Services, so changing the back office settings
will not change what is displayed on the control automatically. The Data
Services cache needs to be cleared in order to reflect the back office
configurations. The best way to clear the cache is do an Application Pool
reset on the Data Services, which will be located on the server. In order
to reflect the most recent back office configurations, the cache will
need to be cleared after each push. It is also possible to set a value
in the configuration file to clear the cache every [number] of minutes.
By default, the site cache will automatically clear when the site is idle
for thirty minutes and this typically occurs overnight. See Setting
up Online Store and App Data Cache for more information.
If
system type and code are not displaying on my web page even though they
are web-enabled it in the back office, you must check the data cache.
The data is cached in the Data Services, so changing the back office settings
will not change what is displayed on the control automatically. The Data
Services cache needs to be cleared in order to reflect the back office
configurations. The best way to clear the cache is do an Application Pool
reset on the Data Services, which will be located on the server. In order
to reflect the most recent back office configurations, the cache will
need to be cleared after each push. It is also possible to set a value
in the configuration file to clear the cache every [number] of minutes.
By default, the site cache will automatically clear when the site is idle
for thirty minutes and this typically occurs overnight. See Setting
up Online Store and App Data Cache for more information.