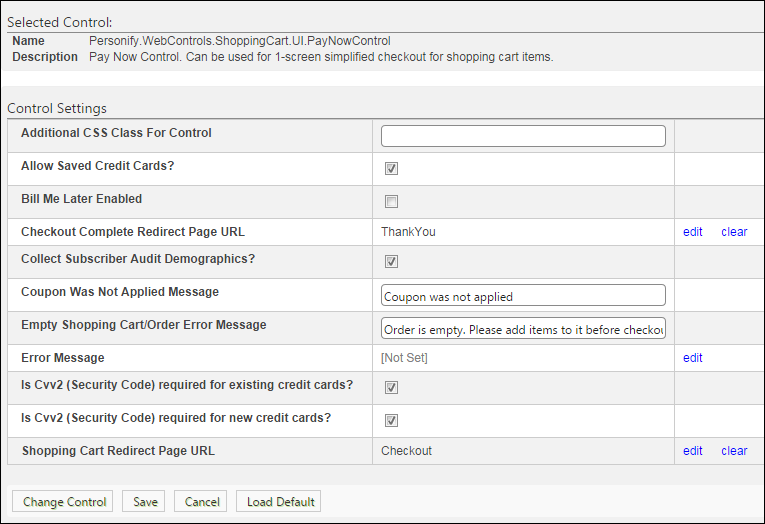
The Control Settings for this control display, as shown below. For a detailed description of each parameter, please see the table at the bottom of this section.
It is up to each client to determine the appropriate location of this page, and to create the menu item that will lead web users to this page. The section below details how to set up this control on your website. The instructions are intended for a web user with web admin/host privileges. In addition, this is NOT a standalone control, which means that in order for it to function, it needs to be incorporated into the Checkout workflow on the web. For more information, refer to the Standalone Controls section.
See Also:
· For a broad summary of the Pay Now control, refer to Pay Now Control Overview.
· To see the back office set ups necessary for the Pay Now control, refer to Configuring the Back Office Settings for the Pay Now Control.
Before configuring the Pay Now control, it is important that your back office configurations are accurate. If not, these configurations will not display properly on your e-Business website. See Configuring the Back Office Settings for the Pay Now Control for more information on the system types and codes that need to be web enabled before setting up this control.
To configure the web settings for the Pay Now control:
1. Add the
"PayNowControl" control to the desired page. For more information,
please see Adding a .NET
Web Control to a Page.
The Control Settings for this control display, as shown below. For a detailed
description of each parameter, please see the table at the bottom of this
section.
 Text fields
have a 250 character limit.
Text fields
have a 250 character limit.
2. Configure the control settings, as necessary. See below for a detailed description of each setting.
3. Click Save.
Parameter |
Description |
|---|---|
Additional CSS Class For Control |
This option allows you to add an additional layout to the skin by developing a new DOTNETNUKE style, which requires an advanced understanding of HTML and CSS. |
Allow Saved Credit Cards? |
Uncheck this checkbox if you do NOT want to display saved credit cards as payment options on this control. |
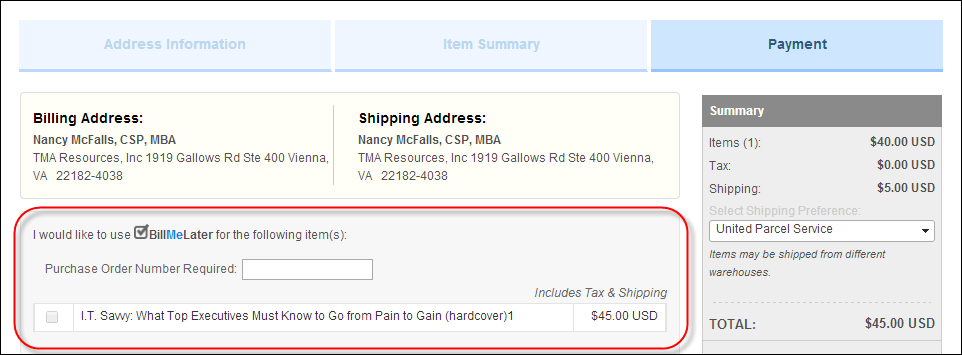
When checked, it allows web users to pay
for a purchase at a later date, as shown below. See Bill
Me Later for more information about the back office setting
required to for a web user to select this option. |
|
Checkout Complete Redirect Page URL |
You should set the PWF parameter to the
Checkout Thank You page's URL when the web user clicks to process
his/her order, as highlighted below. See Setting
up PWF Parameters to learn more about these parameters and
why your website's redirect URLs are managed there. |
Collect Subscriber Audit Demographics? |
As of 7.5.0SP1, if this checkbox is checked, if a customer is purchasing a new subscription or a subscription renewal of a BPA-audited publication, or if a member is purchasing or renewing a membership that comes with a BPA-audited publication as a member-benefit, the customer will be required to answer subscriber audit demographic questions before they can successfully check out. For more information about the screen that displays, please see Audit Demographics on the Web.
|
This message should inform your web user
that his/her coupon was not applied to his/her order, as highlighted
below. |
|
Empty Shopping Cart/Order Error Message |
This error message will display to the web users if there are no items in his/her shopping cart, such as "Shopping Cart is Empty" |
Error Message |
The error message will display on the control for the action that was being performed at the time of the error. If left blank, the default error message, "An error occurred while performing [Insert Action]. If the problem persists, please contact the site administrator", will display. [Insert Action] will be substituted with the action the control was performing at the time of the error. If you wish to change the default error message, customize it with a PWF Parameter. See Setting up PWF Parameters to learn more about these parameters and why your website's redirect URLs are managed there. |
Is Cvv2 (Security Code) required for existing credit cards? |
If this checkbox is checked, a credit card security code is required for new credit cards during checkout.
|
Is Cvv2 (Security Code) required for new credit cards? |
If this checkbox is checked, a credit card security code is required for existing credit cards during checkout.
|
Shopping Cart Page Redirect URL |
You should set the PWF parameter to a
value (e.g., Checkout) that will take the web user to the shopping
cart page when he/she selects "click here", as shown
below. See Setting
up PWF Parameters to learn more about these parameters and
why your website's redirect URLs are managed there.
|
 When a web user updates the subscription
information needed for auditing purposes, the Sub_Qual_Master.QUALIFICATION_BATCH
will be set to the ecommerce batch that is open. Sub_Qual_Master.QUALIFICATION_DATE
will be set to the batch date of that batch.
When a web user updates the subscription
information needed for auditing purposes, the Sub_Qual_Master.QUALIFICATION_BATCH
will be set to the ecommerce batch that is open. Sub_Qual_Master.QUALIFICATION_DATE
will be set to the batch date of that batch.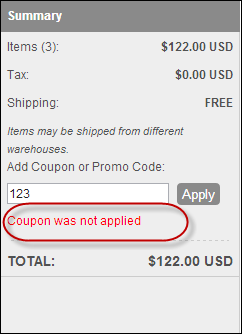
.png)
 The message shown above only
displays if the logged in web user has additional items in his/her
cart.
The message shown above only
displays if the logged in web user has additional items in his/her
cart.