 Security
groups must be defined before you begin. For more information, please
see Defining Security Groups.
Security
groups must be defined before you begin. For more information, please
see Defining Security Groups.A Personify360 user is an individual who accesses Personify360 by entering their unique credentials. From the User Maintenance (PSM001) screen, once you create a user, you can add the user to organization units, security groups, and personas.
Security
groups must be defined before you begin. For more information, please
see Defining Security Groups.
When users log in to Personify360, the default password is the same as the User ID.
Permission
changes can be made while the user is in the application, but the changes
will not take effect until the user logs out and logs back in to Personify360.
From the User Maintenance screen, you can perform the following using the task bar:
· Import permissions to other users
· Review assigned applications and access points
 Only
a Super User can create or edit another Super User.
Only
a Super User can create or edit another Super User.
To define users:
1. From the Security Central screen, click Define User.
2. Click
Create New Standard User.
The User Maintenance screen displays, as shown below.
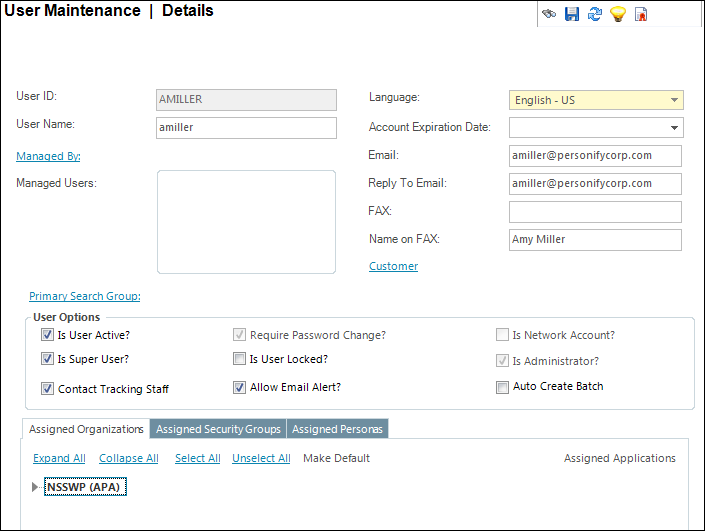
3. Enter the User ID.
The User
ID field does not accept any special characters. Any special characters
entered in this field will be automatically changed to an underscore "_".
4. Enter the User Name.
5. Click the Managed By link to select the user's manager.
6. From the
Managed Users section, select the user in which
the new user is responsible for managing.
Double-click a user in this section to open that user's record in User
Maintenance.
7. If necessary, click the Primary Search Group link and search for a Primary Search Group to link to a user.
8. Select
the Language from the drop-down.
Values are populated based on the options defined on the Language
Maintenance screen.
9. If necessary, select the Account Expiration Date.
10. Enter the user’s information as needed. The options include:
· Reply to Email
· FAX
· Name on FAX
11. If necessary, click the Customer link and search for a customer to link to a user.
12. In the User Options section, check the appropriate checkboxes:
· Is User Active?
· Is Super User?
· Require Password Change?
· Is User Locked?
· Is Network Account
· Is Administrator?
· Contact Tracking Staff
· Allow Email Alert?
· Auto Create Batch
13. The Assigned Organizations tab displays a list of the organizations and organization units to which you can assign the users. To assign the user permissions to organization unit, perform the following:
a. Access
the Assigned Organizations tab, as shown below.
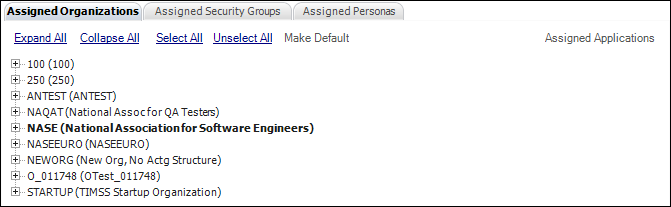
b. Click the + next to the appropriate organization to expand it.
c. Double-click
the organization unit to which you want to add the user.
The red X changes to a green
checkmark.
d. To assign
the user access to ALL organizations and organization units, click the
Select All link.
Similarly, click the Unselect All link to remove
access to all organization and organization units.
e. If you
have multiple organizations, you can make one the default. To do this,
highlight the organization unit you want to make the default for this
user, double-click it so a green checkmark displays next to it, and click
the Make Default link.
The default organization unit displays in bold.
f. Click Save.
14. On the Assigned Security Groups tab, you will see a list of active security groups for the organization units selected in step 9. To assign the user to a security group(s), perform the following:
a. Access
the Assigned Security Groups tab, as shown below.

b. Click the + next to the appropriate security group to expand it.
c. Double-click
the security group you want to set for the user.
The red X changes to a green
checkmark.
Security
groups that start with an underscore (e.g., _ACCT_MGR (_Accounting Manager))
provide access across the subsystem. Security groups that begin with the
subsystem acronym (e.g., FAR_FULL (FARAccounting - Full Control)) provide
access to the level identified.
d. To assigned
the user access to ALL security groups, click the Select
All link.
Similarly, click the Unselect All link to remove
access to all security groups.
e. Click Save.
15. On the Assigned Personas tab, you will see a list of personas. To assign the user a persona, perform the following:
a. Access
the Assigned Personas tab, as shown below.

b. Click
the + next to the appropriate persona to expand it. Double-click the persona
you want to set for the user.
The red X changes to a green
checkmark. Users can only use one persona at a time, but they can change
the persona within the application without logging out.
c. If you
assign multiple personas to the sure, you can make one the default. To
do this, highlight the persona you want to make the default for this user,
double-click it so a green checkmark displays next to it, and click the
Make Default link.
The default persona unit displays in bold.
To assigned
the user access to ALL personas, click the Select All
link.
16. Click
Save.
The Generate Password screen displays where you can set the first login
password, as shown below.
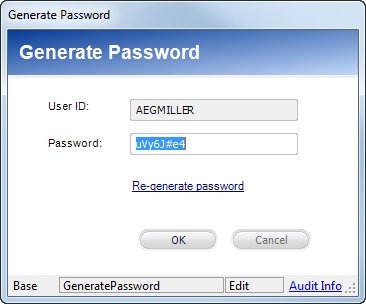
17. Click
OK.
An email opens in your default email provider with an attachment containing
an image of the user's password. If you defined an email address for the
user, the To field defaults to the defined email address of the user.
Screen Element |
Description |
|---|---|
User ID |
Text box. A unique ID for the user. This ID is used when signing into Personify360. As of the 7.2.3 release, this field defaults based on the first character of the user’s first name and up to 19 characters of the user’s last name. |
User Name |
Text box. The long name or description of the User ID. |
Managed By |
Link. As of 7.4.1, when clicked, opens the Generic Chooser to select the user who manages the new user. |
Managed Users |
Selection box. As of 7.4.1, a list of users that be selected as users managed by the new user. |
Language |
Drop-down. The language used for this User ID inside the application. The screen captions and messages will display in this language. |
Account Expiration Date |
Drop-down. You can set a user account expiration date so users cannot access their account after a specific date. This functionality exists for cases where organizations hire temps that should only need access for a given amount of time. The user can no longer log in after this date. |
Text box. The email address of the user. It is used in the Contact Tracking module to send an email to this user. |
|
Reply To Email |
Text box. The email address to which the user wants reply emails to be sent. |
Fax |
Text box. The fax number of the user. It is used in the Contact Tracking module to send an email to this user. |
Name on Fax |
Text box. The name that appears on the fax when it is sent from the fax number. |
Account Expiration Date |
Drop-down. The date on which the user’s account expires (if any). The user cannot log in to this account after the expiration date. Accounts with expiration dates are typically created when an association hires a temp or conducts training. |
Customer |
Link. When clicked, the Customer Chooser displays where you can select an individual customer to link to a user so that the application recognizes the user as a fundraising solicitor or sales person. |
Primary Search Group |
Link. When clicked, the Primary Search Group Chooser displays where you can select the primary search group (subgroup that is typically a chapter) to be used in searches for the user. To delete the Primary Search Group selected here, right-click the group name and select Clear. For more information on primary search groups, please see Creating a Primary Search Group Mapping. |
User Options |
|
Is User Active? |
Checkbox. When checked, indicates the user is active. Inactivating a user means the user will not be able to log into Personify360. Before you inactivate a user, make sure they are not assigned to any open or private contact tracking records or that the user doesn't own any public Quick Pick items with no expiration date.
As a matter of best practice, you should also re-assign another staff member if the staff member being inactivated is a current segment manager, defined as a manager of other back office users, or defined as a staff person on a current or future Abstracts Call Submission Type.
Staff can also be assigned as the point of contact for fundraising planned giving plan, but if the staff being inactivated was the person who worked with the donor to secure the planned giving commitment, it would be appropriate to leave that staff person assigned to the planned giving plan. |
Require Password Change? |
Checkbox. When checked, indicates the user must change the password upon logging in to Personify360. The password is no longer set to the same as the User ID. Instead, it is generated as an encrypted password that complies with RegEx standards. See Resetting a User’s Password for more information. |
Is Network Account? |
Read-only checkbox. When checked, indicates the user account is the network account, and the Active Directory is enabled. See Enabling Active Directory for more information.
|
Checkbox. When checked, indicates that the user is a super user. A super user can view all screens in all personas, regardless of other security groups. However, if organization unit segmentation is defined, those segmentation rules still apply to the super user. Typically, this checkbox is unchecked because it allows the user to bypass screen and menu security. Only super users can create other super users on this screen. |
|
Is User Locked? |
Checkbox. When checked, indicates the user is locked out of his or her workstation. The system limits repeated access attempts by locking out the user ID after six attempts. If this occurs, the user can try to log in again in 30 minutes, or the administrator can access this screen and uncheck this checkbox. |
Read-only checkbox. When checked, indicates the user performs administrator tasks and should have administrator rights. Whether or not this checkbox is checked is calculated by the system based on the following properties: · User is a super user (i.e., the Is Super User? checkbox is checked) · User belongs to a security group with access to Application Designer and Database Designer (i.e., the Can Use Application Designer? and Can Use Database Designer? checkboxes are checked) · User belongs to a security group with access to publish screens (i.e., the Can Publish Screens? checkbox is checked) · User belongs to a security group with access to use debug tools (i.e., the Can Use Debug Tools? checkbox is checked) · User has permission to application screens (i.e., the Administrative Application checkbox is checked) and admin access points (i.e., the Administrative Access-Point checkbox is checked). This checkbox is checked automatically based on the criteria outlined above. It is a requirement for PA-DSS/PCI that all activities performed by a user who has "administrative" rights must be recorded. The "Is Administrator?" checkbox is an indicator that all of the user's activities are tracked by PA-DSS audit logging service. |
|
Contact Tracking Staff |
Checkbox. As of 7.6.1, indicates the user is a staff person who can be assigned to contact tracking items. If this checkbox is checked, the user will display in the Staff Assigned drop-down on the Contact Tracking screen when adding a new record.
|
Allow Email Alert? |
Checkbox. When checked, indicates the user is allowed to receive email alerts from the system through Contact Tracking alerts. |
Auto Create Batch |
Checkbox. As of 7.6.2, this checkbox was added to support batch functionality in PersonifyGO. If this checkbox is checked, the system will automatically open a batch when the user proceeds through the payment workflow in PersonifyGO. If this checkbox is NOT checked, when the user tries to create a batch through the payment workflow, the Batch Chooser screen will open asking the user to select a direct or deferred batch.
|