 Screens
that are not published to
the database cannot be added to security groups or menus.
Screens
that are not published to
the database cannot be added to security groups or menus.This screen is used when you create a new screen or batch job and you want to grant users access to the application. From the Application Security Setup screen, you can assign permissions to multiple security groups. Security groups must exist before you can assign permissions to them here.
Screens
that are not published to
the database cannot be added to security groups or menus.
To define applications:
1. From the Security Central screen, click Maintain Application Security.
2. Click
Create New Application.
The Application Security Setup screen displays, as shown below.
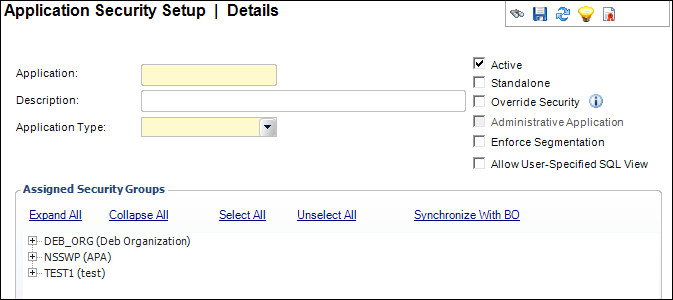
3. Enter the Application name.
Best practice
for entering the application is to start the application with the three-letter
acronym of the subsystem. For example, CUS for Customer or MTG for Meetings.
4. Enter a Description for the application.
5. Select
the Application Type from the drop-down.
The security groups display in the Assigned Security Groups section.
a. If you selected "XML Based Screen", select whether or not the screen will be Available for Advance Search.
6. Check the appropriate checkboxes:
· Active
· Standalone
· Override Security
· Administrative Application
· Enforce Segmentation
· Allow User-Specified SQL View
7. From the
Assigned Security Groups section, click the +
next to the appropriate security group to expand it. Double-click the
permission code to grant access to this application for the selected security
group.
The red X changes to a green checkmark.
8. Click Save.
Screen Element |
Description |
|---|---|
Application |
Text box. A unique code for the application. Refer to the note in step 3 above for more information on best practice for how to label the application code. |
Description |
Text box. A description of the application. |
Application Type |
Drop-down. The type of application. For example, screen or batch process. Depending on which type is selected, different permissions display in the Permissions table. If you select "XML Based Screen", the Available for Advance Search checkbox displays. |
Available for Advance Search |
Checkbox. When checked, the Search Settings button will display for users to modify the search settings on that screen. Only displays when "XML Based Screen" is selected as the Application Type. |
Active |
Checkbox. When checked, indicates the application is active. This option is available so you can deactivate an application instead of deleting it. When unchecked, indicates the application is inactive and you cannot launch the screen. |
Standalone |
Checkbox. When checked, the application can stand alone and is not dependent on another screen. Standalone applications display in the list of screens (click the Screen link) on the Persona Menu Designer screen. Non-standalone screens, such as pop-ups or choosers, cannot be accessed through the command line. |
Override Security |
Checkbox. When checked, indicates any user can access the application, despite the user’s permissions. When unchecked, the permissions for viewing or editing remain for the application. Some screens, such as Choosers or some modal screens, do not require security, so checking this checkbox would not enforce security on those screens.
|
Read-only checkbox. When checked, indicates the application can only be accessed by an administrative user. Whether or not a user is an administrative user is determine by the Is Administrator? checkbox on the User Maintenance screen.
The following base screens have been marked as administrative applications: · APP008 · APP014 · APP014B · APP014C · NTS001_Notification · NTS002_Notification_Header · NTS003_Notification_Footer · NTS004_Notification_Queue · NTS007_Notification_Process · ORG001 · ORG002 · PSM001 · PSM002 · PSM003 · PSM005 · PSM007 · PSM011 · PSM012 · SyncBOEandTRS |
|
Enforce Segmentation |
Checkbox. When checked, indicates this screen will enforce the segmentation rules. |
Allow User-Specified SQL View |
Checkbox. As of 7.5.2, when checked, indicates that the application can be selected when adding a new view. For more information, please see Setting Up Application Views. Currently, this has only been implemented for MRM004. |
 When this checkbox is checked,
all users will have access to this application; the "Assigned
Security Groups" section will be disabled, and, therefore,
you do not need to assign access to security groups.
When this checkbox is checked,
all users will have access to this application; the "Assigned
Security Groups" section will be disabled, and, therefore,
you do not need to assign access to security groups.