 At
least one organization and organization unit must be defined before you
can begin.
At
least one organization and organization unit must be defined before you
can begin.A security group is a set of records that says who can perform what tasks within an application. Once the security group is established, members, permissions, and access points can be added to the security group.
At
least one organization and organization unit must be defined before you
can begin.
 Base
security groups that start with an underscore (e.g., _ACCT_MGR (_Accounting
Manager)) provide access across the subsystem. Base security groups that
begin with the subsystem acronym (e.g., FAR_FULL (FARAccounting - Full
Control)) provide access to the level identified.
Base
security groups that start with an underscore (e.g., _ACCT_MGR (_Accounting
Manager)) provide access across the subsystem. Base security groups that
begin with the subsystem acronym (e.g., FAR_FULL (FARAccounting - Full
Control)) provide access to the level identified.
To define security groups:
1. From the Security Central screen, click Define Security Group.
2. Click
Add Security Group.
The Security Group Maintenance screen displays, as shown below.
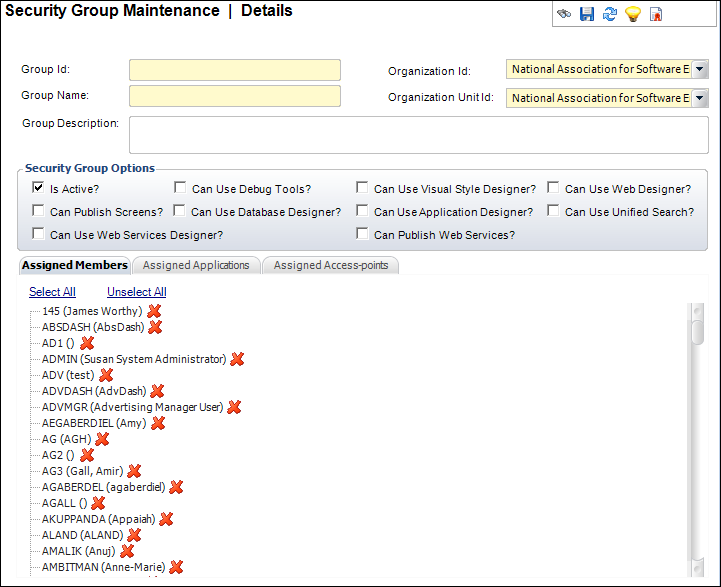
3. Enter a unique Group ID and Group Name.
4. Enter the Group Description.
5. Select the appropriate Organization ID.
6. Select the appropriate Organization Unit ID.
7. In the Security Group Options section, check the appropriate checkboxes:
· Is Active?
· Can Use Debug Tools?
· Can Use Visual Style Designer?
· Can Use Web Designer?
· Can Publish Screens?
· Can Use Database Designer?
· Can Use Application Designer?
· Can Use Unified Search?
· Can Use Web Services Designer?
· Can Publish Web Services?
To comply
with PA-DSS, any user who can use debug tools is considered an “Administrator”.
If you do not want a specific security group to have administrator privileges,
make sure to uncheck the “Can Use Debug Tools?” checkbox. If this box
is checked, the security group defaults any user within that group to
administrator privileges.
8. Click Save.
You must
save now before proceeding to the next step.
9. On the Assigned Members tab, you will see a list of users within the organization unit. To assign users to the security group, perform the following:
a. Access
the Assigned Members tab, as shown below.
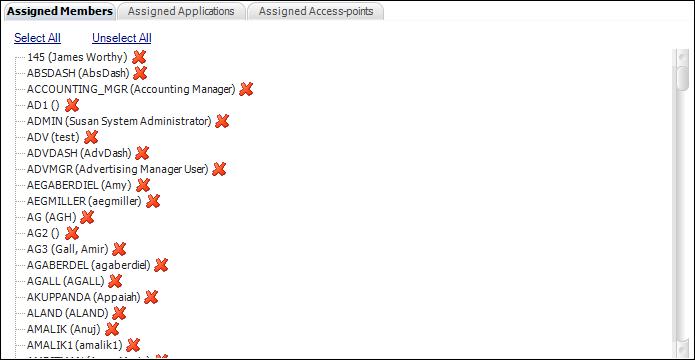
b. Double-click
the users who should be made members of the security group.
The red X changes to a green
checkmark.
c. If you
want to assign ALL users to this security group, click the Select
All link.
Similarly, click the Unselect All link to remove
all users from the security group.
10. From the Assigned Applications tab, you can view a list of batch processes, online reports, XML-based screens, or web pages, and define the appropriate permissions.
a. To assign access to batch reports, perform the following:
i. From the Assigned Applications tab, select "Batch Process" from the Application Type drop-down.
ii. Select
the Assigned,
Unassigned,
or All radio buttons to filter the display
of batch processes based on whether or not they have been assigned to
the security group, as shown below.
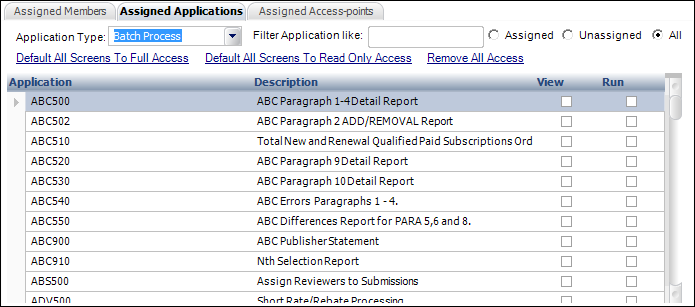
iii. Check the View checkbox next to the batch process that you want to allow the security group to view any report outputs that have been run for the specified batch report.
iv. Check the Run checkbox next to the batch process that you want to allow the security group to open the actual TRS process to customize parameters and run the report.
Checking
both fields is required for full security access to the specified batch
process.
v. Click Default All Screens to Full Access to automatically give the security group full access (all permission checkboxes are checked) to all batch processes.
vi. Click Default All Screens to Read-Only Access to automatically give the security group read-only access (only the “View” checkbox is checked) to all batch processes.
vii. Click Remove All Access to remove all checked checkboxes.
b. To assign access to online reports, perform the following:
i. From the Assigned Applications tab, select "Online Report" from the Application Type drop-down.
ii. Select
the Assigned,
Unassigned,
or All radio buttons to filter the display
of online reports based on whether or not they have been assigned to the
security group, as shown below.
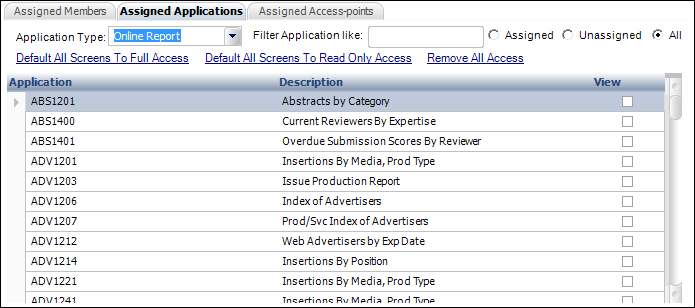
iii. Check the View checkbox next to the online report that you want to allow the security group to view.
iv. Click Default All Screens to Full Access to automatically give the security group full access (all permission checkboxes are checked) to all online reports.
v. Click Default All Screens to Read-Only Access to automatically give the security group read-only access (only the “View” checkbox is checked) to all online reports.
vi. Click Remove All Access to remove all checked checkboxes.
c. To assign access to XML based screens, perform the following:
i. From the Assigned Applications tab, select "XML Based Screen" from the Application Type drop-down.
ii. Select
the Assigned,
Unassigned,
or All radio buttons to filter the display
of XML screens based on whether or not they have been assigned to the
security group, as shown below.
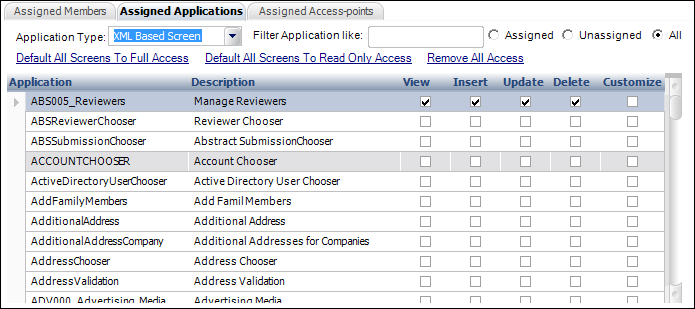
iii. Check the View checkbox next to the screen that you want to allow the security group to view.
iv. Check the Insert checkbox next to the screen that you want to allow the security group to add data.
v. Check the Update checkbox next to the screen that you want to allow the security group to change data.
vi. Check the Delete checkbox next to the screen that you want to allow the security group to delete data.
Users with
Delete privileges have permission to delete records created by another
user. Because this poses a security risk, especially in Contact Tracking
and Batch Job Submission, Delete privileges should be assigned carefully.
vii. Check the Customize checkbox next to the screen that you want to allow the security group to customize.
viii. Click Default All Screens to Full Access to automatically give the security group full access (all permission checkboxes are checked) to all screens.
ix. Click Default All Screens to Read-Only Access to automatically give the security group read-only access (only the “View” checkbox is checked) to all screens.
x. Click Remove All Access to remove all checked checkboxes.
11. On the
Assigned Access Points tab (shown below), you will see a list of access
points defined for the organization unit and the privileges that this
group has for those access points.
For more information on access points, please see Defining
Access Points.
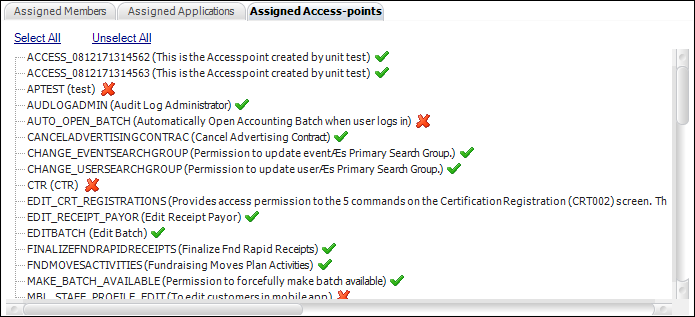
a. Double-click
the access point you want to add to the security group.
The red X changes to a green
checkmark.
b. Click the Select All link to assign access to all access points.
c. Click the Unselect All link to remove all assigned access points.
The access
points with the “OLK” prefixes are associated with Outlook integration.
If assigned, the security group is permitted to perform certain actions
in Outlook.
12. Click Save.
Screen Element |
Description |
|---|---|
Group ID |
Text box. A unique ID for the security group. |
Group Name |
Text box. The long name of the security group. |
Group Description |
Text box. The description of the security group. |
Organization ID |
Drop-down. The organization ID in which the security group will be available. |
Organization Unit ID |
Drop-down. The organization unit ID in which the security group will be available. |
Security Group Options |
|
Is Active? |
Checkbox. When checked, indicates the security group is active. Only an active security group can be assigned. |
Checkbox. When checked, indicates the security group can publish screens to the database. |
|
Checkbox. When checked, indicates the security group can use the debug tools. The debug tools include the options available from the Debug menu on the menu bar. If you check this checkbox and modify the Toolbars.xml file in the Config folder, then the members of the security group have permission to turn on or off the command line (the blank line below the toolbar where you can enter a screen name and access it directly). |
|
Checkbox. When checked, indicates the security group can use the Database Designer. |
|
Can Use Visual Style Designer? |
Checkbox. When checked, indicates the security group can use the Visual Style Designer. |
Checkbox. When checked, indicates the security group can use the Application Designer. The Application Designer is used to customize and create Personify360 screens. |
|
Can Use Web Designer? |
Checkbox. When checked, indicates the security group can use the Web Form Designer. The Web Form Designer is used to create and publish forms for your Personify360 e-Business or external ASP.NET applications.
|
Can Use Unified Search? |
Checkbox. When checked, indicates the security group can use the Unified Search functionality first introduced in the 7.3.1 release.
Unified Search is a search box that appears in the top-left corner of the application that allows users to enter a free-text search across all customer and order entry records within the user’s Organization Unit.
|