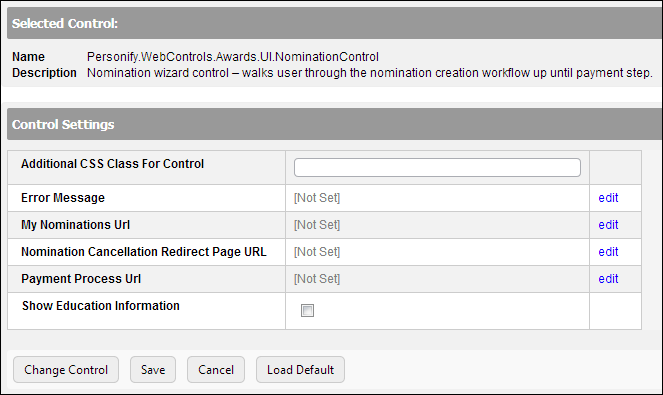
The Control Settings for this control display, as shown below.
This section discusses the web settings required to add the Nomination control to your website.
· For an overview of the online award nomination process, please see Online Award Nominations.
· For information on configuring the necessary back office settings for this process to properly display on your website, please see Configuring the Back Office Settings for the Online Award Nomination Process.
· To see what the nomination process might look like from a web user perspective, please see the Sample Non-Self Nomination Workflow and Sample Self-Nomination Workflow.
To configure the web settings for the Nomination control:
1. Add the "NominationControl" to the desired page. For more information, please see Adding a .NET Web Control to a Page.
The Control Settings for this control display, as shown below.
2. In the Additional CSS Class for Control field, enter the CSS class, if necessary.
This option allows you to add additional layout to the skin by developing a new style, which requires an advanced understanding of HTML and CSS. See Configuring Pages, Modules, and Skin Settings for more information.
3. If necessary, select or create a new Error Message.
The error message will display on the control for the action that was being performed at the time of the error.
a. If left blank, the default error message, "An error occurred while performing [Insert Action]. If the problem persists, please contact the site administrator", will display. [Insert Action] will be substituted with the action the control was performing at the time of the error.
b. If you wish to change the default error message, customize it with a PWF parameter. See Setting up PWF Parameters for more information.
4. From My Nominations Url, click edit.
The Select/Edit Personify Web Parameter screen displays.
a. Click the select link next to the appropriate PWF parameter that will take the web user to the page where he/she can view his/her award nominations. For more information, please see My Awards Nominations.
If this PWF parameter does not exist or you would like to create a new one, see Setting up PWF Parameters for more information.
5. From Nomination Cancellation Redirect Page URL, click edit.
The Select/Edit Personify Web Parameter screen displays.
a. Click the select link next to the appropriate PWF parameter that will take the web user to the appropriate page if the user cancels their nomination (e.g., My Awards Nominations page).
If this PWF parameter does not exist or you would like to create a new one, see Setting up PWF Parameters for more information.
6. From Payment Process Url, click edit.
The Select/Edit Personify Web Parameter screen displays.
a. Click the select link next to the appropriate PWF parameter that will take the web user to the payment screen.
If this PWF parameter does not exist or you would like to create a new one, see Setting up PWF Parameters for more information.
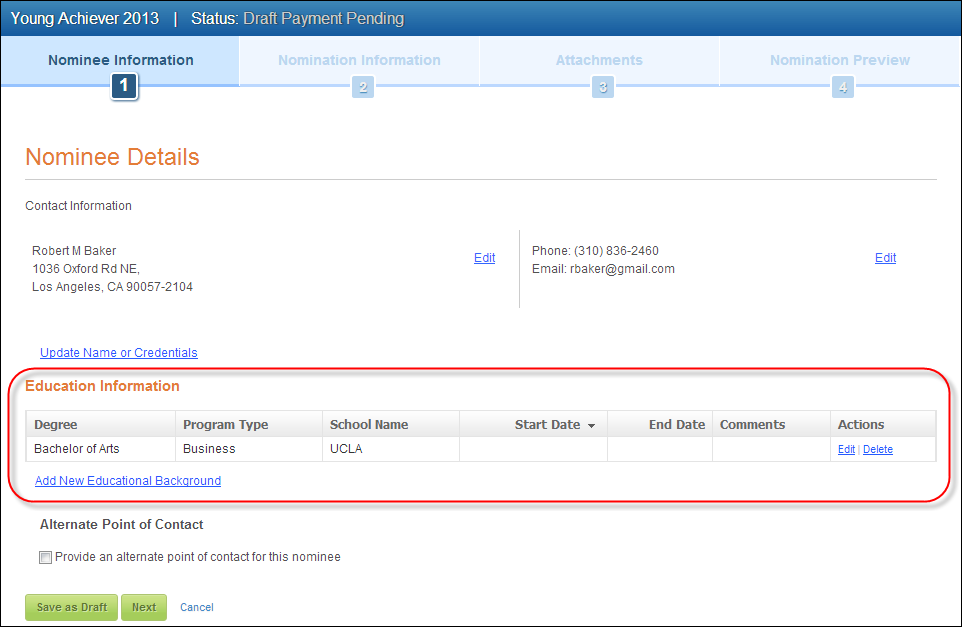
7. If necessary, check the Show Education Information checkbox. If checked, the Education Information section displays on the Nominee Information step of the self-nomination process, as highlighted below. For more information on this control, please see the Educational Background Control Overview.
8. Click Save.