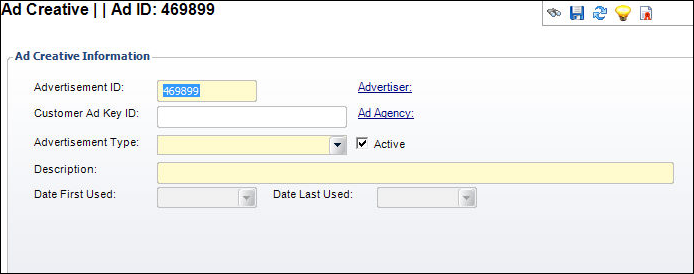
The Ad Creative screen displays, as shown below.

The Advertising Creative Maintenance (ADV004) screen is used to manage advertising materials submitted by advertisers and advertising agencies. The Ad Creative screens allow the system to manage all materials that the publishers use in creating the advertiser’s advertisement. Advertising material is called “creative.” Ad creatives can consist of art, copy, and/or digital/audio files.
To create a new ad creative:
1. From the toolbar, select Advertising Order Processing > Ad Creative Maintenance.
The Ad Creative Maintenance search screen displays.
2. Click Create New.
The Ad Creative screen displays, as shown below.

3. If necessary, change the Advertisement ID.
4. Click the Advertiser link.
The Customer Chooser displays. Search for and select the advertiser.
5. Click the Ad Agency link.
The Customer Chooser displays. Search for and select the advertising agency.
6. Enter the Customer Ad Key ID.
7. Select the Advertisement Type from the drop-down.
The Advertisement Type selected changes the options in the Ad Specifications section. Values in the drop-down are populated based on the fixed codes defined for the ADV "ADVERTISEMENT_TYPE" system type.
8. Enter a Description of the advertisement.
9. If necessary, deselect the Active checkbox.
10. Select the Date First Used from the drop-down.
11. If necessary, select the Date Last Used from the drop-down.
12. Enter information into the Ad Specifications fields:
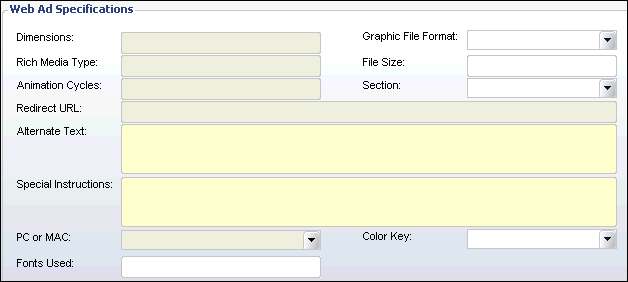
a. If an Advertisement Type of “Internet” is selected:

i. In the Web Ad Specifications section, enter the Dimensions. This is the actual size of the advertisement (height and width).
ii. Enter the Rich Media Type. This describes the type of media to be used in the advertisement. For example, Flash.
iii. Enter the Animation Cycles.
iv. Select a Graphic File Format from the drop-down.
v. Enter the File Size.
vi. Select a Section from the drop-down.
vii. Enter the Redirect URL.
viii. Enter any Alternate Text.
ix. Enter any Special Instructions.
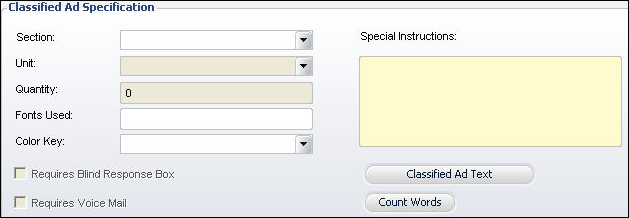
b. If an Advertisement Type of “Print Classified” is selected:

i. Select a Section from the drop-down.
ii. Select a Unit from the drop-down.
iii. Enter the Quantity.
iv. Enter any Special Instructions.
v. If necessary, select the Requires Blind Response checkbox. This indicates whether a blind PO box is necessary. Used when a classified employment advertisement is placed by an employment agency.
vi. If necessary, select the Requires Voice Mail checkbox. This indicates that a voice mail box is required when placing a classified personal advertisement.
vii. Click Classified Ad Text.
viii. Click Count Words.
c. If an Advertisement Type of “Print Display” is selected:

i. In the Copy Information section, select the Material Type the print display was delivered as from the drop-down.
Values in the drop-down are populated based on the non-fixed codes defined for the ADV "MATERIAL_TYPE" system type.
ii. Select whether the material is viewable via PC or MAC from the drop-down.
Values in the drop-down are populated based on the non-fixed codes defined for the ADV "PC_MAC" system type.
iii. Select the Application Type from the drop-down.
Values in the drop-down are populated based on the non-fixed codes defined for the ADV "APPLICATION_TYPE" system type.
iv. Select the Graphic File Format from the drop-down.
v. Enter the Image Size.
vi. Enter the Ad Size.
vii. Enter the different Fonts Used.
viii. Select whether the advertisement is Camera Ready.
ix. In the Production Information section, enter any Color Comments.
x. Select a Color Key from the drop-down.
Values in the drop-down are populated based on the non-fixed codes defined for the ADV "COLOR_KEY" system type.
xi. Enter the Bleed Description.
xii. Enter the URL.
xiii. Select whether the advertisement is in Landscape or Portrait format from the Page Orientation drop-down.
Values in the drop-down are populated based on the non-fixed codes defined for the ADV "PAGE_ORIENTATION" system type.
xiv. Select a Section from the drop-down.
xv. Enter any Special Instructions.
13. Click Save.
See Also:
· Accessing Ad Creative Maintenance
· Maintaining Ad Creative Classifications
· Tracking Ad Creative Material
· Reviewing Insertion Orders that use this Ad Creative