Checkout Control - Step 2: Item Summary
When the web user clicks Next from step
1 of the checkout process, he/she is taken to step 2 of the checkout
process. Step 2 of the checkout process provides the web users with a
summary of his/her order. It contains details such as quantity, unit price,
total price, availability (back-order, in stock, or number left), etc.
 If
a MBR product is included in the order, it will display first in the list.
Any other products in the order will display in the order in which they
were added to the order (descending so that the last product added to
the order will be shown first).
If
a MBR product is included in the order, it will display first in the list.
Any other products in the order will display in the order in which they
were added to the order (descending so that the last product added to
the order will be shown first).
From this step, the web user can:
· View
Product Details
· Accept
Licensing Agreement
· Select
Shipping Preferences
· Apply
a Coupon and/or Promo Codes
· View
Meeting Registrants
At this time, the web user sees actual tax and shipping (not just an
estimate as shown in the Shopping
Cart Summary control). In addition, the web user can see how much
money he/she save by being a member of your organization or how much money
they could save by becoming a member.
If
a web user has a membership product in his/her shopping cart, the members
saving message will display.

Viewing
Product Details
If you define a URL for a product in the Product
URL field on the eBusiness Control screen in Product Maintenance
in the back office, when the web user clicks a product's hyperlink or
image from checkout, a new tab opens in your web user's browser with the
URL defined in the Product URL field in the back office. If a URL is NOT
defined and the web user clicks the product's hyperlink or image, he/she
is redirected to the Product
Detail page or Meeting
Detail page accordingly. For more information, please see Configuring
the Back Office Settings for the Checkout Control.
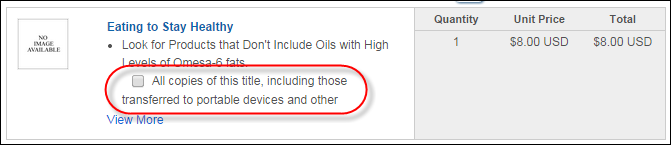
Accepting
Licensing Agreement
If the web user is purchasing a DCD product that has been defined to
display copyright information, he/she must accept the licensing information
before proceeding to the payment step, as shown below. For more information,
please see Configuring
the Back Office Settings for the Checkout Control.
Selecting
Shipping Preferences
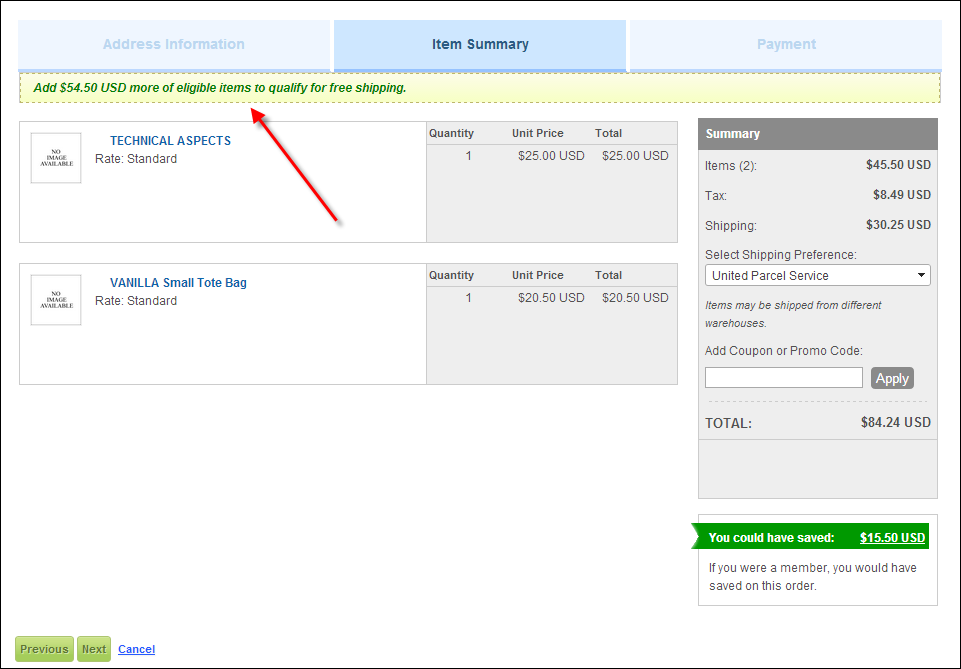
As of 7.5.2, if the order qualifies for free shipping, the free shipping
option will automatically be selected in the Select
Shipping Preference drop-down, as shown below. Please note that
this text is defined on the Free Shipping Org Unit Defaults screen. For
more information, please see Defining
Free Shipping Org Unit Defaults.
If a ship-via
is defined at the product level, that ship-via will default into the Select Shipping Preference drop-down.
If there is more than one product in the shopping cart with a ship-via
defined OR none of the products have a ship-via defined at the product
level, the system will select the default defined at the org unit level.
For more information, please see Defining
Organization Unit Shipping Details. Please note that the selected
ship-via code must also be web-enabled in order for it to display on the
web.
 As of 7.5.2,
an additional filter has been added to the logic for displaying shipping
options based on the ship-to address on the order. If the International
Only checkbox is checked on the Shipping
Charges Maintenance screen for the "[ALL]" country and if
the ship-to address country is NOT present in ORD_DOMESTIC_SHIP_COUNTRY
table then the system will display ship-via codes setup for that country
and for [ALL]. If the International
Only checkbox is checked for the "[ALL]" country and
if the ship-to address country is present in ORD_DOMESTIC_SHIP_COUNTRY
table then the system will display ship-via codes setup only for that
country. If the International Only
checkbox is NOT checked for the "[ALL]" country, the system
will display all ship-via codes setup for that country and for [ALL].
As of 7.5.2,
an additional filter has been added to the logic for displaying shipping
options based on the ship-to address on the order. If the International
Only checkbox is checked on the Shipping
Charges Maintenance screen for the "[ALL]" country and if
the ship-to address country is NOT present in ORD_DOMESTIC_SHIP_COUNTRY
table then the system will display ship-via codes setup for that country
and for [ALL]. If the International
Only checkbox is checked for the "[ALL]" country and
if the ship-to address country is present in ORD_DOMESTIC_SHIP_COUNTRY
table then the system will display ship-via codes setup only for that
country. If the International Only
checkbox is NOT checked for the "[ALL]" country, the system
will display all ship-via codes setup for that country and for [ALL].
If this control has been setup to allow shipping to multiple addresses,
the web user can select a different address or shipping preference per
line item. For more information, please see Configuring
the Web Settings for the Checkout Control. Additionally, the web user
can select an existing or add a new address to the ship-to product. Please
note that products that are received electronically (e.g., DCD products)
do not require an address.

As of 7.5.2, during the checkout process, the system will calculate
if the order will receive free
shipping and displays a message to the web user, as shown below.
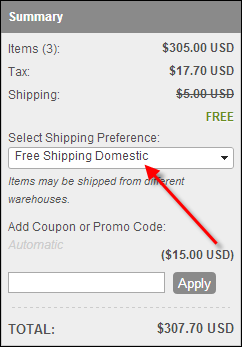
If some items in the customer's order qualify for free shipping, the
shipping discount will display in the buy box, as shown below.
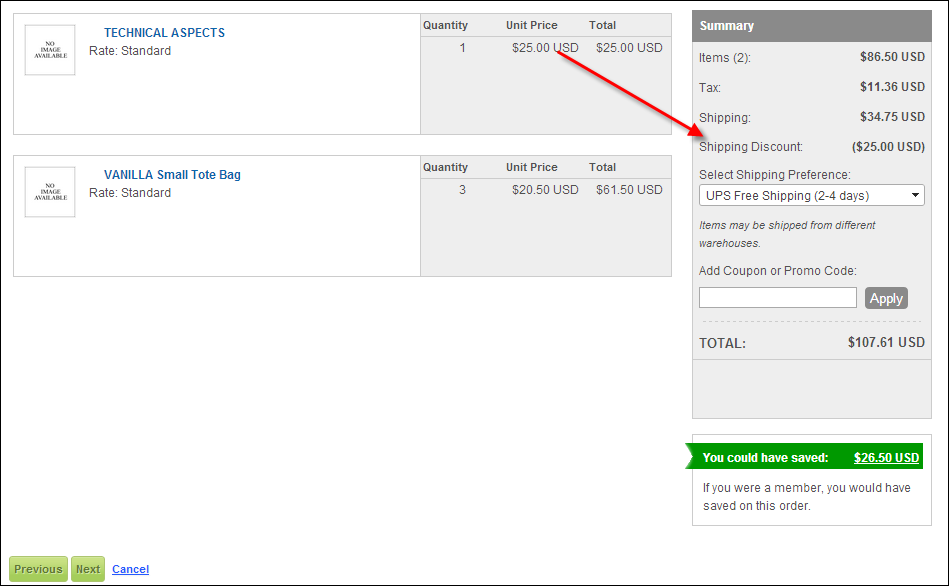
If the entire order qualifies for free shipping, the shipping amount
will be crossed out in the buy box, as shown below.

Applying
a Coupon and/or Promo Code
Web users have the option to applying a coupon or promo code to their
order. As of 7.5.2, you can define a market code and/or coupon code that
qualifies the web user for free
shipping. For more information on coupons and promo codes, please
see Configuring
Back Office Settings for the Checkout Control.
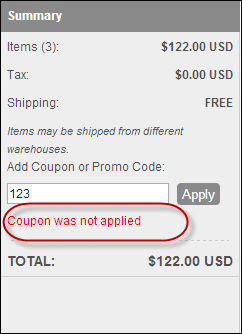
If the web user applies a coupon or promo code that was not accepted,
the page displays, as shown below. Please note that this message is configurable
in the web
settings for this control.
If
the web user applies BOTH a free
shipping coupon AND a free
shipping market code to his/her order, if he/she removes the market
code, the system will remove the free shipping even though the coupon
is still applicable. This is a known issue. The web user must remove the
coupon and re-add it in order for the free shipping to be applied.
Viewing
Meeting Registrants
As of 7.6.0, web users have the ability to register other people, as
well as themselves, for a meeting; this functionality is referred to as
Register
Someone Else. If a web user registered someone else for a meeting
and navigates to step 2 of the checkout process, the page will display
the meeting product for each individual registrant, along with the registrant's
name, as shown below.

Additionally,
the Register Someone Else workflow allows you to use group discounts.
If the order qualifies for a group discount, then the savings are visible
to the web user on step 2 of the checkout process. In order for an order
to qualify for a group discount, all registrants need to be included within
the order. There is no way to add registrants later and apply the group
discount on the web. However, if web users need to add a registrant after
placing an order, they can call your organization and a staff member can
add the registrant and manually apply the group discount, which is not
automatically applied to already invoiced lines. If any registrants must
be waitlisted, or cannot be registered at all for the meeting (e.g., waitlist
count is 0), a message will display to the web user. For more information
on setting up group discounts, refer to Quantity
Discounts.