Configuring the Web Settings for the Full Product Listing Control
It is up to each client to determine the appropriate location of this
page, and to create the menu item that will lead web users to this page.
The section below details how to set up this control on your website.
The instructions are intended for a web user with web admin/host privileges.
In addition, this is a standalone control, which means that it has its
own individual value, does not require another control in order for it
to function, as well as it is not part of a specific workflow on the web.
For more information, refer to the Standalone
Controls section.
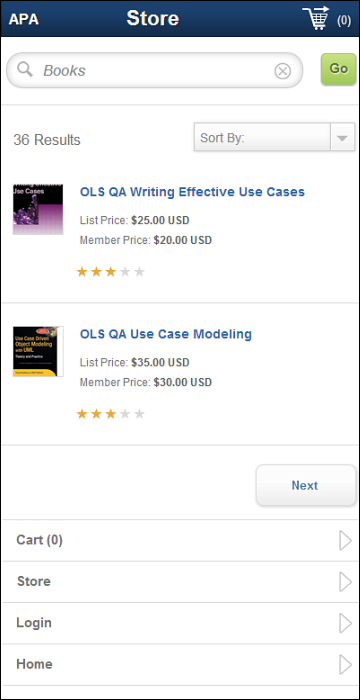
 This control can be configured to be
responsive to mobile users.
After adding the responsive CSS to this page, your mobile phone user will
see the control on the responsive page similar to the one shown below.
For more information
about using this control on a responsive page, please see Configuring
Responsive CSS for the Full Product Listing Page.
This control can be configured to be
responsive to mobile users.
After adding the responsive CSS to this page, your mobile phone user will
see the control on the responsive page similar to the one shown below.
For more information
about using this control on a responsive page, please see Configuring
Responsive CSS for the Full Product Listing Page.
See also:
· Full
Product Listing Control Overview
· Configuring
the Back Office Settings for the Product Listing Control
To configure the web settings for the Full Produce
Listing control:
1. Add the
"FullProductListControl" to the desired page. For more
information, please see Adding
a .NET Web Control to a Page.
The following Control Settings display for this control, as shown below.
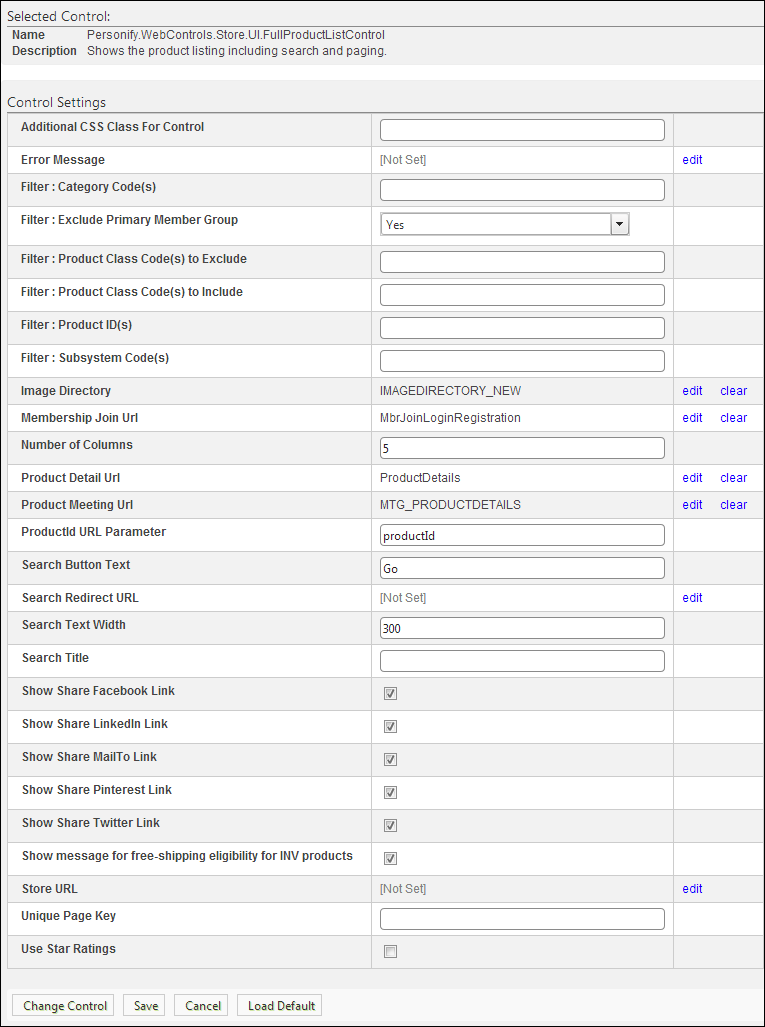
2. If necessary, in the Additional CSS Class for Control field, enter
the CSS class, if necessary.
This option allows you to add additional layout to the skin by developing
a new DOTNETNUKE style, which requires an advanced understanding of HTML
and CSS.
3. If necessary, select
or create a new Error Message.
The error message will display on the control for the action that was being
performed at the time of the error.
a. If left
blank, the default error message, "An error occurred while performing
[Insert Action]. If the problem persists, please contact the site administrator",
will display. [Insert Action] will be substituted with the action the
control was performing at the time of the error.
b. If you
wish to change the default error message, customize it with a PWF parameter.
See Setting up PWF Parameters for
more information.
4. As of
7.5.0, the product listing is configurable so that organizations can have
a particular set of filters applied to display only specific types of
products in the listing. For example, your organization may want to have
a "Bookstore" product listing and a "New Release"
product listing. These two product listing pages can be configured to
display predefined filters to your web users using the following parameters.
For more information, please see Filtering
the Online Store Listing by Default.
· Filter: Category Code(s)
· Filter: Exclude Primary Member Group
· Filter: Product Class Code(s) to Exclude
· Filter: Product Class Code(s) to Include
· Filter: Product ID(s)
· Filter: Subsystem Code(s)
5. From the
Image Directory line, click edit.
The Select/Edit Personify Web Parameter screen displays.
a. Click
the select link next to the appropriate PWF
parameter.
This is the name of the image to display if the Membership Product does
not have a small image defined. The default is “NotFoundImage.jpg” and
this ensures that the image exists in the image directory.
6. From the Membership Join Url line, click edit.
The Select/Edit Personify Web Parameters screen displays.
a. Click
the select link next to the appropriate PWF
parameter.
You should set the PWF parameter to a value that will take the user to
the URL that will display all member products.
If this PWF parameter does not exist or you would like to create a new
one, see Setting up PWF Parameters for
more information.
 If left blank,
this parameter will default to the Product Detail Url.
If left blank,
this parameter will default to the Product Detail Url.
7. In the
Number of Columns
text field, enter the desired number of columns.
The recommended
number is three. If you add more columns, it will not resize the image,
so be mindful of the real estate this may take up.
8. From the
Product Detail Url line, click edit.
The Select/Edit Personify Web Parameter screen displays.
a. Click
the select link next to the appropriate PWF
parameter.
You should set the PWF parameter to a value (e.g., PRODUCTDETAILS) that
will direct the user to the product details page.
b. If this
PWF Parameter does not exist or you would like to create a new one, see
Setting up PWF Parameters for more information.
9. From the Product
Meeting Url line, click edit.
The Select/Edit Personify Web Parameters screen displays.
a. Click
the select link next to the appropriate PWF
parameter.
You should set the PWF parameter to a value that will take the user to
the URL that will display all meeting products.
If this PWF parameter does not exist or you would like to create a new
one, see Setting up PWF Parameters for
more information.
If left blank,
this parameter will default to the Product Detail Url.
10. In the ProductId
URL Parameter text box, enter "productid".
This is the default name of the parameter to read the product’s ID, but
if the environment's redirection logic uses a different Query String name
set it here. See Setting
up PWF Parameters for more information.
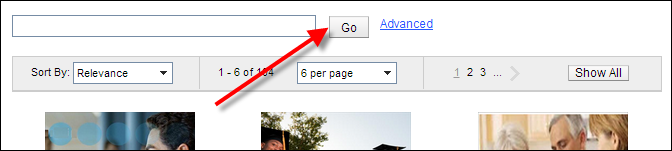
11. In the Search
Button Text text box, enter the text you want the search button
to display (for example, “Go” or “Search”).
12. From the Search
Redirect URL line, click edit.
The Select/Edit Personify Web Parameters screen displays.
a. Click
the select link next to the appropriate PWF parameter.
You should set the PWF parameter to a value that will take the user to
the URL in your site where he/she view his/her search results.
If this PWF parameter does not exist or you would like to create a new
one, see Setting up PWF Parameters for
more information.
Leave this
line blank if search results are displayed on the same page.
13. In the Search
Text Width text box, enter the desired width of the search text
field.
This field defaults to 300, the recommended width.
14. In the Search
Title text box, enter the text displayed before the search box.
If this field is left blank, no text will display.
For example, this text can be “Search” or “Enter your search criteria here”.
The search title differs from the button text because the title comes
before the search field, where the button is clickable and comes after
the search bar.
15. Check the Show
Share Facebook Link checkbox to show the Facebook icon on the Preview window.
Users can click on this icon and share the selected product with their
Facebook friends. When the user clicks this icon, he or she will be required
to log in to Facebook with his/her credentials.
16. Check the Show
Share LinkedIn Link checkbox to show the LinkedIn icon on the Preview window.
Users can click this icon and share the selected product with their LinkedIn
connections. When the user clicks this icon, he/she will be required to
log in to LinkedIn with his/her credentials.
17. Check the Show
Share MailTo Link checkbox to show the envelope icon on the
Preview window.
Users can click on this icon and mail the selected product to whomever
they want. This will open a blank email in the user’s default email system.
18. Check the Show
Share Pinterest Link checkbox to show the Pinterest icon on
the Preview window.
Users can click on this icon to pin the selected product to one of their
Pinterest boards. When the user clicks this icon, he/she will be required
to log in to Pinterest with his/her credentials.
19. Check the Show
Share Twitter Link checkbox to show the Twitter icon on the
Preview window.
Users can click on this icon and Tweet the selected product and share it
with their Twitter followers. When the user clicks this icon, he/she will
be required to log in to Twitter with his/her credentials.
20. As of 7.5.2, check
the Show message for free-shipping eligibility
for INV products checkbox if you want free shipping eligibility
messaging to display below the product image in the product listing. Please
note that this message only displays for INV product that are NOT eligible
for free shipping. For more information, please see Free
Shipping on the Web.
21. In the Width
field, enter the desired width of the product listing.
This field defaults to 650, the recommended width.
22. As of 7.5.1 FP1, Personify
developed its own responsive CSS. If you are using Responsive CSS, from
the Store URL line, click edit.
The Select/Edit Personify Web Parameter screen displays.
i. Click
the select link next to the appropriate PWF
parameter.
You should set the PWF parameter to a value (e.g., Store Landing page)
that will redirect users the Store page's URL when they click the Store
link located on the top and bottom of the page. Please note that these
links only display on mobile devices when using the responsive CSS. See
Setting Up PWF Parameters
to learn more about these parameters and why your website's redirect URLs
are managed there. See Configuring Responsive CSS: Product Listing Page
for more information.
23. As
of 7.5.1 FP1, if
necessary, in the Unique Page Key field, enter a string value.
This field is used to distinguish search terms being used in configurations
where you may have multiple product listing pages. You have a different
Unique Page Key value that drives the appropriate search terms on these
pages.
If this control has been dropped on the same page (e.g., Online Store Landing
page or Product Listing page) as either the Search
control or Navigation Bar control
and the Unique Page Key field has been set for either control, then the
same value must be entered here. The Unique Page Key field's value MUST
be the same for all three controls. For example, if you enter "APAstore"
in this field on the Online Store Landing page for the Search control,
then you should enter "APAstore" on this field for the Navigation
Bar control on the Online Store Landing page and on the Product Listing
control on the Product Listing page.
24. As of 7.5.2, check
the Use Star Rating checkbox if
you want the product's star rating to display on the product listing page.
For more information on product star ratings, please see the Create
Product Review Control Overview.
25. Click
Save.
Control Setting |
Description |
Additional CSS Class for Control |
This option allows you to add additional
layout to the skin by developing a new DOTNETNUKE style, which
requires an advanced understanding of HTML and CSS. |
Error Message |
The error message will display on the
control for the action that was being performed at the time of
the error. If left blank, the default error message, "An
error occurred while performing [Insert Action]. If the problem
persists, please contact the site administrator", will display.
[Insert Action] will be substituted with the action the control
was performing at the time of the error. If you wish to change
the default error message, customize it with a PWF parameter.
See Setting up PWF
Parameters for more information. |
Filter: Category Code(s) |
Enter one or more category codes (comma
separated) to filter the list of products displayed on the page
by category. For example, a set of MBR and MTG products with a
category code of CAREER_STARTER can be listed together on a separate
product listing page.
As
of 7.5.0, the product listing is configurable so that organizations
can have a particular set of filters applied to display only specific
types of products in the listing. For example, your organization
may want to have a "Bookstore" product listing and a
"New Release" product listing. For more information,
please see Filtering
the Online Store Listing by Default. |
Filter: Exclude Primary Member Group |
Select whether or not products belonging
to the organization's primary member group should be excluded
from being displayed on the page. For example, if your organization
has a separate page for memberships that takes users through a
join or renew workflow, you should select to exclude primary member
group products.
As of 7.5.0, the product listing is configurable
so that organizations can have a particular set of filters applied
to display only specific types of products in the listing. For
example, your organization may want to have a "Bookstore"
product listing and a "New Release" product listing.
For more information, please see Filtering
the Online Store Listing by Default. |
Filter: Product Class Code(s) to Exclude |
Enter one or more product class codes
(comma separated) to filter the list of products that should not
be displayed on the page by product class. For example, webinar
meeting products can be shown on a different page than annual
conference meetings based on their product class.
As of 7.5.0, the product listing is configurable
so that organizations can have a particular set of filters applied
to display only specific types of products in the listing. For
example, your organization may want to have a "Bookstore"
product listing and a "New Release" product listing.
For more information, please see Filtering
the Online Store Listing by Default. |
Filter: Product Class Code(s) to Include |
Enter one or more product class codes
(comma separated) to filter the list of products that should be
displayed on the page by product class. For example, webinar meeting
products can be shown on a different page than annual conference
meetings based on their product class.
As of 7.5.0, the product listing is configurable
so that organizations can have a particular set of filters applied
to display only specific types of products in the listing. For
example, your organization may want to have a "Bookstore"
product listing and a "New Release" product listing.
For more information, please see Filtering
the Online Store Listing by Default. |
Filter: Product ID(s) |
Enter one or more product IDs (comma separated)
to filter the list of products displayed on the page by product.
For example, a set of products that cannot be selected by any
other common data can be selected by using the product ID of each
product.
As of 7.5.0, the product listing is configurable
so that organizations can have a particular set of filters applied
to display only specific types of products in the listing. For
example, your organization may want to have a "Bookstore"
product listing and a "New Release" product listing.
For more information, please see Filtering
the Online Store Listing by Default. |
Filter: Subsystem Code(s) |
Enter one or more subsystem codes (comma
separated) to filter the list of products displayed on the page
by subsystem. For example, digital and electronic content delivery
products can be displayed on their own product listing page.
As of 7.5.0, the product listing is configurable
so that organizations can have a particular set of filters applied
to display only specific types of products in the listing. For
example, your organization may want to have a "Bookstore"
product listing and a "New Release" product listing.
For more information, please see Filtering
the Online Store Listing by Default.
 As of 7.6.0, a new online
donation control has been implemented. Therefore, it is recommended
that you filter out the Fundraising subsystem so fundraising gifts
no longer display in the store listing. As of 7.6.0, a new online
donation control has been implemented. Therefore, it is recommended
that you filter out the Fundraising subsystem so fundraising gifts
no longer display in the store listing.
|
Image Directory |
You should set this parameter to the name of the image to display if the
Membership Product does not have a small image defined. The default
is “not_available.gif" file, as shown below, and this ensures
that the image exists in the image directory. If you would like
to change this default image, replace the not_available.gif file in
the image folder with the default image file of your choice.
If this PWF parameter does not exist or you would like to create
a new one, see Setting
up PWF Parameters for more information.
 |
Membership Join URL |
You should set the PWF parameter to a
value that will take the user to the URL that will display all
member products.
If this PWF parameter does not exist or you would like to create
a new one, see Setting
up PWF Parameters for more information.
If left blank, this parameter
will default to the Product Detail Url. |
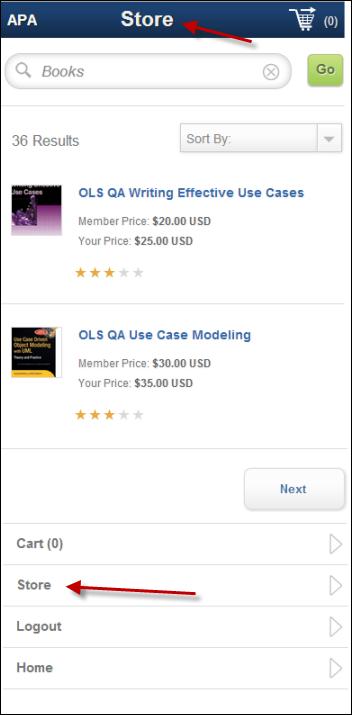
Number of Columns |
Enter the desired number of columns, as
shown below.
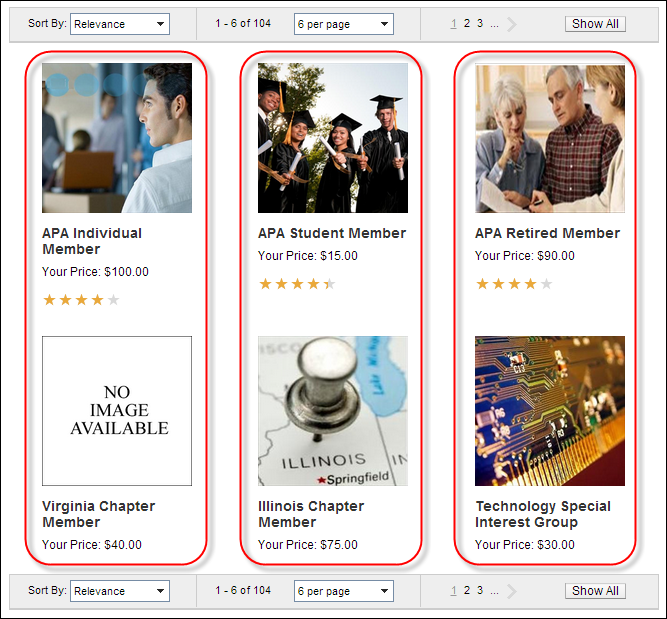
The recommended number is three.
If you add more columns, it will not resize the image, so be mindful
of the real estate this may take up. |
Product Detail URL |
You should set the PWF parameter to a
value (e.g., PRODUCTDETAILS) that will direct the user to the
product details page.
If this PWF Parameter does not exist or you
would like to create a new one, see Setting
up PWF Parameters for more information. |
Product Meeting URL |
You should set the PWF parameter to a
value that will take the user to the URL that will display all
meeting products.
If this PWF parameter does not exist or you would like to create
a new one, see Setting
up PWF Parameters for more information.
If left blank, this parameter
will default to the Product Detail Url. |
ProductID URL Parameter |
Enter "productid".
This is the default name of the parameter to read the product’s
ID, but if the environment's redirection logic uses a different
Query String name set it here. See Setting
up PWF Parameters for more information. |
Search Button Text |
Enter the text you want the search button
to display, as highlighted below (for example, “Go” or “Search”).
 |
Search Redirect URL |
You should set the PWF parameter to a
value that will take the user to the URL in your site where he/she
view his/her search results.
If this PWF parameter does not exist or you would like to create
a new one, see Setting
up PWF Parameters for more information.
Leave this line blank if search
results are displayed on the same page. |
Search Text With |
Enter the desired width of the search
text field.
This field defaults to 300, the recommended width. |
Search Title |
Enter the text displayed before the search
box. If this field is left blank, no text will display.
For example, this text can be “Search” or “Enter your search criteria
here”. The search title differs from the button text because the
title comes before the search field, where the button is clickable
and comes after the search bar. |
Show Share Facebook Link |
Check this checkbox to show the Facebook
icon on the product
Preview window.
Users can click on this icon and share the selected product with
their Facebook friends. When the user clicks this icon, he or
she will be required to log in to Facebook with his/her credentials. |
Show Share LinkedIn Link |
Check this checkbox to show the
LinkedIn icon on the product
Preview window.
Users can click this icon and share the selected product with their
LinkedIn connections. When the user clicks this icon, he/she will
be required to log in to LinkedIn with his/her credentials. |
Show Share MailTo Link |
Check this checkbox to show the
envelope icon on the product
Preview window.
Users can click on this icon and mail the selected product to whomever
they want. This will open a blank email in the user’s default
email system. |
Show Share Pinterest Link |
Check this checkbox to show the Pinterest
icon on the product
Preview window.
Users can click on this icon to pin the selected product to one
of their Pinterest boards. When the user clicks this icon, he/she
will be required to log in to Pinterest with his/her credentials. |
Show Share Twitter Link |
Check this checkbox to show the Twitter
icon on the product
Preview window.
Users can click on this icon and Tweet the selected product and
share it with their Twitter followers. When the user clicks this
icon, he/she will be required to log in to Twitter with his/her
credentials. |
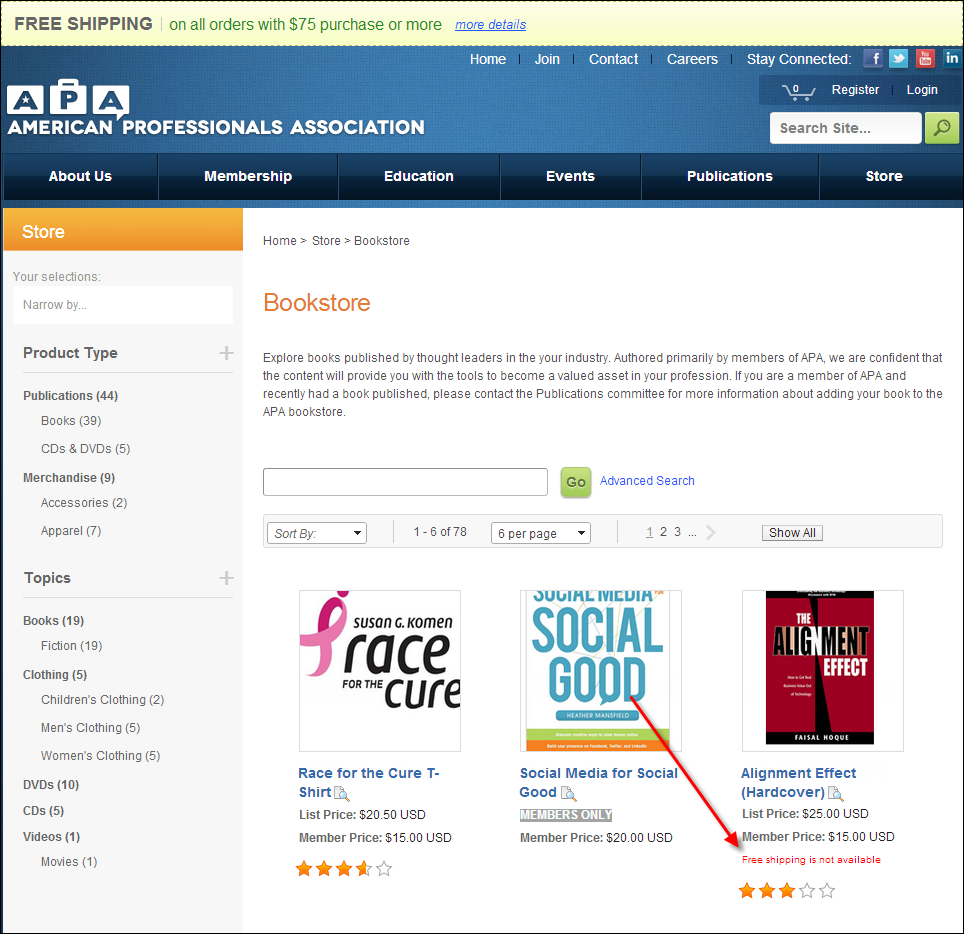
Show message for free-shipping eligibility
for INV products |
As of 7.5.2, check this checkbox if you
want free shipping eligibility messaging to display below the
product image in the product listing, as shown below. Please note
that this message only displays for INV product that are NOT eligible
for free shipping. For more information, please see Free
Shipping on the Web.
|
Width |
Enter the desired width of the product
listing.
This field defaults to 650, the recommended width. |
Store URL |
As of 7.5.1 SP1, Personify developed its
own responsive CSS. If you are using Responsive CSS, you should
set the PWF parameter to a value (e.g., Store Landing page) that
will redirect users the Store page's URL when they click the Store
link located on the top and bottom of the page, as highlighted
below. Please note that these links only display on mobile devices
when using the responsive CSS. See Setting
Up PWF Parameters to learn more about these parameters and
why your website's redirect URLs are managed there. See Configuring
Responsive CSS: Product Listing Page for more information.
 |
Unique Page Key |
As
of 7.5.1 SP1, if
necessary, enter a string value. This field is used to distinguish
search terms being used in configurations where you may have multiple
product listing pages. You have a different Unique Page Key value
that drives the appropriate search terms on these pages.
If
this control has been dropped on the same page (e.g., Online Store
Landing page or Product Listing page) as either the Search
control or Navigation
Bar control and the Unique Page Key field has been set for
either control, then the same value must be entered here. The
Unique Page Key field's value MUST be the same for all three controls.
For example, if you enter "APAstore" in this field on
the Online Store Landing page for the Search control, then you
should enter "APAstore" on this field for the Navigation
Bar control on the Online Store Landing page and on the Product
Listing control on the Product Listing page. |
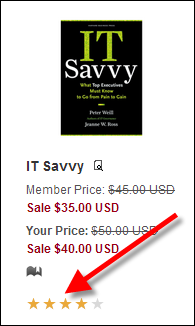
Use Star Rating |
As of 7.5.2, check this
checkbox if you want the product's star rating to display
on the product listing page, as shown below. For more information
on product star ratings, please see the Create
Product Review Control Overview.
 |