Adding a .NET Web Control to a Page using DNN
Before you can add a .NET control to a page on your website, you must
first add the DNN Web Control Container to the page. Be sure to read the
descriptions of each web control to get an idea of what the function is,
how it is displayed on your site, and how to best utilize your control.
To add a .NET web control to a page using DNN:
1. Log into
your site as host.
2. Create
a new page or navigate to an existing page on your site to add the control.
Please refer to Adding a Page on
Your Site Using DNN for more information.
 You have
to set the right page permissions in order for your web users to be able
to view a page in your e-Business site. For example, if you want all users
(registered and non-registered) to be able to view a page, such as online
store, you check the All Users checkbox. If
you just want registered users to be able to view a page, check the Registered Users checkbox. In addition, all IMS
roles are also displayed in the Page Permissions tab and that is why you
see Personify Staff, Personify Member, etc. Please refer to Adding
a Page on Your Site Using DNN for more information.
You have
to set the right page permissions in order for your web users to be able
to view a page in your e-Business site. For example, if you want all users
(registered and non-registered) to be able to view a page, such as online
store, you check the All Users checkbox. If
you just want registered users to be able to view a page, check the Registered Users checkbox. In addition, all IMS
roles are also displayed in the Page Permissions tab and that is why you
see Personify Staff, Personify Member, etc. Please refer to Adding
a Page on Your Site Using DNN for more information.
3. Add the
DNN Web Control Container to the page (see Adding
a DNN Web Control Container Module for more information).
The DNN Web Control Container module displays on the page, as shown below.

 One DNN
Web Control Container must be added per .NET web control. If you want
multiple controls on a page, you will have to drop a DNN container for
each control.
One DNN
Web Control Container must be added per .NET web control. If you want
multiple controls on a page, you will have to drop a DNN container for
each control.
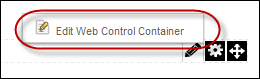
4. Select
the Edit Web Control Container option from the
pencil icon, as highlighted below.
The Select A Web Control window displays, as shown below.
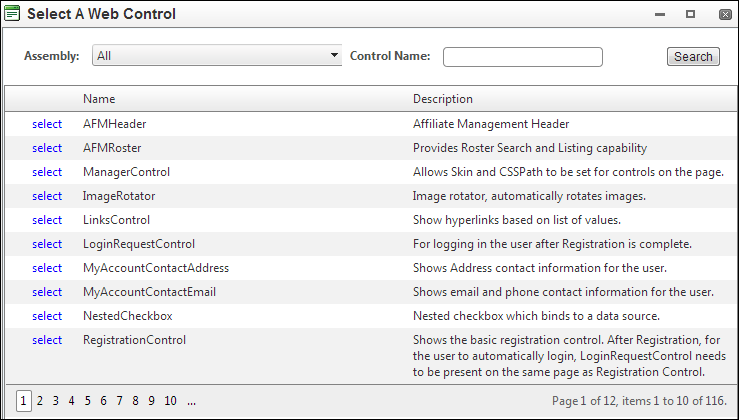
5. Search and select the
.NET web control that you want to render for this module. This will load
all the available settings for this web control. For more information
about each .NET web control and the control's setting, see Using
Web Controls.
If you do
not want the name "DNN Web Container Control" to display on
your e-Business site, uncheck the Display
Container checkbox in the module's settings. For more information,
please see Adding
a DNN Web Control Container Module.
6. Configure
the settings of your selected web control.
7. Click
Save.
You will be taken back to your current designing page . The web control
rendered will be with the control feature that you just set up.
Container Usage Details
The list of the compatible web controls to be used with the container
includes the web controls that are developed with the PersonifyWebStandAlone
attribute.
All
of the compatible web controls also need to be inside an assembly with
the following naming pattern: “.WebControls.*.UI.dll” (i.e., Personify.WebControls.Store.UI.dll).
When
you are choosing a web control for the first time, the container will
load the default values for each control setting if they are available.
After you have completed setup on your first control, the system will
load using the previous settings that you specified. You can also click
“Load Default” to get back to the initial default values.
See Also:
· Adding
a Page to Your Site Using DNN
· Adding
a DNN Web Control Container Module
· Using
DNN as Your CMS Platform