For
a video demonstrating how to create a repeating meeting in Personify360,
please refer to Video
Demo: Creating a Repeating Meeting.
For
a video demonstrating how to create a repeating meeting in Personify360,
please refer to Video
Demo: Creating a Repeating Meeting.As of 7.5.2, you have the ability create a set of meetings that will occur over a period of time and this is known as a repeating meeting. The purpose of the repeating meeting functionality is to provide an efficient way to create meeting products in Personify360 that will occur on the same day and time over an extended period of time. For additional information about repeating meetings, refer to the following sections:
· Logic Behind Creating the Parent and Product Code for Repeating Meetings
· Best Practice Recommendations for the Number of Meetings to be Created at One Time
· Locating the Last Repeating Meeting in a Series
For
a video demonstrating how to create a repeating meeting in Personify360,
please refer to Video
Demo: Creating a Repeating Meeting.
To create a repeating meeting:
1. From the
Personify360 main toolbar, select Products
> Product Central.
The Product Maintenance search screen displays.
2. Click Search to find a product or click Create New Product.
 Repeating
meetings can only be created for parent meeting products. The only parent
meeting products are M, COURSE, and EXAMPROCT.
Repeating
meetings can only be created for parent meeting products. The only parent
meeting products are M, COURSE, and EXAMPROCT.
 As a best
practice, you should always copy the latest version of the meeting in
order to make it recurring. For example, you setup a recurring 12 week
meetings and you want to create the next set of the 12 week meetings,
you would copy the latest version of the meeting in order to extend it.
See Locating
the Last Repeating Meeting in a Series for more information.
As a best
practice, you should always copy the latest version of the meeting in
order to make it recurring. For example, you setup a recurring 12 week
meetings and you want to create the next set of the 12 week meetings,
you would copy the latest version of the meeting in order to extend it.
See Locating
the Last Repeating Meeting in a Series for more information.
3. Since the repeating
meetings functionality uses the Product Copy's screen, from the Related
Task Category, select Copy this product.
The Product Copy screen displays with information on the original product
appearing at the top of the screen.
4. Check the Repeating
checkbox.
Additional tabs are now visible on the Product Copy screen, so you can
define the repeating event's rules, as highlighted below.
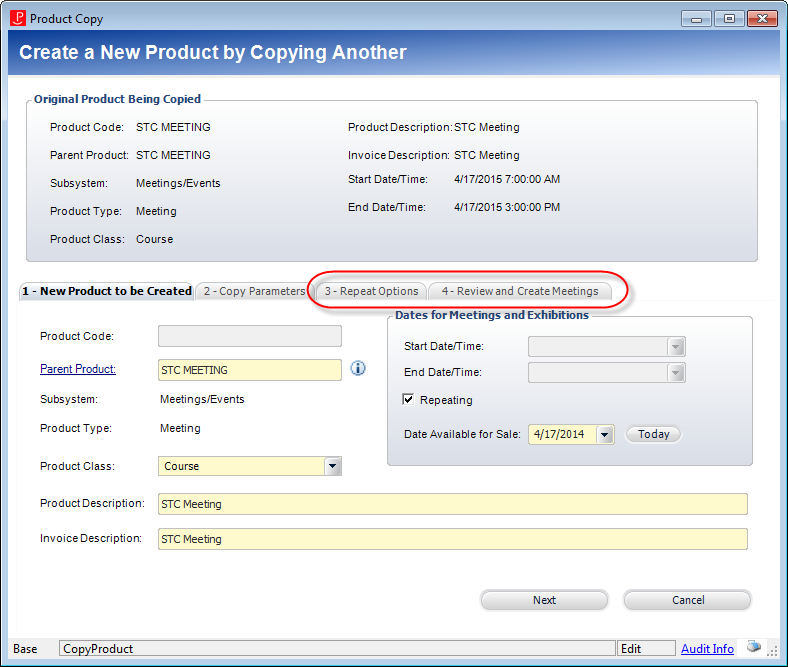
5. Since you checked the Repeating checkbox, the Product Code field is disabled.
6. In the Parent Product field, enter up to 13 characters for the parent product and the system will append 11 characters to the code that will identify the start date and time (military). For more information about this logic, refer to Logic Behind Creating the Parent and Product Code for Repeating Meetings.
When creating
a repeating meeting, the first 13 characters from the meeting product
code will be copied over to the Parent Product field. For example, if
you are creating a repeating meeting for the following meeting: STCMeeting14AUG191630. STCMeeting14AU
would be copied over to the Parent Product field. As a best practice,
you should remove the unnecessary character. In the above example, 14AU
would be removed from the field.
7. Select
the Product Class of the new product.
This value defaults from the original product, but may be changed as needed.
8. Enter
the Product Description and Invoice Description.
These values defaults from the original product, but may be changed as
needed.
9. Since you checked the Repeating checkbox, the Start Date/Time and End Date/Times are disabled. These fields are defined on the 3- Repeat Options tab.
10. If necessary, modify the Date Available for Sale.
11. Click Next.
The Copy Parameters tab display, as shown below.
12. On the 2- Copy Parameters tab, select the appropriate radio button in the System Accounts section.
· Use Default System Account
· Copy System Accounts
13. If necessary,
check the Impose Mask on System Accounts checkbox.
When checked, you must enter a GL account mask. When you enter a GL account
mask, the system will validate that the resulting GL account is a valid
GL account in the FGL_Account_Master table.
If it does not exist in the table, then a warning is issued and the user
must define these accounts manually.
14. From the Recognition Method drop-down, select a value. This field controls how revenue recognition for the order will be handled and the values are populated based on the fixed REVENUE_RECOG_METHOD system type for the MTG subsystem.
15. From the Recognition Date drop-down, select a value.
16. Check the appropriate checkboxes in the Revenue Accounts section.
· Copy Revenue Accounts
· Impose Mask on Revenue Accounts
17. If necessary,
enter the GL Account Mask.
This field is enabled if either of the “Impose Mask” checkboxes are checked.
When checked, it will accept a mask and then update the account based on
this mask. The system must validate that the resulting account is a valid
account. GL account numbers are created with segments that represent the
same type of item for all GL account numbers. You can define the pattern
for the GL account here.
18. From the
Copy Parameters section, check the appropriate checkboxes of the parameters
to copy.
The parameters include the following:
· Rates and Prices
· Components
· Cancellation Fees
· Shipping Fees
· Product Images
· Web Text Info
· Ebus Controls
· Categories/Keywords
· Relationships
19. From the
Copy Subsystem- Specific Parameters section, check the appropriate checkboxes
of the parameters to copy.
The parameters include the following:
· Subproducts
· Meeting Location
· Requirements
· Questionnaire
· Rotating Images
20. Click
Next.
The 3- Repeat Options tab displays, as shown
below.
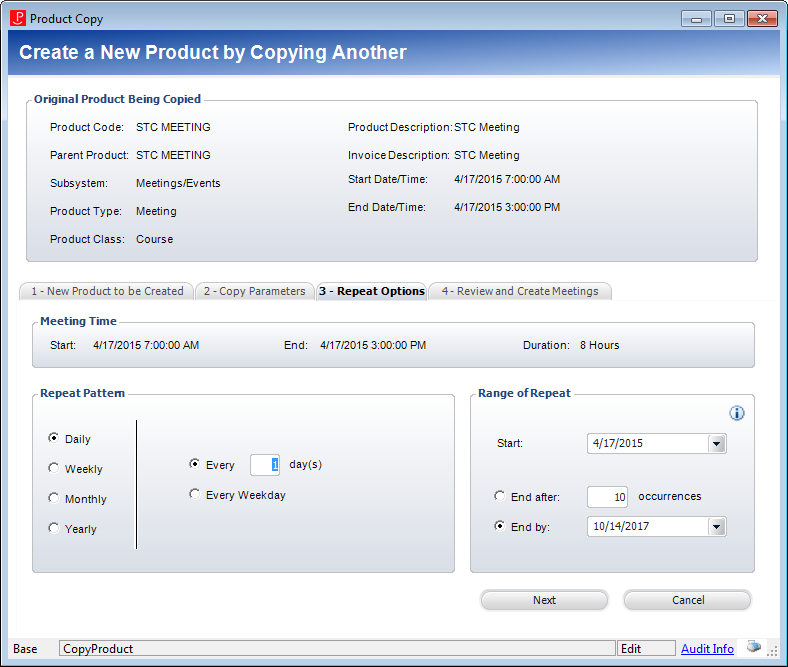
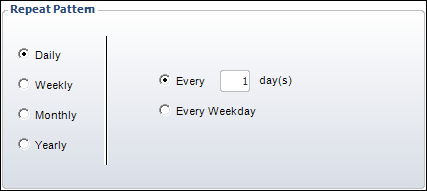
21. In the Repeat Pattern section, select one of the following radio buttons to determine how often you want the meeting to occur:
· Daily
If you select Daily, select one of the following radio buttons:
o Every "N" Day(s): if you want the meeting to occur every "N" amount of days. Enter a numeric value for "N". For example, if you enter "2", the meeting will occur every two days; if you enter "4", the meeting would occur every four days.
o Every Weekday: if you want the meeting to occur Monday thru Friday.
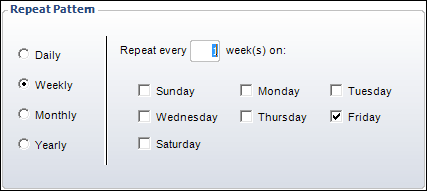
· Weekly
If you select Weekly, enter the following information:
o In the Repeat Every "N" Week(s) On field, enter a numeric value for "N" that indicates how often you want the meetings to occur. For example, if you want the meetings to occur every three weeks, enter "3" in this field.
o Check which day(s) of the week that you would like the meetings to occur. For example, if you want the meetings to occur on Sunday, Tuesday, and Friday, you would check those checkboxes.
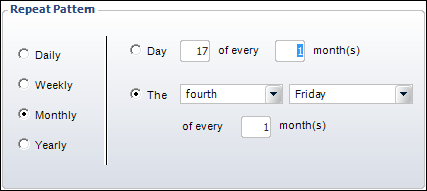
· Monthly
If you select Monthly, select one of the following radio buttons:
o Day "N" of every "X" Month(s): indicates that you want the meetings to occur on the "N" day of every "X" month. Both "N" and "X" are numeric values; "N" equals the day of the month and "X" equals how often. For example, if you want your recurring meetings to occur on the 17th every 3 months, enter 17 for the day and 3 for the month. Please note that if you enter the 31st for the day, since not every month has thirty-one days in it, the system selects the last day in that month. For example, for April, the day that the meeting would occur on is the 30th.
o The "Occurrence" "Day of the Week" of Every "N" Month(s): indicates that you want your meeting to occur on either the first, second, third, fourth, or last day of every "Y" months; "N" is a numeric value and it equals how often. For example, if you want to create a meeting that occurs on the second Monday every three months, from the "Occurrence" drop-down, select "second", from the "Day of Week" drop-down, select "Monday", and in the "N" field, enter "3".
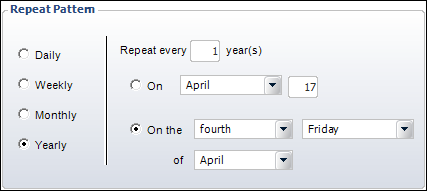
· Yearly
If you select Yearly, enter the following information:
o In the Repeat Every "N" Year(s) field, enter a numeric value for "N" that indicates how often you want the meetings to occur. For example, if you want the meetings to occur every two years, enter "2" in this field.
o Select one of the following radio buttons:
§ On "Month" "Day": indicates the date that you want your meeting to occur every year. For example, if you want your meeting to occur on May 18th every year, from the "Month" drop-down, select May and in the "Day" field enter 18.
§ On the "Occurrence" "Day of Week" of "Month": indicates that you want your meeting to occur yearly on either the first, second, third, fourth, or last day of a specific month. For example, if you want to create a meeting that occurs on the second Monday of November, from the Occurrence drop-down, select "second", from the "Day of Week" drop-down, select "Monday", and from the "Month" drop-down, select November.
22. In the Range of Repeat section, enter the following information:
a. From the Start drop-down, select the date that you want your meeting to start.
By default,
the start date for the repeating meeting will be the date of the meeting
you are copying from.
b. Select one of the following radio buttons:
i. End After "N" Occurrences: the amount of times you would like this meeting to occur; enter a numeric value for "N". For example, if you want the meeting to be over after ten occurrences, enter 10 for this field.
ii. End By: the date that you want your
meetings to end.
The number of years out that a repeating meeting can be created is determined
by the "Maximum Years Out to Create Repeating Meetings" field
on the Meeting Parameters screen. You can only create recurring meetings
up to 5 years out, and in base, this field automatically defaults to 2
years out. See Defining
Organization Unit Meeting Parameters for more information.
By default,
the repeating meetings functionality creates new meetings in batches of
twenty at one time. How fast the meeting products are created is a function
of your organization's network and hardware. On average, it takes about
1 minute to create 300 meetings with basic options. If you choose to copy
images, questions, etc., then it depends on the number of images, size
of the images, location of the application server, etc. for how long it
will take to create the meeting. In addition, it is recommended
that you only create 6 months out for daily occurrences, 12 months out
for weekly occurrences, and 2 years out for monthly occurrences.
23. Click
Next.
The 4- Review and Create Meetings tab displays,
as shown below.
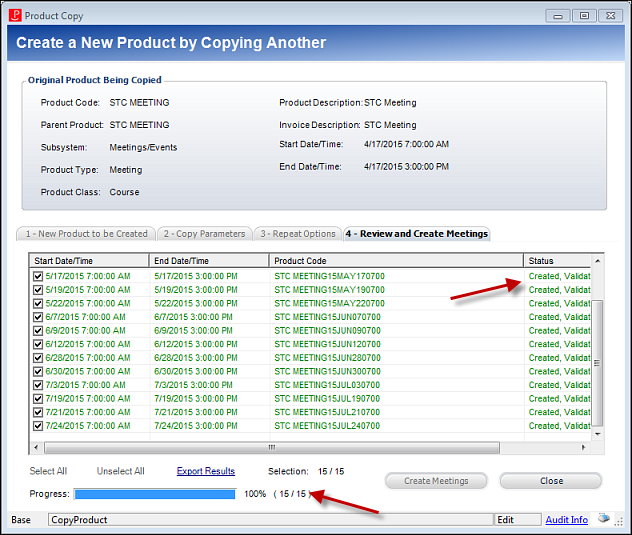
You can use this tab to see the meetings that will be created.
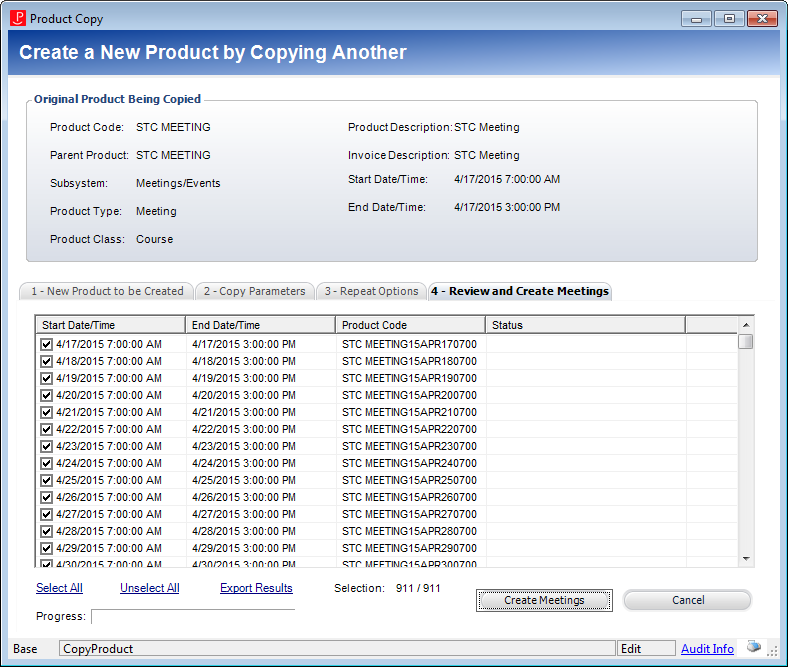
24. Review
all your fields, select/deselect meetings in the grid, and after review,
click the Create Meetings button.
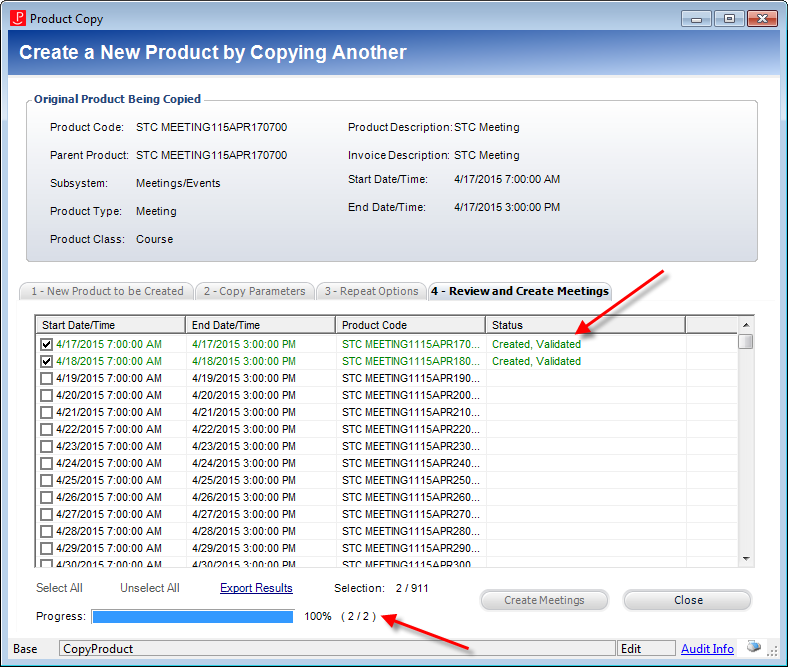
The
status column displays the results. When the system is first creating
the repeating events, a status of "Processing" is displayed.
Once the events are created, a status of "Created, Validated"
or "Created, Not Validated" is displayed for each event. At
the bottom of the screen, a progress bar provides visual confirmation
of progress and a counter tallies total events created along with the
total that will be created.
 Once you
create the repeating meetings, there is no way edit all the meetings in
the series at once; you will have to manually edit each meeting. It is
very IMPORTANT that you verify that the logic is correct for your repeating
meetings before clicking the Create Meetings
button.
Once you
create the repeating meetings, there is no way edit all the meetings in
the series at once; you will have to manually edit each meeting. It is
very IMPORTANT that you verify that the logic is correct for your repeating
meetings before clicking the Create Meetings
button.
The system creates the number of meetings, courses, or proctored exams based on the recurrence pattern and range of recurrence defined on the Repeat Options tab. When each new meeting is being created, if enough information has been copied, that the product can be validated, and the products' validation flag(s) should be updated to "Y". How fast the meeting products are created is a function of your organization's network and hardware. On average, it takes about 1 minute to create 300 meetings with basic options. If you choose to copy images, questions, etc., then it depends on the number of images, size of the images, location of the application server, etc. for how long it will take to create the meeting.
If you have
a meeting product with sessions, you can copy BOTH the meeting and the
session(s). However, this process does not automatically validate the
session product. You still need to click Validate
Setup, as with other product setups, to finalize the product.
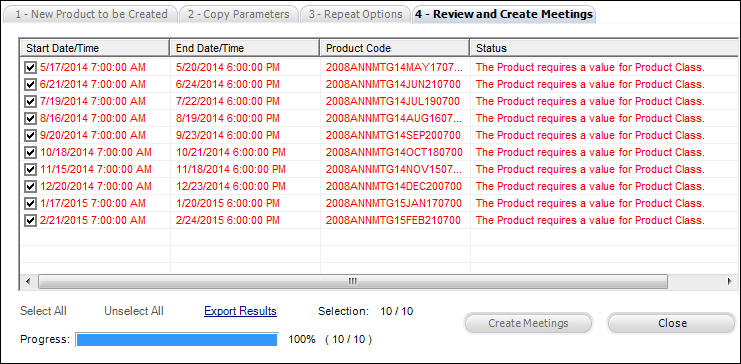
If there
are any issues encountered during the creation of repeating meetings,
the status column will display information about the issue, as shown below,
but will continue creating the next repeating meeting. Some conditions
that may cause the creation of a new meeting record to fail include the
following: using a Parent Product/ Product Code combination that already
exists, trying to create a facility and room reservation for a meeting
that is already booked, etc.
25. If necessary,
click Cancel to stop the creation
of the meeting products that have not been created yet.
A warning message will display asking you to confirm that you want to stop
the process.
26. After the repeating meetings were created, you can perform the following:
a. If necessary, select Export Results to save the results as a comma-separated file.
b. If necessary, double-click on a meeting product in the grid in order to open it in Product Central.
27. Click
Close.
The last meeting that was created in the series will open in Product Central.
Screen Element |
Description |
|---|---|
1 – New Product to be Created tab |
|
Product Code |
Read-only. Since you checked the Repeating checkbox, this field is disabled. |
Parent Product |
Text box. Enter up to 13 characters for the parent product and the system will append 11 characters to the code that will identify the start date and time (military).
Personify360 supports a maximum of 24 characters for parent and product codes. Since it is possible to have the same meeting on the same day (e.g., in the morning and the evening or a half hour apart), start time is part of this code. Therefore, the formula that was implemented for a repeating meeting is the following: · 1-13 characters from meeting being copied
· yymmmddhhmm (11 characters) § 2 digits to represent year § 3 characters to represent three-letter code for month § 2 digits to represent day § 2 digits to represent start time hour in military time § 2 digits to represent start time minutes (00-59)
For example, if you are creating a repeating meeting that occurs on the 14th of every month at 3:30 p.m., the product code calculation would be the following: STC Meeting 14AUG191630. STC Meeting represents the 1-13 characters from the meeting being copied and 14AUG191630 represents yymmmddhhmm.
|
Product Class |
Drop-down. Used to classify any meeting product (master or subproduct) to distinguish between break-out sessions and social events from general sessions. It can also be used to give a discount to a certain class of products. The options available are determined by the Product Type selected. This value defaults from the original product, but may be changed as needed. |
Product Description |
Text box. Enter a description This value defaults from the original product, but may be changed as needed. |
Invoice Description |
Text box. Defaults to the Product Description. If your Product Description is extraordinary long, you can edit the Invoice Description to 50 characters. If the Invoice Description is longer than 50 characters, it will be cropped off the invoice. This value defaults from the original product, but may be changed as needed. |
Start Date/Time |
Since you checked the Repeating checkbox, the Start Date/Time, End Date/Times, and Date Available for Sale fields are disabled. These fields are defined on the 3- Repeat Options tab.
|
Repeating |
Checkbox. As of 7.5.2, this checkbox identifies that the meeting(s) to be created will be repeating events. When this meeting is copied and this checkbox is checked, additional tabs are visible on this screen, so you can define the repeating event rules. This checkbox only displays for meeting products with a Product Type of "M", "Course", or "EXAMPROCT". |
Date Available for Sale |
Drop-down. Select the date that you would like the meeting products to be available for sale. This value defaults from the original product, but may be changed as needed.
|
2- Copy Parameters tab |
|
Use Default System Account |
Radio button. When selected, the system will copy the system accounts defined as default system accounts for the subsystem of the product being copied. |
Copy System Accounts |
Radio button. When selected, the system copies the Product_Account record from the original product. |
Impose Mask on System Accounts |
checkbox. When checked, you must enter
a GL account mask. When you enter a GL account mask, the system
will validate that the resulting GL account is a valid GL account
in the FGL_Account_Master table. |
Recognition Method |
Drop-down. From the Recognition Method drop-down, select a value. This field controls how revenue recognition for the order will be handled and the values are populated based on the fixed REVENUE_RECOG_METHOD system type for the MTG subsystem. Options include the following: · Begin Date: revenue will be recognize at the meeting begin date. · End Date: revenue will be recognize at the meeting end date. · On Invoice: selected by default for meeting products. · On Specific Date: typically not used for meeting products. · At Year End: refers to the fiscal year end; typically not used for meeting products. |
Recognition Date |
Drop-down. This field is only enabled when "On Specific Date" is selected from the Recognition Method drop-down. The Recognition Date field indicates the specific date that revenue should be recognized. After this date, sales transactions will hit the real revenue account rather than the deferred revenue account. |
Copy Revenue Accounts |
checkbox. When checked, the system copies the records from the Product_Revenue_Distribution. |
Impose Mask on Revenue Accounts |
checkbox. When checked, you must enter
a GL Account Mask so the system validates that the resulting account
exists in the Financial and Accounts Receivable system. |
GL Account Mask |
Text box. This field is enabled if either
of the “Impose Mask” checkboxes are checked. |
Rates and Prices |
checkbox. When checked, the rate codes and rate structures from the original meeting product are copied to the new meeting product(s). See Defining Meeting /Session Product Rates and Pricing for more information. |
Components |
checkbox. When checked, if your existing meeting product has components saved to it, the system copies them from the existing meeting to the new meeting being created. Components are products that should be included with the active products at no additional charge. Any product in Personify can be added as a product component. See Defining Meeting/Session Product Components for more information. |
Cancellation Fees |
checkbox. When checked, if your existing meeting product has cancellation fees saved to it, the system copies them from the existing meeting to the new meeting being created. See Defining Meeting/Session Cancellation Fees for more information. |
Shipping Fees |
checkbox. When checked, if your existing meeting product has shipping fees saved to it, the system copies them from the existing meeting to the new meeting being created. See Defining Meeting/Session Shipping Fees for more information.
|
Product Images |
checkbox. As of 7.5.2, when checked, if your existing meeting product has images saved to it, the system copies the image records from the existing meeting to the new meeting being created. For more information about adding images to your meeting product, refer to Adding Online Store Listing Images. |
Web Text Info |
checkbox. When checked, if your existing meeting product has a brief and long web description saved to it, the system copies them from the existing meeting to the new meeting being created. See Adding a Brief Web Description and Adding a Long Web Description for more information. |
Ebus Controls |
checkbox. When checked, if your existing meeting product has fields defined on the eBusiness Control screen, the system copies them from the existing meeting to the new meeting being created. See Defining a Meeting Product to Display on the Web for more information. |
Categories/Keywords |
checkbox. When checked, if your existing meeting product has categories and keywords saved to it, the system copies them from the existing meeting to the new meeting being created. See Defining Categories and Keywords for more information. |
Relationships |
checkbox. When checked, if your existing meeting product has relationships saved to it, the system copies them from the existing meeting to the new meeting being created. Relationships are optional and are setup between the active product, customers, other products, and/or reports. See Membership Product Relationships for more information. |
Subproducts |
checkbox. When checked, the application copies over any meeting sessions. The setup of the sessions remains the same. You may need to update its availability dates to align with the new product. |
Meeting Location |
checkbox. This is the location you selected
within the Meeting Products section of the product’s General Setup
screen. |
Requirements |
checkbox. Requirements are equipment and
services, such as podiums, microphones, coffee service, etc.,
defined for the original product. |
Questionnaire |
checkbox. As of 7.5.2, when checked, if your existing meeting product has a questionnaire attached to it, the system copies the questionnaire from the existing meeting to the new meeting being created. For more information about attaching a questionnaire to your meeting product, refer to Creating a Meeting Product Questionnaire. |
Rotating Images |
checkbox. As of 7.5.2, when checked, if your existing meeting product has images saved to it, the system copies the rotating image records from the existing meeting to the new meeting being created. For more information about adding rotating images to your meeting product, refer to Adding Rotating Images. |
3- Repeat Options tab |
|
Daily |
Radio button. Indicates
that you want to create daily meetings. · Every "N" Day(s): if you want the meeting to occur every "N" amount of days. Enter a numeric value for "N". For example, if you enter "2", the meeting will occur every two days; if you enter "4", the meeting would occur every four days. · Every Weekday: if you want the meeting to occur Monday thru Friday. |
Weekly |
Radio button. Indicates
that you want to create weekly meetings. · In the Repeat Every "N" Week(s) On field, enter a numeric value for "N" that indicates how often you want the meetings to occur. For example, if you want the meetings to occur every three weeks, enter "3" in this field. · Check which day(s) of the week that you would like the meetings to occur. For example, if you want the meetings to occur on Sunday, Tuesday, and Friday, you would check those checkboxes. |
Monthly |
Radio button. Indicates
that you want to create monthly meetings, as shown below. · Day "N" of every "X" Month(s): indicates that you want the meetings to occur on the "N" day of every "X" month. Both "N" and "X" are numeric values; "N" equals the day of the month and "X" equals how often. For example, if you want your recurring meetings to occur on the 17th every 3 months, enter 17 for the day and 3 for the month. Please note that if you enter the 31st for the day, since not every month has thirty-one days in it, the system selects the last day in that month. For example, for April, the day that the meeting would occur on is the 30th. · The "Occurrence" "Day of the Week" of Every "N" Month(s): indicates that you want your meeting to occur on either the first, second, third, fourth, or last day of every "Y" months; "N" is a numeric value and it equals how often. For example, if you want to create a meeting that occurs on the second Monday every three months, from the "Occurrence" drop-down, select "second", from the "Day of Week" drop-down, select "Monday", and in the "N" field, enter "3". |
Yearly |
Radio button. Indicates that you want
your meeting to repeat every year, as shown below. · In the Repeat Every "N" Year(s) field, enter a numeric value for "N" that indicates how often you want the meetings to occur. For example, if you want the meetings to occur every two years, enter "2" in this field. · Select one of the following radio buttons: § On "Month" "Day": indicates the date that you want your meeting to occur every year. For example, if you want your meeting to occur on May 18th every year, from the "Month" drop-down, select May and in the "Day" field enter 18. § On the "Occurrence" "Day of Week" of "Month": indicates that you want your meeting to occur yearly on either the first, second, third, fourth, or last day of a specific month. For example, if you want to create a meeting that occurs on the second Monday of November, from the Occurrence drop-down, select "second", from the "Day of Week" drop-down, select "Monday", and from the "Month" drop-down, select November. |
Start |
Drop-down. Select the date that you want your meeting to start.
|
End After "N" Occurrences |
Radio button. The amount of times you would like this meeting to occur; enter a numeric value for "N". For example, if you want the meeting to be over after ten occurrences, enter 10 for this field.
|
End By |
Radio button. The date that you want your
meetings to end.
|
4- Review and Create Meetings tab |
|
Create Meetings |
Button. Review all your fields, select/deselect
meetings in the grid, and after review, click this button.
The system creates the number of meetings, courses, or proctored exams based on the recurrence pattern and range of recurrence defined on the Repeat Options tab. When each new meeting is being created, if enough information has been copied, that the product can be validated, and the products' validation flag(s) should be updated to "Y". How fast the meeting products are created is a function of your organization's network and hardware. On average, it takes about 1 minute to create 300 meetings with basic options. If you choose to copy images, questions, etc., then it depends on the number of images, size of the images, location of the application server, etc. for how long it will take to create the meeting.
|
Cancel |
Button. Click this button to stop the
creation of the meeting products that have not been created yet. |
Export Results |
Link. Select this link to save the results as a comma-separated file. |