 Master_Customer_ID
and Sub_Customer_ID must exist as the first two columns in the report
in order for the DA query to work.
Master_Customer_ID
and Sub_Customer_ID must exist as the first two columns in the report
in order for the DA query to work.Marketing lists can be populated with customer records based on a predefined Data Analyzer query created using existing Personify360 data. Importing a predefined query uses the MKT510 batch process. This functionality is only available if “Data Analyzer Query” is selected as the Creation Method. The results returned by the Data Analyzer query will create the customers on the marketing list.
The marketing process involves several steps:
1. Define where the list is coming from.
Personify360 can help identify who you wish to communicate to, based on
inputs from a variety of sources (e.g., an event attendee list, a log
of constituents’ opt in requests, or a query for constituents meeting
certain criteria such as location, age, past purchases, etc.).
2. Define
who is in the list.
The first step indicates where the data comes from, but in order to proceed,
a list of names and IDs need to be loaded into a distinct list, which
will be used to create emails, mailing labels, faxes, and/or a file. Each
of the data sources that were defined in the first step may change over
time, so this next step “loads” the list of current names (who is on the
opt in list right now, who was on the most recently purchased list, who
currently meets a query’s criteria, etc.).
3. Produce
the list.
This is where the actual communication occurs. Using the list defined in
the previous step, Personify360 will output emails, label, faxes, and/or
a file that staff can use as a call list. An activity, contact tracking
record, or appeal can be captured on each constituent’s record when this
occurs.
You can use BusinessObjects folders that are referenced by public folders and personal folders to search for the query. For public marketing lists (available to all users in your org/org unit), save your Data Analyzer query in the All > Public Folders > Personify[version] > [Org_OrgUnit] > Marketing Lists folder.
Example:
All > Public Folders > Personify760> NASE_NASE > Marketing
Lists.
For personal marketing lists, save your Data Analyzer query the All > My Favorites folder.
Master_Customer_ID
and Sub_Customer_ID must exist as the first two columns in the report
in order for the DA query to work.
The use of a Data Analyzer query to generate a marketing list gives you the opportunity to create more complex marketing segments as well as retain the query and create additional reports around the data.
If you want to use a Data Analyzer query list with MKT510, you need to create a DA query with only 2 columns - Master_Customer_ID and Sub_Customer_Id in Select if the query has a UNION clause.
If you want to create a query that excludes certain records, then the best practice is to create two lists and use Creation Method of Merge Lists on the List Maintenance screen.
Example:
If you want to pull all clients from Montana but exclude those with advanced
degrees, then create two queries: the first query should include constituents
from Montana and the second should list constituents with advanced degrees.
Use the Marketing module to specify that all constituents from the first
list should be used EXCEPT where those customers are found in the second
list. This approach will provide better performance than trying to exclude
records within a multi-step Data Analyzer query.
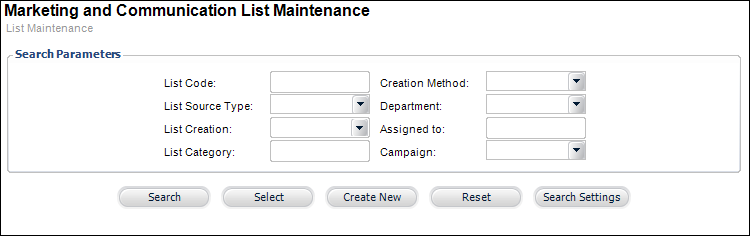
To create a list from a Data Analyzer query:
1. From the
toolbar, select Marketing & Communication >
List Maintenance.
The Marketing and Communication List Maintenance search screen displays,
as shown below.
2. Click
Create New.
The Marketing and Communication List Maintenance List Information screen
displays, as shown below.
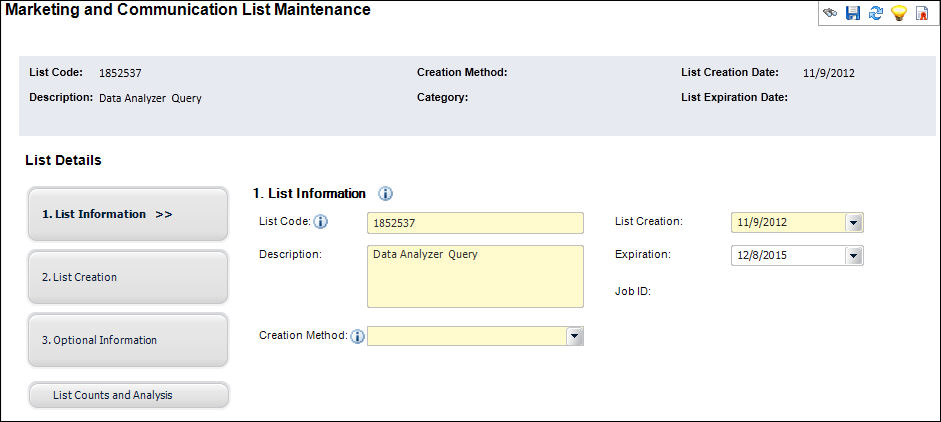
3. Modify the system-generated List Code, if necessary.
4. The List Creation date defaults to today. Change this if necessary.
5. Enter a Description of the list.
6. If necessary, select the list Expiration date from the drop-down.
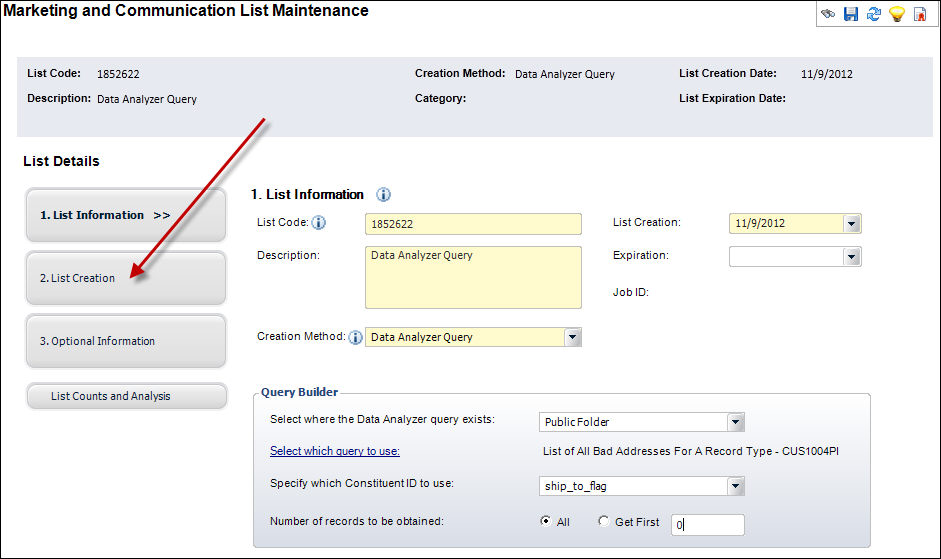
7. From the
Creation Method drop-down, select “Data Analyzer
Query”, as shown below.

When you tab out of the drop-down, the Query Builder section displays,
as shown below.
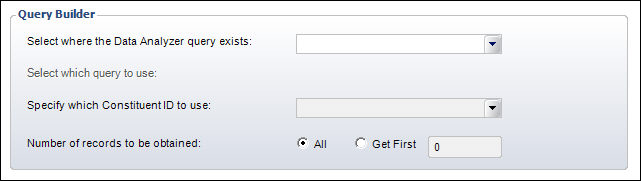
8. Click
the Select where the Data Analyzer query exists
drop-down to select a folder.
If you select "Public Marketing Lists", the Data Analyzer Queries
window will populate with Data Analyzer queries that were saved in Public
Folders > [Environment Folder] > [OrgID_OrgUnit] > Marketing
Lists in Data Analyzer.
If you select "Private Marketing Lists", the Data Analyzer Queries
window will populate with Data Analyzer queries that were saved in the
"My Favorites" folder in Data Analyzer.
9. Click
the Select which query to use link.
The Data Analyzer Queries window appears.
The list of Data Analyzer queries populates based on the folder selected
from the Select where the Data Analyzer query exists drop-down.
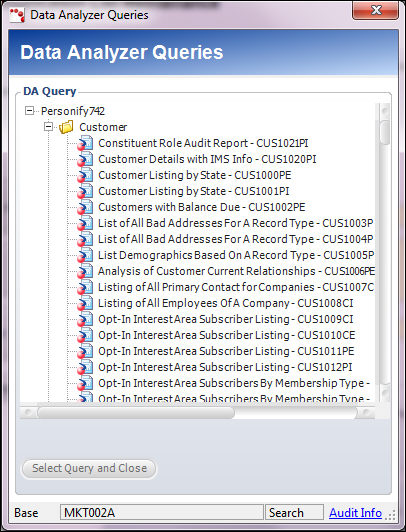
If you cannot
find the DA query you're looking for or want to create a new query, close
this window, and click Launch Data Analyzer
to open Data Analyzer in a new tab. 2. If you create a new query, you
will need to refresh the list on MKT002 when you return. The list of queries
is cached when the Creation Method of Data Analyzer is first selected
and saved. As long as the new webi/query is saved in an appropriate folder,
you can click Get Latest Query Logic to see
it. When a Data Analyzer query is selected, its rules (i.e., the SQL logic)
are saved in the system (when this setup is saved and/or the list is loaded).
This allows the list creation process (MKT510)
to perform quickly, because it does not need to go back to Data Analyzer
to look up the selection criteria. However, there is a chance that what
is stored in the system for this list can become out of synch with changes
made in Data Analyzer. Therefore, you are responsible for using the Get
Latest Query Logic button to synchronize these when appropriate. If a
query that was specified in the past is no longer available (i.e., it
was renamed, removed, etc.), then the SQL will no longer be available.
In that circumstance, you should refresh the query list to see what the
current options are.
If Master
Customer ID and Sub-Customer ID are not defined in the Data Analyzer query
setup, the query will NOT be processed.
10. Select an item from the list and click Select Query and Close.
11. Click the Specify which Constituent ID to use drop-down and select a type of identifier from the list.
12. If necessary, select the number of records to receive by selecting the Get First radio button and entering a number, or you can receive all of the records by selecting All.
13. Click 2.
List Creation, as highlighted below.
The List Creation screen displays, as shown below.
14. Check the Follow “Do Not Solicit” Preferences of Constituents on List checkbox to adhere to the constituent’s contact preferences.
15. Check the Only Include Current Members on the List checkbox to eliminate any constituents from the generated list who are not current members, if necessary.
16. Click the Define
Constituents to Exclude from This List link to search for and select
specific constituents to remove from the generated list, if necessary.
For further instructions on excluding constituents from a list, refer to
Excluding Constituents from a List.
17. Check the Promotional Communication checkbox to indicate that the list is meant to be for a marketing promotion, if necessary.
18. Click the Include or Exclude customers from the Selected Opt-In Interest Areas drop-down to add or remove customers to the list based on interest area, if necessary.
19. Click the Opt-In
Category drop-down to select an area of interest to either include
or exclude customers by, if necessary.
After selecting an opt-in category, the Opt-In Choice drop-down becomes
a required field.
20. Click the Opt-In Choice drop-down to either exclude or include customers based on the specified interest area if necessary.
21. Click the Select
If/How Households Should Appear in the List
drop-down to either include or exclude customers who do not belong to
a household if necessary.
This option is only available if the “Use Householding” app parameter =
Y.
See Householding
for more information.
22. Save your changes.
At this point,
you can create your list by clicking the Create List button, or you can
proceed to add additional information.
23. Click 3.
Optional Information as shown below.
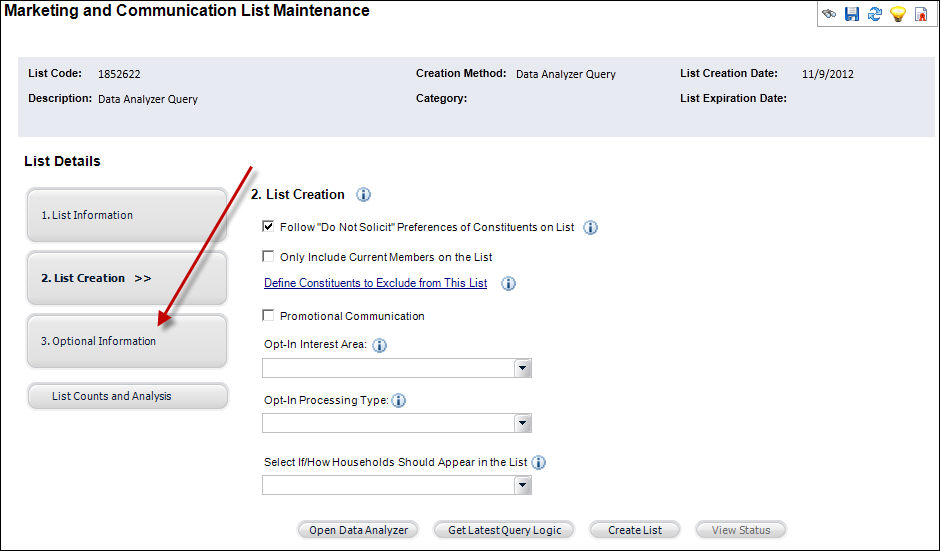
The Optional Information screen displays, as shown below.
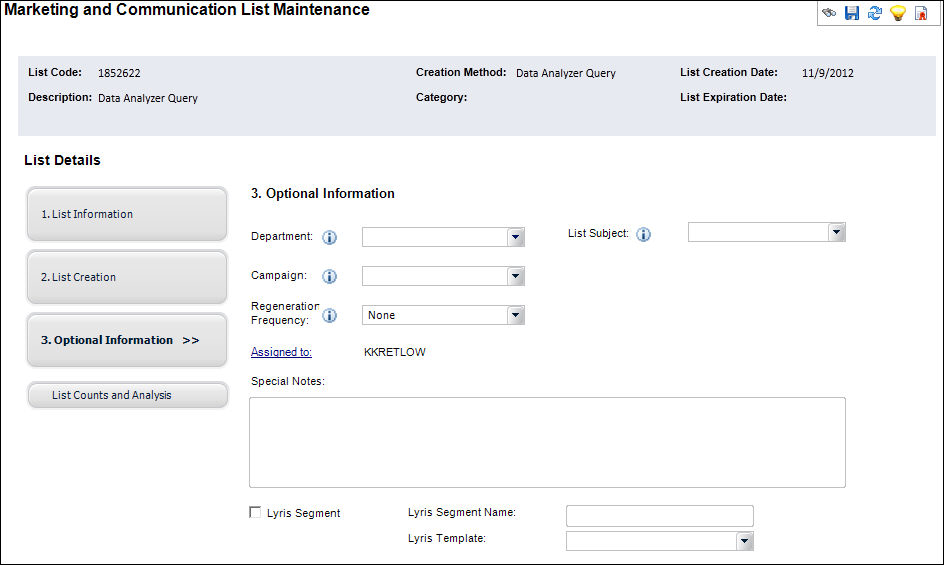
24. Select the department code or the name of the department that owns the list from the Department drop-down, if necessary.
25. Select a subject from the List Subject drop-down to better categorize your list, if necessary.
26. Click the Campaign link to select how you want this list to be used to target customers, if necessary.
27. Select an option from the Regeneration Frequency drop-down to define how often the list will regenerate so that it has the most up-to-date customer information, if necessary.
If you select
a regeneration frequency of ALWAYS, any time MKT600 is run in the future,
it will also regenerate any marketing list with a regeneration frequency
of ALWAYS.
28. Click the Assigned to link and select a different user to assign the list to, if necessary.
29. Add any additional information in the Special Notes text box, if necessary.
30. Check the Lyris
Segment checkbox if your list is a segment of a larger list.
This value is only available if you are integrating with Lyris.
31. Enter a Lyris
Segment Name to be identifiable when searching for it in Lyris.
This value is only available if you are integrating with Lyris.
32. Select a Lyris
Template to be used if the list is going to be sent to Lyris.
The template maps to the Interface Setup screen. This value is only needed
if you are integrating with Lyris.
33. Click 2. List Creation.
34. Click Create
List.
The system runs the MKT500 batch
process. A confirmation pop-up window displays asking you if you wish
to review the status of the job.
If any changes
were made to the Data Analyzer query, such as dates, the list will not
load the new data and you must create a new list.
35. Click Yes if you want to review the status.
At any time,
you may also click View Status to review the status.
The Submission Status screen displays.
On this screen, you can view the parameters used, the status of the job,
and the output for the job.
Screen Element |
Description |
|---|---|
List Information Screen |
|
List Code |
Text field. This unique code identifies the marketing list throughout Personify360. While the system captures the list code when you record it on the Order Entry screen and assigns the list code to a specific group of customers and prospects, you can change the code here. The list code helps determine if a person from a specific list responds to a specific appeal. The system uses the list code to perform an ad hoc analysis of the results from one or more lists. This code cannot exceed 24 characters. |
List Creation |
Drop-down. Displays the date the list was created. This field defaults to the current date, but you can change the date by clicking the drop-down to select from that calendar. Once the information is saved, you can no longer edit this field. |
Description |
Text field. Enter a description for the list. This field is required to generate a list. |
Expiration |
Drop-down. Displays the date the list will expire. Click the drop-down to specify a date for users to discontinue using the list. This field is optional. |
Creation Method |
Drop-down. Click the drop-down to select a type of list. Your selection will affect the fields that display. Options include: · Data Analyzer Query – Select this option if you want to import an existing list of customers/prospects from Data Analyzer. · Customer Import – Select this option if you want to import an existing CSV file that contains the master_customer_id or sub_customer_id for customer records in Personify360. · Prospect Import List – Select this option if you want to import an electronic data file that contains customer information for prospects outside of Personify360. Typically, this data is purchased from a third party and has rules about how often an organization can communicate to the prospects on the list. · Opt-In List – Select this option when the customers on your marketing list will be selected from customers on an opt-in list. · Merged Lists – Select this option to create a new list from combining existing marketing lists. You can add or exclude customers from the new list you create.
Values in the drop-down are populated based on the fixed codes defined for the MKT "CREATION_METHOD" system type. |
Job ID |
Read-only. When the MKT_List_Master.SUBMITTED JOB ID is not null, the value in this field is displayed as read-only data. |
Query Builder Section |
|
Select where the Data Analyzer query exists |
Drop-down. If you select "Public Marketing Lists", the Data Analyzer Queries window, launched via the Select which query to use link, will populate with Data Analyzer queries that were saved in the following location in Data Analyzer: Public Folders > [Environment Folder] > [OrgID_OrgUnit] > Marketing Lists. For example: Public Folders > PPRO > NSSWP_NSSWP > Marketing Lists.
If you select "Private Marketing Lists", the Data Analyzer Queries window, launched via the Select which query to use link, will populate with Data Analyzer queries that were saved in the "My Favorites" folder in Data Analyzer.
As of 7.4.1SP1, if you select "Public Folder", the Data Analyzer Queries window, launched via the Select which query to use link, will populate with Data Analyzer queries that were saved in the Public Folders folder in Data Analyzer. For example: Public Folders > Personify741 > Customers > Customer Listing by State. |
Select which query to use |
Link. This link becomes active after selecting where the Data Analyzer query exists. Please note that if you cannot find the DA query you're looking for or want to create a new query, close this window, and click Launch Data Analyzer to open Data Analyzer in a new tab. If you create a new query, you will need to refresh the list on MKT002 when you return. The list of queries is cached when the Creation Method of Data Analyzer is first selected and saved. As long as the new Webi/query is saved in an appropriate folder, you can click Get Latest Query Logic to see it. When a Data Analyzer query is selected, its rules (i.e., the SQL logic) are saved in the system (when this setup is saved and/or the list is loaded). This allows the list creation process (MKT510) to perform quickly, because it does not need to go back to Data Analyzer to look up the selection criteria. However, there is a chance that what is stored in the system for this list can become out of synch with changes made in Data Analyzer. Therefore, you are responsible for using the Get Latest Query Logic button to synchronize these when appropriate. If a query that was specified in the past is no longer available (i.e., it was renamed, removed, etc.), then the SQL will no longer be available. In that circumstance, you should refresh the query list to see what the current options are. |
Specify which Constituent ID to use |
Drop-down. Click the drop-down to select the constituent ID to use. Options include master_customer_id and sub_customer_id. |
Number of records to be obtained |
Radio buttons. Select the All radio button to generate all of the records, or you can select the Get First radio button, then specify a number in the field to only receive a few records. |
List Creation Screen |
|
Follow "Do Not Solicit" Preference of Constituents on List |
Checkbox. When selected, the upload process does not create a record for customers/prospects who have indicated that they do not want to be contacted. If these customers/prospects have opted out of communication with the company, no promotional requests on this customer/prospect are permitted. This option is available for all lists except Prospect Import Lists. |
Only Include Current Members on the List |
Checkbox. This serves as an additional filter for lists being created from the MKT002 screen. If this flag is checked, the system will eliminate any constituents from the generated list who are not current members. |
Exclude These Constituents from This List/Define Constituents to Exclude from This List |
Link. Click to display the Constituents Excluded from List (MKT002X) window. This option allows you to exclude ship-to (order) or bill-to (donation) customers from your list who have purchased a product, campaign, fund, or appeal within the fiscal year, calendar year, or the last six months. The link will display as “Define Constituents to Exclude from This List” if no rules to exclude customers have been defined for the list. This link will not appear for Prospect Import Lists, or for merged lists that are composed of only Prospect Import Lists. |
Promotional Communication |
Checkbox. When selected, this option identifies a list as being used to send promotional communication and automatically checks the “Exclude Do Not Call” checkbox on the Generate List Communication (MKT006) screen. Customers who requested to not receive promotional communications (checked the “Do Not Call” checkbox) will be dropped from this list when running the MKT800 communication-generation batch process. This checkbox is used for customers who have specified specific methods in which to not receive solicitations, whereas the Exclude Removal checkbox is used for customers who requested to receive no solicitations at all. |
Include or Exclude Customers from the Selected Opt-In interest Area |
Drop-down. Click the drop-down to select whether to include or exclude customers based on the opt-in interest area specified in the Opt-In Category drop-down. Values are Include and Exclude. |
Opt-In Category |
Drop-down. Select this option if you want to either include or exclude customers based on their opt-in interest area. Selecting an option in the drop-down will render the Opt-In Choice drop-down mandatory for saving or processing your record. Values in the drop-down are populated based on the non-fixed codes defined for the CUS "OPT_IN_INTEREST_AREA" system type. |
Opt-In Choice |
Drop-down. Select this option to specify the opt-in category to either include or exclude customers from the list by. |
Select If/How Households Should Appear in the List |
Drop-down. If you are using Personify360’s householding feature, you can specify whether the marketing list should contain only households or households and individuals. If you select Households Only, a customer who does not belong to a household will not appear in the list. This option is only displayed if the “Use Householding” app parameter = Y. Values in the drop-down are populated based on the fixed codes defined for the MKT "HOUSEHOLD_INCLUSION_RULE" system type. |
Open Data Analyzer |
Button. If you cannot find the Data Analyzer query you are looking for, or you want to create a new query click this button to open the Data Analyzer Infoview homepage.
|
Get Latest Query Logic |
Button. The list of queries is cached when the creation method Data Analyzer is first selected and saved. As long as the new Webi/query is saved in an appropriate folder, you can click Get Latest Query Logic to see it. When a Data Analyzer query is selected, its rules (i.e., the SQL logic) are saved in the system (when this setup is saved and/or the list is loaded). This allows the list creation process (MKT510) to perform quickly, because it does not need to go back to Data Analyzer to look up the selection criteria. However, there is a chance that what is stored in the system for this list can become out of synch with changes made in Data Analyzer. Therefore, you are responsible for using the Get Latest Query Logic button to synchronize these when appropriate. If a query that was specified in the past is no longer available (i.e., it was renamed, removed, etc.), then the SQL will no longer be available. In that circumstance, you should refresh the query list to see what the current options are.
|
Create List |
Button. The system runs the MKT500 batch process. A confirmation pop-up window displays asking you if you wish to review the status of the job. Click Yes if you want to review the status. |
View Status |
Button. Click to display the Submission Status screen. You can select your job from the queue and export it for viewing and printing. |
Optional Information Screen |
|
Department |
Drop-down. Select the department code or the name of the department that owns the list. The code is used to categorize the list to facilitate an easier search for one list among many in an organization. This information is used for reporting purposes only. Values in the drop-down are populated based on the non-fixed codes defined for the MKT "DEPARTMENT" system type. |
List Subject |
Drop-down. Select a user-defined code to further define the list. For example, Annual Conference or Membership. Values in the drop-down are populated based on the non-fixed codes defined for the MKT "LIST_SUBJECT" system type. |
Campaign |
Link. Select how you want this list to be used to target customers. For example, the list could be used to contact a group of customers to inform them of a fundraising campaign.
|
Regeneration Frequency |
Drop-down. Select an option to define
how often the list will regenerate so that it has the most up-to-date
customer information. If you schedule the job here, you must verify
the MKT600
batch job is running using the Job Submission screen.
Values in the drop-down are populated based on the fixed code defined for the MKT "REGENERATION_FREQUENCY" system type. |
Assigned to |
Link. This field defaults to the logged in user. If necessary, click the link and select a different user. |
Special Notes |
Text field. Enter any extra notes you want to record about this list. |
Lyris Segment |
Checkbox. This identifies whether the list is a segment of a larger list. This value is only needed if you are integrating with Lyris. For more information, see the Sending a List to Lyris and Personify360/Lyris ListManager Interface Overview sections. |
Lyris Segment Name |
Text field. This is the unique name you give the list so as to be identifiable when searching for it in Lyris. This value is only needed if you are integrating with Lyris. For more information, see the Sending a List to Lyris and Personify360/Lyris ListManager Interface Overview sections. |
Lyris Template |
Drop-down. This is the template to be used when the list is sent to Lyris. The template maps to the Interface Setup screen. This value is only needed if you are integrating with Lyris. Values are populated based on the non-fixed MKT "LYRIS_TEMPLATE" system type. For more information, see the Sending a List to Lyris and Personify360/Lyris ListManager Interface Overview sections. |
See Also:
· Creating a Customer Import List
· Creating a List from an External File
· Creating a List based on Customer Interest Areas
· Viewing List Counts and Analysis
· Excluding Constituents from a List
 To
see a video demonstration on creating a marketing list from a Data Analyzer
query, please see Video
Demo: Creating a List from a Data Analyzer Query.
To
see a video demonstration on creating a marketing list from a Data Analyzer
query, please see Video
Demo: Creating a List from a Data Analyzer Query.