 To
see a video demonstration on importing a prospect list into Personify360
from start to finish, please see the Video Demo: Importing
a Prospect List.
To
see a video demonstration on importing a prospect list into Personify360
from start to finish, please see the Video Demo: Importing
a Prospect List.From the Marketing and Communication List Maintenance screen, you can import list information from an outside source into Personify. Purchased lists may come in fixed record length or character-delimited files. These files may consist of lists of companies or individuals. You can create records for one or both record types. For example, if an address is received with both an individual and a company name linked to it, Personify can create both an individual and a company record for the same address.
After defining the list and the associated rules on these screens, you can load the list and the prospect records into Personify. Prospect records created in the Personify application work similar to the way uploading customer records created in the application works.
Importing an external file from the Marketing and Communication List Maintenance screen runs the MKT500 batch process. This functionality is only available if "Prospect List Import" is selected as the Creation Method.
 To
see a video demonstration on importing a prospect list into Personify360
from start to finish, please see the Video Demo: Importing
a Prospect List.
To import from an external file:
1. The following instructions assumes that you have already created a list mapping. For more information, please see Creating a New List Mapping Template.
2. From the
toolbar, select Marketing & Communication >
List Maintenance.
The Marketing and Communication List Maintenance screen displays, as shown
below.

3. Click
Create New.
The List Information step displays, as shown below.

4. Modify the system-generated List Code, if necessary.
5. Enter a Description of the list.
6. If necessary, select the list Expiration date from the drop-down.
7. From the
Creation Method drop-down, select "Prospect
List Import", as shown below.

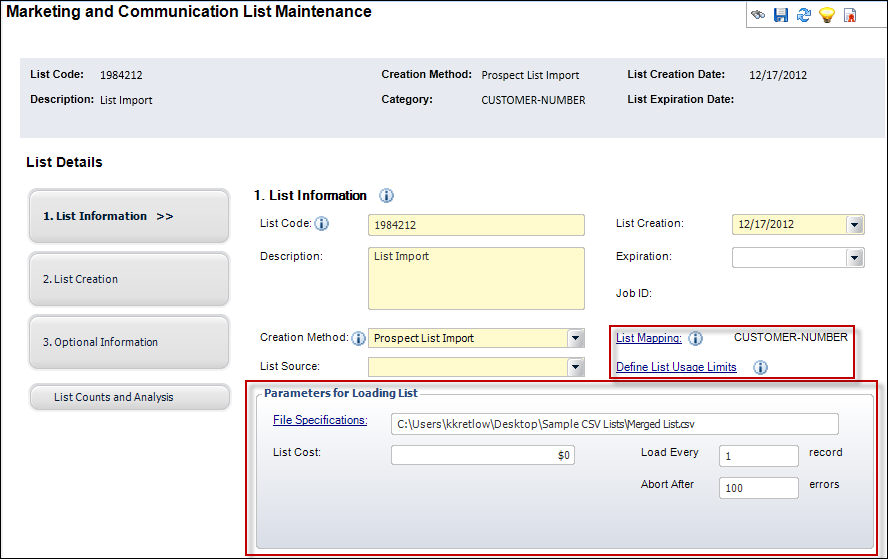
When you tab out of the drop-down, the Parameters for Loading List section
displays, as well as the List Source
field, and the List Mapping and
Define List Usage Limits links,
as shown below.

8. Click
the List Mapping link to select
a mapping template, if necessary.
Available mappings are defined on the External Prospect List Mapping screen.
For more information, please see Creating
a New List Mapping Template.
9. Select
the List Source from the drop-down.
Please note that this MUST match the List Source defined for the selected
List Mapping.
10. Click
the Define List Usage Limits link to limit the
number of times a customer can be contacted based on this list.
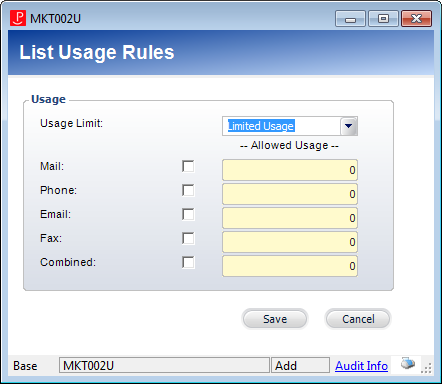
The List Usage Rules window appears, as shown below.

a. If you want to limit the distribution of the list by contact type, select the Usage Limit from the drop-down.
b. Check
the checkbox next to the desired communication type and enter a number
in the text field.
The number will indicated the amount of times a constituent will be able
to be contacted in this method.
c. Click Save.
11. Click
the File Specifications link.
The Open window screen displays.
12. Search and select the appropriate source file.
 The system
only supports CSV and TXT input files.
13. If necessary, enter the List Cost.
14. Enter
the Load Every [number] record.
This specifies that only the specified numbered record from the flat file
needs to be loaded in the list. If no value is specified for this parameter,
then the default value is “1” and all the records in the flat file are
loaded into the list.
15. Enter
the Abort After [number] errors.
This specifies the number of initial records that can result in error before
the process terminates. The process aborts in failure if the number of
records rejected exceeds the value entered in this field.
16. Save your changes.
17. Click
2. List Creation,
as highlighted below.

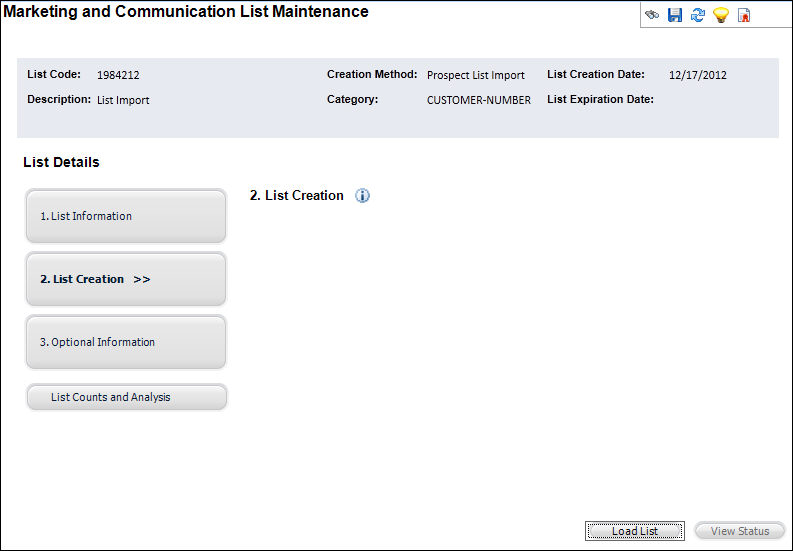
The List Creation screen displays, as shown below.

18. Save your changes.
 At this point,
you can create your list by clicking the Load
List button, or you can proceed to add additional information.
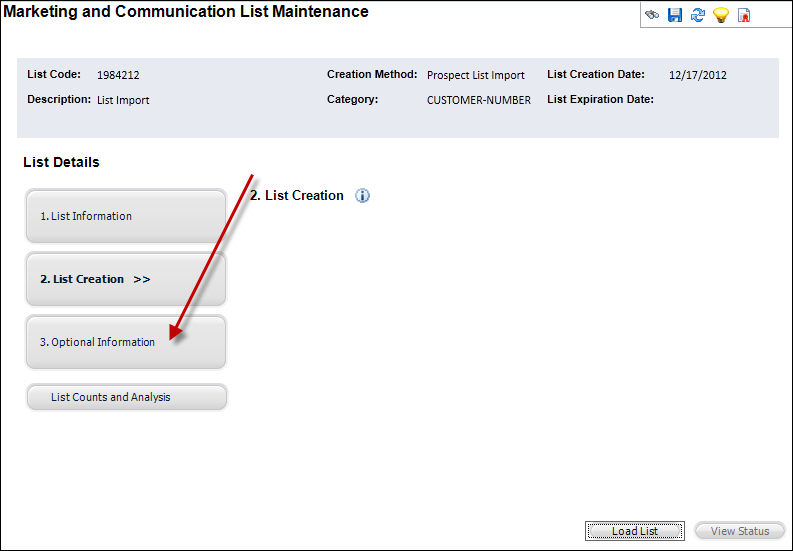
19. Click 3.
Optional Information,
as highlighted below.

The Optional Information screen displays, as shown below.

20. Select the department code or the name of the department that owns the list from the Department drop-down, if necessary.
21. Select a subject from the List Subject drop-down to better categorize your list, if necessary.
22. Click the Campaign link to select how you want this list to be used to target customers, if necessary.
23. Select an option from the Regeneration Frequency drop-down to define how often the list will regenerate so that it has the most up-to-date customer information, if necessary.
 If you select
a regeneration frequency of ALWAYS, any time MKT600
is run in the future, it will also regenerate any marketing list with
a regeneration frequency of ALWAYS.
24. Click the Assigned to link and select a different user to assign the list to, if necessary.
25. Add any additional information in the Special Notes text box, if necessary.
26. Check the Lyris
Segment checkbox if your list is a segment of a larger list.
This value is only available if you are integrating with Lyris.
27. Enter a Lyris
Segment Name to be identifiable when searching for it in Lyris.
This value is only available if you are integrating with Lyris.
28. Select a Lyris
Template to be used if the list is going to be sent to Lyris.
The template maps to the Interface Setup screen. This value is only needed
if you are integrating with Lyris.
29. Click 2. List Creation.
30. Click Load
List.
The system runs the MKT500 batch
process. A confirmation pop-up window displays asking you if you wish
to review the status of the job.
31. Click Yes if you want to review the status.
 At any time,
you may also click View Status
to review the status.
The Submission
Status screen displays.
On this screen, you can view the parameters used, the status of the job,
and the output for the job.
Screen Element |
Description |
|---|---|
List Information Screen |
|
List Code |
Text field. This unique code identifies the marketing list throughout Personify. While the system captures the list code when you record it on the Order Entry screen and assigns the list code to a specific group of customers and prospects, you can change the code here. The list code helps determine if a person from a specific list responds to a specific appeal. The system uses the list code to perform an ad hoc analysis of the results from one or more lists. This code cannot exceed 24 characters. |
List Creation |
Drop-down. Displays the date the list was created. This field defaults to the current date, but you can change the date by clicking the drop-down. Once the information is saved, you can no longer edit this field. |
Description |
Text field. Enter a description for the list. This field is required to generate a list. |
Expiration |
Drop-down. Displays the date the list will expire. Click the drop-down to specify a date for users to discontinue using the list. This field is optional. |
Creation Method |
Drop-down. Click the drop-down to select a type of list. Your selection will affect the fields that display. Options include: · Data Analyzer Query – Select this option if you want to import an existing list of customers/prospects from Data Analyzer. · Customer Import – Select this option if you want to import and existing CSV file that contains the master_customer_id or sub_customer_id for customer records in Personify. · Prospect Import List – Select this option if you want to import an electronic data file that contains customer information for prospects outside of Personify. Typically, this data is purchased from a third party and has rules about how often an organization can communicate to the prospects on the list. · Opt-In List – Select this option when the customers on your marketing list will be selected from customers on an opt-in list. · Merged Lists – Select this option to create a new list from combining existing marketing lists. You can add or exclude customers from the new list you create.
Values in the drop-down are populated based on the fixed codes defined for the MKT "CREATION_METHOD" system type. |
Job ID |
Read-only. When the MKT_List_Master.SUBMITTED JOB ID is not null, the value in this field is displayed as read-only data. |
List Mapping |
Link. Mapping is only required if the marketing list is being created as a Prospect Import List. This is selected from the category defined for the list mapping, where fields in the data file are mapped to fields in Personify's Mkt_Prospect table. Available mappings are defined on the External Prospect List Mapping screen. For more information, please see Creating a New List Mapping Template. |
List Source |
Link. You can define if the list comes from your Personify database or if the list was purchased from an external vendor. This information is used for reporting purposes only. Values are populated based on the non-fixed MKT "LIST_SOURCE" system type. |
Define/View List Usage Limits |
Link. Click to display the List Usage Rules window [MKT002U]. You can select options on this window to limit the number of times, and the method by which customers are contacted based on this list. |
List Usage Rules Window |
|
Usage Limit |
Drop-down. This fixed code indicates the usage limit of the marketing list in terms of the communication type. It has the following possible values: · Limited - The list has limited usage for marketing purposes. Personify uses the mail, phone, email, and fax communication types on a limited basis. Enter the permitted number of instances of the communication type in the appropriate field. · Mixed - If one of the lists being combined has a Usage Limit code as “Unlimited” and the others have “Limited,” then the Usage Limit is set to “Mixed.” If applicable, enter the permitted number of instances of the communication type in the appropriate field. · Unlimited - The list has unlimited usage for marketing purposes. Personify uses the mail, phone, email, and fax communication types on an unlimited basis. If all the lists being merged have the Usage Limit code as “Unlimited,” then the other Usage fields are disabled.
Values in the drop-down are populated based on the fixed codes defined for the MKT "USAGE_LIMIT" system type. |
Checkbox and text box. This indicates that the records can be used for mailings. For a “Limited” or “Mixed” usage, enter the allowed number of mailings for a person on this list. |
|
Phone |
Checkbox and text box. This indicates that the records can be used for phone or telemarketing contacts. For a “Limited” or “Mixed” usage, enter the allowed number of phone calls for this list. |
Checkbox and text box. This indicates that the records can be used for email contacts. For a “Limited” or “Mixed” usage, enter the allowed number of email messages to be sent to a person on this list. |
|
Fax |
Checkbox and text box. This indicates that the records can be used for fax contacts. For a “Limited” or “Mixed” usage, enter the allowed number of faxes for a person on this list. |
Combined |
Checkbox and text box. This indicates that the records can be used for a combination of contacts for marketing purposes. For a combined use, enter the total number of allowed combinations of mail, phone, email, and fax communication types for this list. |
Parameters for Loading List Section |
|
File Specifications |
Link. Click the link to select a customer list to import. This file must be in a CSV format. This link appears after selecting the CUS_IMPORT Customer ID Upload option from the Creation Method drop-down. |
List Cost |
Text field. Enter a cost for procuring the marketing list. This field appears after selecting the CUS_IMPORT Customer ID Upload option from the Creation Method drop-down. |
Load Every |
Text field. Enter a number to randomize the records the system loads. For example, if you enter 7, the system will load every 7th record. The default value is “1” and all the records in the flat file are loaded into the list unless otherwise specified. This field appears after selecting the CUS_IMPORT Customer ID Upload option from the Creation Method drop-down. |
Abort After |
Text field. Enter the number of initial records that can result in error before the process terminates. The process aborts in failure if the number of records rejected exceeds the value entered in this field. This field appears after selecting the CUS_IMPORT Customer ID Upload option from the Creation Method drop-down. |
List Creation Screen |
|
Load List |
Button. The system runs the MKT500 batch process. A confirmation pop-up window displays asking you if you wish to review the status of the job. Click Yes if you want to review the status. |
View Status |
Button. Click to display the Submission Status screen. You can select your job from the queue and export it for viewing and printing. |
Optional Information Screen |
|
Department |
Drop-down. Select the department code or the name of the department that owns the list. The code is used to categorize the list to facilitate an easier search for one list among many in an organization. This information is used for reporting purposes only. Values in the drop-down are populated based on the non-fixed codes defined for the MKT "DEPARTMENT" system type. |
List Subject |
Drop-down. Select a user-defined code to further define the list. For example, Annual Conference or Membership. Values in the drop-down are populated based on the non-fixed codes defined for the MKT "LIST_SUBJECT" system type. |
Campaign |
Link. Select how you want this list to be used to target customers. For example, the list could be used to contact a group of customers to inform them of a fundraising campaign.
|
Regeneration Frequency |
Drop-down. Select an option to define
how often the list will regenerate so that it has the most up-to-date
customer information. If you schedule the job here, you must verify
the MKT600
batch job is running using the Job Submission screen.
Values in the drop-down are populated based on the fixed code defined for the MKT "REGENERATION_FREQUENCY" system type. |
Assigned to |
Link. This field defaults to the logged in user. If necessary, click the link and select a different user. |
Special Notes |
Text field. Enter any extra notes you want to record about this list. |
Lyris Segment |
Checkbox. This identifies whether the list is a segment of a larger list. This value is only needed if you are integrating with Lyris. For more information, see the Sending a List to Lyris and Personify/Lyris ListManager Interface Overview sections. |
Lyris Segment Name |
Text field. This is the unique name you give the list so as to be identifiable when searching for it in Lyris. This value is only needed if you are integrating with Lyris. For more information, see the Sending a List to Lyris and Personify/Lyris ListManager Interface Overview sections. |
Lyris Template |
Drop-down. This is the template to be used when the list is sent to Lyris. The template maps to the Interface Setup screen. This value is only needed if you are integrating with Lyris. Values are populated based on the non-fixed MKT "LYRIS_TEMPLATE" system type. For more information, see the Sending a List to Lyris and Personify/Lyris ListManager Interface Overview sections. |
See Also:
· Creating a Customer Import List
· Creating a List from a Data Analyzer Query
· Creating a List based on Customer Interest Areas
· Viewing List Counts and Analysis
· Excluding Constituents from a List