 The subscription can only be refunded and cancelled if the Returnable checkbox is checked on the General Setup screen in Product Maintenance.
The subscription can only be refunded and cancelled if the Returnable checkbox is checked on the General Setup screen in Product Maintenance.
Let's use the following example. Say you have a subscription order in which four issues (January 1 through April 1) have been fulfilled, and the customer calls to cancel on March 27.
If your organization's policy is to refund the subscription for the unfulfilled issues, the recommended way to refund the subscription is to perform the following.
1. On the Order Entry screen, search for and open the appropriate order.
2. Right-click the appropriate order line and select Terminate at End.
3. Verify the issue date of the last issue served:
a. From the Work with Line Items task category, click View Issues Served.
The Issues Fulfillments screen displays.
b. Review the Issue Date of the last issue served.
c. Close this screen.
4. Right-click and select Show Full Line Item Details.
5. Click the Product Specifics tab.
6. Change the End Date to the last date of the month in which the customer received the last subscription issue, as identified in step 3b (e.g., April 30).
This way the subscription order will still be active but only through April 30 and Line Status is "Active". You also have the revenue for that period.
7. Click Close.
8. You could then do a refund to refund the remainder of the subscription:
a. Right-click the order line and select Cancel.
The Cancellation and Refunds screen displays.
b. Select the Refund and Cancel radio button.
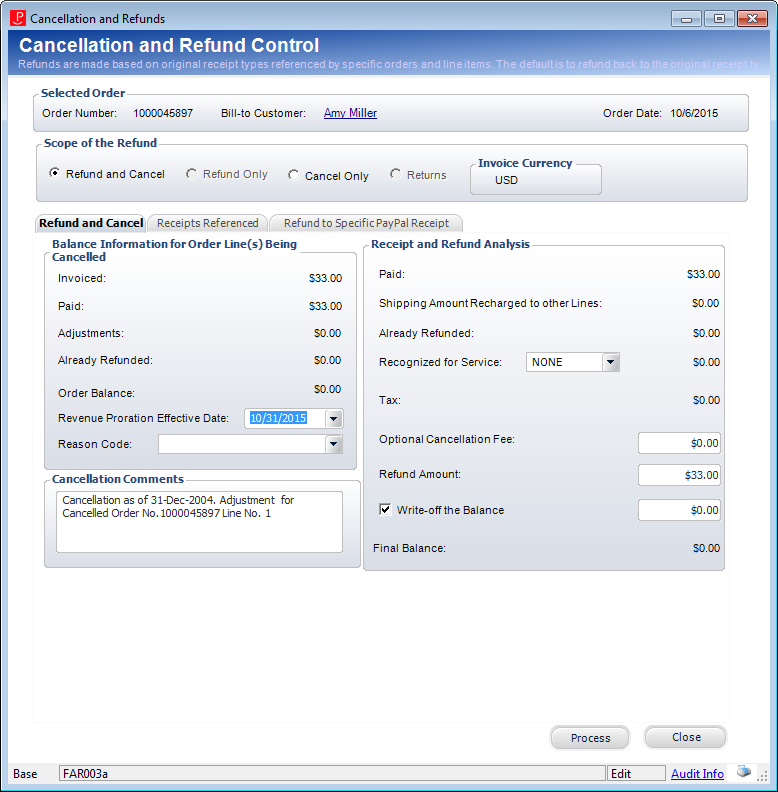
c. Select the Revenue Proration Effective Date.
By default, this is set to the last date of the current month. Set this to the last day of the month of the last issue that was sent, as identified in step 3b.
d. Select the Reason Code.
Values in the drop-down are populated based on the non-fixed codes defined for the ORD "LINE_STATUS_REASON" system type. The option selected is stored in the LINE_STATUS_REASON_CODE column in the Order_Detail table.
e. If necessary, enter any additional Cancellation Comments.
f. Select "Prorate" from the Recognized for Service drop-down.
g. If a cancellation fee was defined for the product, it will display in the Optional Cancellation Fee field. Update this amount, if necessary.
The default cancellation fee will be based on the current date unless you are in an adjustment batch. If you are in an adjustment batch, the cancellation fee will default based on the batch date.
The process of entering cancellation fees is dependent on whether you are adding a cancellation fee for the master order line and/or sub order line. For more information on the options, please see the Cancellation Fees section.
h. If necessary, change the Refund Amount, which is automatically calculated.
i. If you check the Write-off the Balance checkbox, then enter the amount of the write-off in the text box.
If you are currently being served with one or more subscription issues sent but nothing has yet been paid, the amount of revenue recognized must be written off from real revenue, and the balance of the order written off from deferred revenue.
If partially paid with one or more issues sent or months recognized, only the difference between what has been paid and the invoice amount must be written off with recognized revenue written off prior to deferred revenue.
j. On the Receipts Referenced tab, highlight the appropriate receipt.
k. If the receipt was originally created by credit card, click the Refund to Specific Credit Card Receipt tab, as shown below, and perform the following:
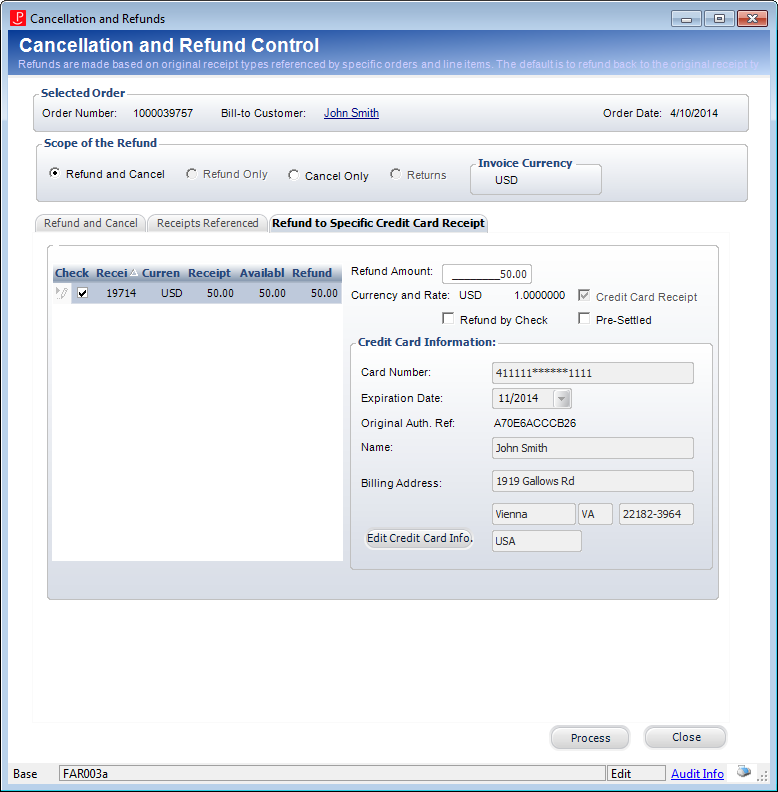
i. If multiple payments were made, select the Check checkbox next to the appropriate payment from the grid.
ii. Change the Refund Amount, if necessary.
iii. To refund the order by check, check Refund by Check.
Please note that refunding to a check is not available for unsettled receipts.
iv. If your organization used a lockbox or outside service to process the credit card receipt, check the Pre-Settled checkbox.
v. If necessary, click Edit Credit Card Info.
vi. Click Process.
The Cancellation and Refunds screen closes and the status of the order line changes to “Cancelled”. The refund will go to the payment processor and settle the next time the CCP610 settlement process is run.
l. If the receipt was originally credited by cash or check, click the Refund to Specific Check Receipt tab, as shown below, and perform the following:
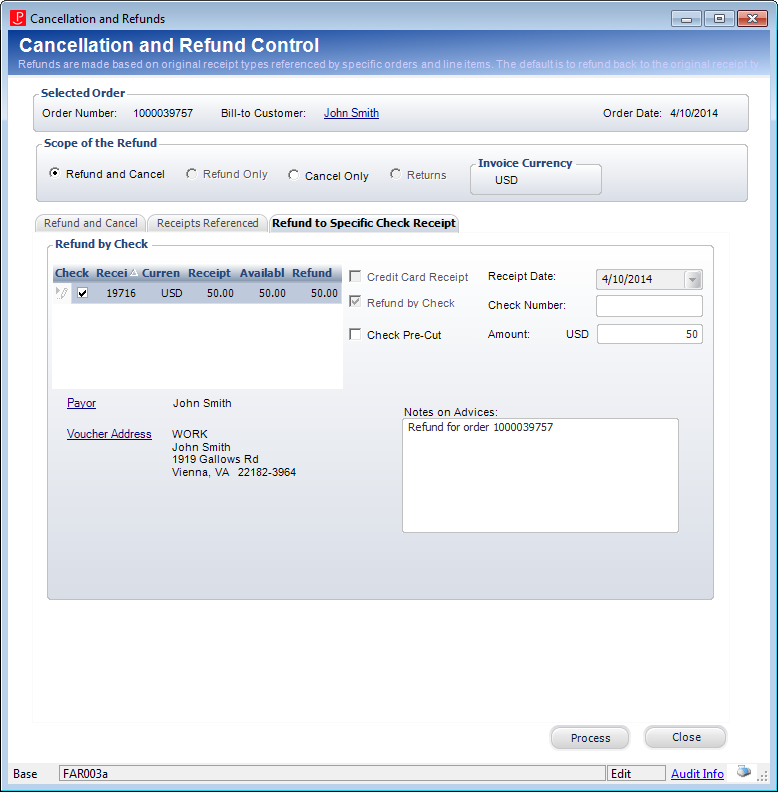
i. If multiple payments were made, check the checkbox next to the appropriate payment from the grid.
ii. If the check has already been printed, check the Check Pre-Cut checkbox and enter the Check Number.
Checking this checkbox changes the status of the refund from "Active" to "Printed"; thus, it will not be processed by the FAR800 Voucher Transfer Process.
iii. Enter the refund Amount.
iv. If necessary, click the Payor link to view more details about the customer.
 You cannot change the Payor on this refund. If the check refund needs to be refunded to a different customer other than the payor (bill-to customer) a new receipt must be entered for the correct payor and the original receipt must be reversed.
v. If necessary, click the Voucher Address link to select a different address.
vi. Enter any Notes on Advices.
vii. Click Process.
The Cancellation and Refunds screen closes and the status of the order line changes to “Cancelled”.
viii. Next, you need to run the following processes:
· FAR800 – this creates an export file of voucher transactions that the you then need to upload to your accounts payable system.
· FAR801 – if there are customers getting refunds that do not have a vendor number in Personify360, an export file of customer and address information is created for those customers that also needs to be uploaded into your accounts payable system.
ix. Then, you need to process the refunds by cutting checks to the customers. To do so, two export files need to be uploaded into Personify360:
· FAR802 – uploads the file from your accounts payable system that then updates the voucher records with refund date and check number of the refund.
· FAR803 – updates customer records in Personify360 with the vendor number of that customer in your accounts payable system.
m. As of 7.6.1, if the receipt was originally created with a PayPal account, access the Refund to Specific PayPal Receipt tab, as shown below, and perform the following:
Once settled, a PayPal payment can be refunded to a customer’s PayPal account if it is refunded within the defined follow-on credit period, which is set to 59 days by default. When a PayPal payment is refunded, the system creates a PRE-CREDIT record in Ccp_Req_Ans, which is visible from the Credit Card Request Review screen.
If a PayPal payment needs to be refunded after the follow-on credit period has passed, the PayPal payment should be refunded by check. When a PayPal payment is refunded by check, the system creates voucher transaction records that can then be passed to the organization’s Accounts Payable third-party application.
You will not be able to refund a PayPal payment to a customer’s PayPal account if the follow-on credit period has passed.
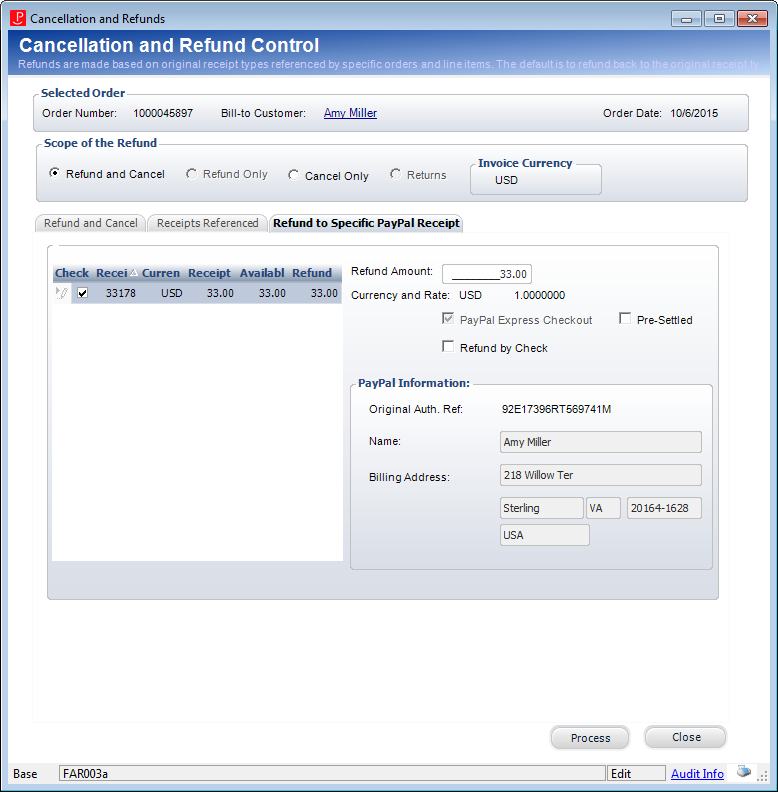
i. If multiple payments were made, select the Check checkbox next to the appropriate payment from the grid.
ii. Change the Refund Amount, if necessary.
iii. If your organization used a lockbox or outside service to process the credit card receipt, check the Pre-Settled checkbox.
iv. To refund the order by check, check the Refund by Check checkbox.
Please note that refunding to a check is not available for unsettled receipts.
v. Click Process.
The Cancellation and Refunds screen closes and the status of the order line changes to “Cancelled”. The refund will go to the payment processor and settle the next time the CCP610 settlement process is run.