In addition, this is NOT a standalone control, which means that in order
for it to function, it needs to be incorporated into the Meetings
workflow on the web. For more information, refer to the Standalone
.NET Web Controls section.
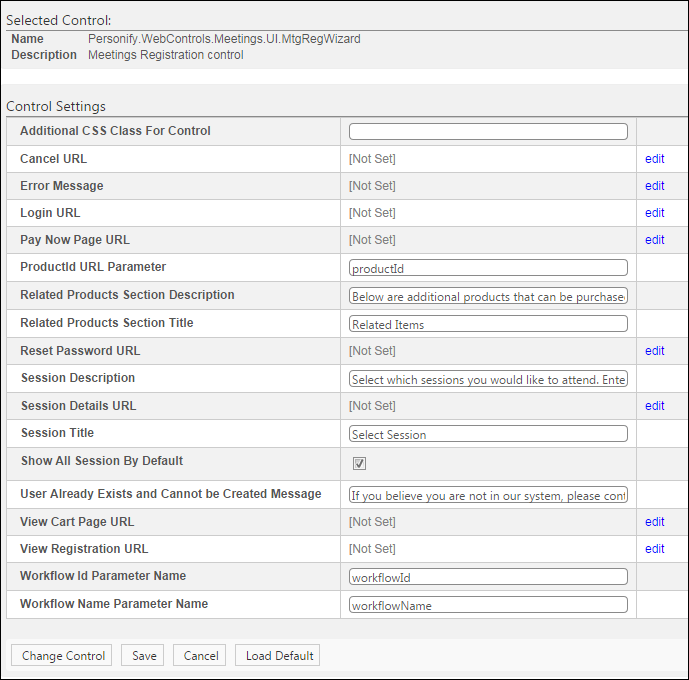
Parameter |
Description |
Additional CSS Class for Control |
This option allows you to add additional
layout to the skin by developing a new DOTNETNUKE style, which
requires an advanced understanding of HTML and CSS. |
Cancel URL |
You should set the PWF parameter to a
value (e.g., MTG_REG_CANCEL) that will take the constituent to
that URL in DNN when he/she clicks Cancel.
If this PWF parameter does not exist or you would like to create
a new one, see Setting
up PWF Parameters for more information. |
Error Message |
The error message will display on the
control for the action that was being performed at the time of
the error. If left blank, the default error message, "An
error occurred while performing [Insert Action]. If the problem
persists, please contact the site administrator", will display.
[Insert Action] will be substituted with the action the control
was performing at the time of the error. If you wish to change
the default error message, customize it with a PWF Parameter.
See Setting
up PWF Parameters for more information. |
Login URL |
You should set the PWF parameter to a
value (e.g., LoginUrl) that will take the constituent to that
URL in DNN when he/she logs in as a user. If this PWF parameter
does not exist or you would like to create a new one, see Setting
up PWF Parameters for more information. |
Pay Now Page URL |
You
should set the PWF parameter to the Pay Now page's URL when the
web user clicks Pay Now
button. See Setting
up PWF Parameters to learn more about these
parameters and why your website's redirect URLs are managed there.
 The Pay Now button will
only display on this page for free products, if the user is logged
into your website, and if the Pay
Now Enable Flag checkbox is checked in
the web settings of the Product
Detail control. When logged in users click the Pay Now button,
in order for the system to process their order, the Pay
Now Page URL field on this control,
must be set to the page that contains the Pay
Now control. The Pay Now button will
only display on this page for free products, if the user is logged
into your website, and if the Pay
Now Enable Flag checkbox is checked in
the web settings of the Product
Detail control. When logged in users click the Pay Now button,
in order for the system to process their order, the Pay
Now Page URL field on this control,
must be set to the page that contains the Pay
Now control.
|
ProductId URL Parameter |
Enter "productid". This is the
default name of the parameter to read the product’s ID, but if
the environment's redirection logic uses a different Query String
name, set it here. See Setting
up PWF Parameters for more information. |
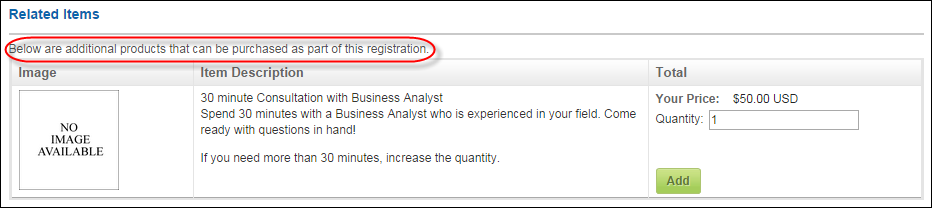
Related Products Section Description |
This description displays on the Additional
Information step in the Meeting Registration workflow. If
there are any related products associated with the selected meeting,
web users will see this description below the Related Products
Section Title, as highlighted below.
 |
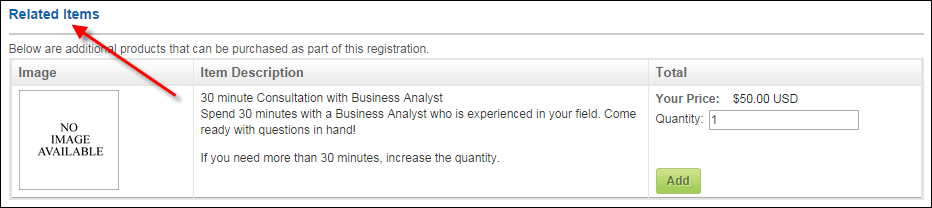
Related Products Section Title |
This title displays on the Additional
Information step in the Meeting Registration workflow. This
title will display above any related products associated with
a meeting, and the Related Products Section Description you entered
in the previous step, as highlighted below.
 |
Reset Password URL |
You should set the PWF parameter to a
value (e.g., ForgotPasswordURL) that will take the constituent
to that URL in DNN when he/she clicks Reset
Password. If this PWF parameter does not exist or you would
like to create a new one, see Setting
up PWF Parameters for more information. |
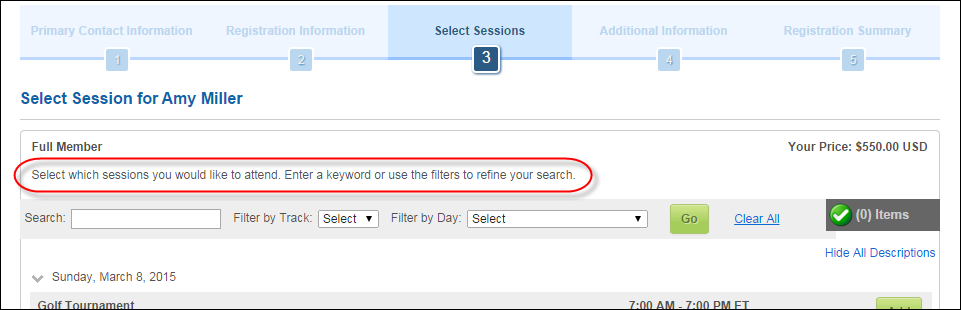
Session Description |
This description displays on the Select
Session step of the Meeting Registration workflow. If there
are any sessions for a web user to select from, this description
will display below the Session Title, as highlighted below.
 |
Session Details URL |
You should set the PWF parameter to a
value (e.g., SimpleSessionDetailURL) that will take the constituent
to that URL in DNN when he/she selects a session. If this PWF
parameter does not exist or you would like to create a new one,
see Setting
up PWF Parameters for more information. |
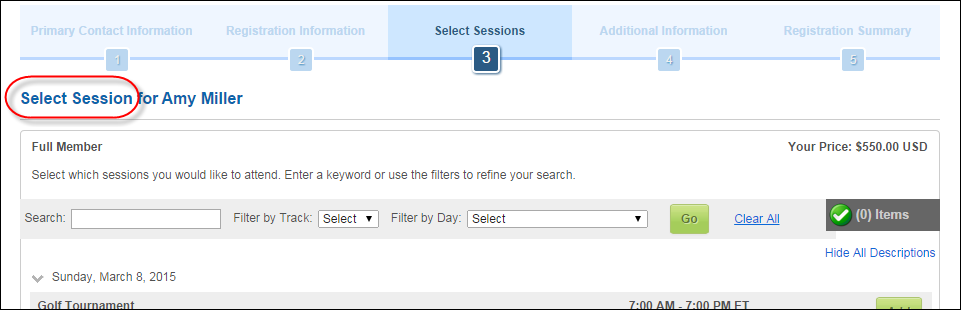
Session Title |
This title will display above the list
of sessions related to a meeting (if applicable), and the Session
Description.
 |
Show All Sessions By Default |
As of 7.6.0, check this checkbox if you
want to display all sessions for a meeting in the meeting registration
workflow. It is recommended that you leave this checkbox unchecked if
you have a large amount of sessions for your meetings. When unchecked,
the system will only display the first day's sessions by default
and the web user will have to filter to see the remaining days'
sessions.
Back office settings still apply
for the session. You are just choosing to display ALL sessions
or just the first day's sessions. See Select
Sessions Back Office Settings for additional information. |
User Already Exists and Cannot be Created
Message |
As of 7.6.0, if the system is setup to
NOT allow duplicate customers, this message will display if a
duplicate customer is found in the system when the user is registering.
By default, this is set to "If you believe you are not in
our system, please contact our Customer Support Center."
For more information, please see Duplicate
Customers on the Web. |
View Cart Page URL |
You should set the PWF parameter to a
value (e.g. ShoppingCart) that will take the constituent to that
URL in DNN when he/she clicks Go
to Cart and Checkout.
If this PWF parameter does not exist or you would like to create
a new one, see Setting
up PWF Parameters for instructions on adding a PWF Parameter. |
View Registration URL |
You should set the PWF parameter to a
value (e.g., Viewregistration) that will take the constituent
to that URL in DNN when he/she clicks View
Registration.
If this PWF parameter does not exist or you would like to create
a new one, see Setting
up PWF Parameters for more information. |
Workflow Id Parameter Name |
Enter WFId. This is the default parameter
value. If this PWF parameter does not exist or you would like
to create a new one, see Setting
up PWF Parameters for instructions on adding a PWF Parameter. |
Workflow Name Parameter Name |
Enter WfName. This is the default parameter
value. If this PWF parameter does not exist or you would like
to create a new one, see Setting
up PWF Parameters for instructions on adding a PWF Parameter.
 The Workflow ID provides a way
to segregate meeting related items from the Shopping Cart page
for Pay Now functionality. There are currently the following two
approaches when someone is paying for a meeting: The Workflow ID provides a way
to segregate meeting related items from the Shopping Cart page
for Pay Now functionality. There are currently the following two
approaches when someone is paying for a meeting:
Pay Now – only displays meetings and sessions added and displays
the price.
Check Out – displays everything in the Shopping Cart including
meetings and sessions.
Typically, you do not have to change the Workflow Id Parameter
Name field and Workflow Name Parameter Name field, because the
above default values usually work. Since Personify360's controls
can live in multiple Content Management Systems (CMS), you have
the option to change the name of these parameters using the Workflow
Id Parameter Name and Workflow Name Parameter Name fields, because
there is a chance that the CMS is not using the same query string
parameters as the defaults.
|