It is up to each client to determine the appropriate location of this
page, and to create the menu item that will lead web users to this page.
The section below details how to set up this control on your website.
The instructions are intended for a web user with web admin/host privileges.
In addition, this is NOT a standalone control, which means that in order
for it to function, it needs to be incorporated into the Online
Store workflow on the web. For more information, refer to the Standalone
Controls section.
Control Setting |
Description |
Additional CSS Class for Control |
This option allows you to add additional
layout to the skin by developing a new DOTNETNUKE style, which
requires an advanced understanding of HTML and CSS. |
All Reviews URL If Other Page |
You should set the PWF parameter to a
value that will take the user to that URL in your site where he/she
can read all the product reviews. Leave this field blank
to use the hash tag if the Reviews Control is on the same page.
If this PWF parameter does not exist or you would like to create
a new one, see Setting
up PWF Parameters for more information. |
Buy for Group to Cart Page URL |
You should set the PWF parameter to a
value that will allow your user to purchase products for a group.
For more information, please see the Buy for Group Control. If
this PWF parameter does not exist or you would like to create
a new one, see Setting
up PWF Parameters for more information.
 This setting must be configured
in order for the Buy for Group button to work on your website.
In addition, the Show Buy for
Group Link checkbox must be checked in order for the Buy for Group button to display. This setting must be configured
in order for the Buy for Group button to work on your website.
In addition, the Show Buy for
Group Link checkbox must be checked in order for the Buy for Group button to display.
|
Checkout Page URL |
You should set the PWF parameter to a
value that will take the user to the checkout page. If this PWF
parameter does not exist or you would like to create a new one,
see Setting up PWF
Parameters for more information. |
Create Review URL |
You
should set the PWF parameter to a value that will take the user
to the page where he/she can create a review for the product.
If this PWF parameter does not exist or you would like to create
a new one, see Setting
up PWF Parameters for more information. |
Description meta tag format |
Meta
descriptions are HTML attributes that provide concise explanations
of the contents of web pages. Meta descriptions are commonly used
on search engine result pages (SERPs) to display preview snippets
for a given page.
As of 7.6.0, to define the description for
SEO, enter the Description meta tag format value.
The recommended value is "{Description}", which is the
eBusiness Brief Description defined on the product setup. For
more information, refer to Search
Engine Optimization.
 For a list of available, useful
values, please refer to the Metadata
Values table. For a list of available, useful
values, please refer to the Metadata
Values table.
|
Donation Amounts |
Enter the donation amounts (comma delimited)
that you want to display to web user donating to a fundraising
product. Alternatively, you can enter “Enter Donation Amount”
in the Donation Amount configuration parameter to display only
web-enabled list prices defined for the fundraising product. |
Error Message |
The error message will display on the
control for the action that was being performed at the time of
the error. If left blank, the default error message, "An
error occurred while performing [Insert Action]. If the problem
persists, please contact the site administrator", will display.
[Insert Action] will be substituted with the action the control
was performing at the time of the error. If you wish to change
the default error message, customize it with a PWF parameter.
See Setting up PWF
Parameters for more information. |
Guest Checkout Login Return URL Parameter |
You should set the PWF parameter to a
value (e.g., ReturnfromLoginPageParam) that will redirect the
web user to the guest email lookup page. See Setting
up PWF Parameter for more information. Refer
to the Guest
Email Lookup Control section for more information. |
Guest Checkout Login URL |
You should set the PWF parameter to a
value (e.g., GuestCheckout) that will take the web user to the
guest checkout page. See the Checkout
Control section for more information. Here the guest web user
begins the checkout process. See Setting
up PWF Parameters for more information. |
Join Page URL |
You should set the PWF parameter to a
value (e.g., MemberJoinListing) that will take the web user to
the Membership Join page's URL when he/she clicks the "Join"
link, as highlighted below. If this PWF parameter does not exist
or you would like to create a new one, see Setting
up PWF Parameters for more information.
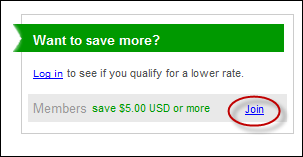
After the web user clicks the "Join"
link, he/she is redirected to the membership join page, as shown
below. Here the web user will begin the membership join process.
See Working with the Membership Join .NET Controls for more information
on how to set up these controls.
 |
Keywords meta tag format |
Meta keywords are a specific type of meta
tag that appear in the HTML code of a web page and help tell search
engines what the topic of the page is. Meta keywords are distinguished
from regular keywords because they appear “behind the scenes,”
in the source code of your page, rather than on the live, visible
page itself.
As of 7.6.0, to define the keywords for SEO,
enter the Keywords meta tag format value. The recommended
value is "{Keywords}", which is a list of the User Defined
Search Keywords defined on the product setup. For more information,
refer to Search
Engine Optimization.
For a list of available, useful
values, please refer to the Metadata
Values table. |
Log In Page URL |
You should set the PWF parameter to a
value (e.g., LoginURL) that will take the web user to the Login
page's URL when he/she clicks the "Login" link.
This displays on the Shopping Cart page, the
Product Detail page, and Meeting Detail page. If this PWF parameter
does not exist or you would like to create a new one, see Setting
up PWF Parameters for more information.
After clicking the "Login" link, the web user is redirected
to the login page. Here the web user can login to your website.
See Configuring the
New Customer Registration Page for more information on how
to set up these controls. |
Pay
Now Enable Flag |
If you want to allow web users to pay
now for a product, check this checkbox. As of 7.6.0, this feature
has been expanded to allow logged in web users to pay now for
ANY type of product. For more information, please see Pay
Now Control Overview.
In order for the system to process the order, the Pay Now Page URL field on this control,
must be set to the page that contains the Pay Now control.
|
Pay Now Page
URL |
If the Pay Now Enable Flag checkbox is checked,
you should set the PWF parameter to the Pay Now page's URL when
the web user clicks "Pay Now" button. See Setting
up PWF Parameters to learn more about these parameters and
why your website's redirect URLs are managed there. |
Product Detail Url |
You should set the PWF parameter to the
Product Detail page's URL. See Setting
up PWF Parameters to learn more about these parameters and
why your website's redirect URLs are managed there.
As of 7.6.0, SEO
enhancements for friendly URLs have been added to the Product
Detail control. The
URLs defined for a given page via the use of PWF Parameters must
be defined in a format that can be consumed by the DotNetNuke
(DNN) friendly URL settings.
If the
use of friendly URLs is enabled, the controls will continue to
recognize a PWF Parameter that is in the previous format. For
more information on friendly URLs, see Search
Engine Optimization. |
ProductId URL Parameter |
Enter "productid". This is the
default name of the parameter to read the product’s ID, but if
the environment's redirection logic uses a different Query String
name set it here. See Setting
up PWF Parameters for more information. |
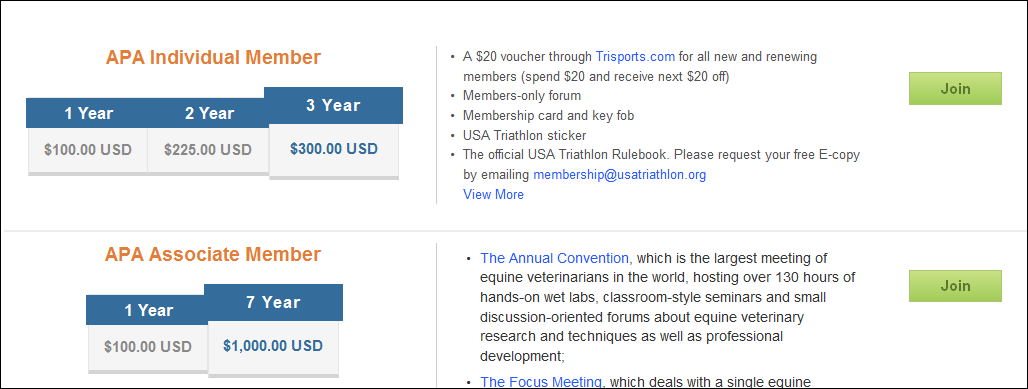
Promo: Log In Reason Message |
Enter a message. For example, "Log
in to see if you qualify for a lower rate". This message
should prompt your web users to login to your site. The message
would display as highlighted below to your web users on your website.
 |
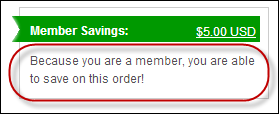
Promo: Member Savings Header |
Enter a message. For example, "Member
Savings". This message should highlight that the web user
would save money on his/her order by being a member of your organization.
The header would display as shown below to your web users on your
website.
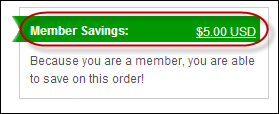 |
Promo: Member Savings Message |
Enter a message. For example, "Because
you are a member, you are able to save on this order!". This
message should bring attention to the benefits your web user is
receiving by being a member of your organization. The message
would display as shown below to your web users on your website.
 |
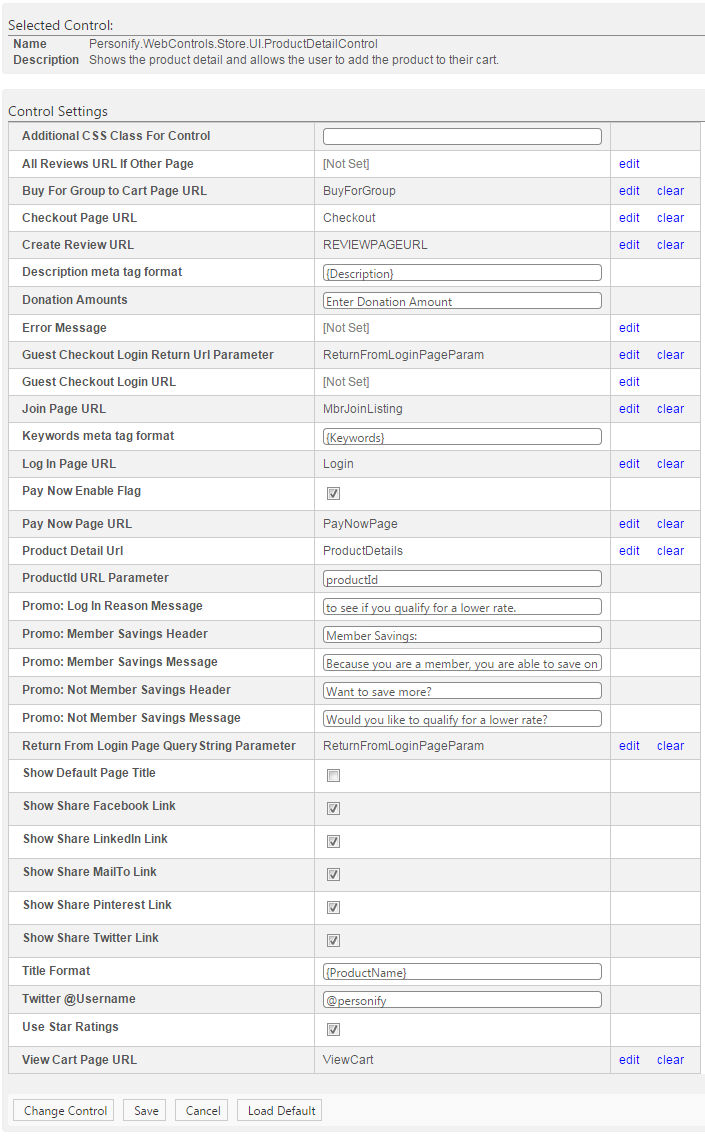
Promo: Not Member Savings Header |
Enter a message. For example, "Want
to save more?" This message should entice web users to want
to learn how they could save more money on their order. The message
would display as shown below to your web users on your website.
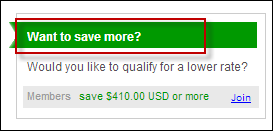 |
Promo: Not Member Savings Message |
Enter a message. For example, "Would
you like to qualify for a lower rate?" This message should
entice web users to want to learn how they could save more money
on their order. The message would display as shown below to your
web users on your website.
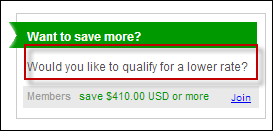 |
Return From Login Page Query String Parameter |
You should set the PWF parameter to a
value (e.g., Shopping Cart) that will take the web user back to
the Shopping Cart's URL after the web user logs into your site. |
Show Default Page Title |
As of 7.5.0SP1, check this checkbox if
you want the default page title to display in the title of the
HTML page. If this checkbox is NOT checked, the product name will
be set as the page title. |
Show Share Facebook Link |
Check this checkbox to show the Facebook
icon. Users can click on this icon and share the selected product
with their Facebook friends. When the user clicks this icon, he
or she will be required to log in to Facebook with his/her credentials.
If the icon does not display
after checking the checkbox, make sure your site skin is accounting
for the social sharing icons. |
Show Share LinkedIn Link |
Check this checkbox to show the LinkedIn
icon. Users can click this icon and share the selected product
with their LinkedIn connections. When the user clicks this icon,
he/she will be required to log in to LinkedIn with his/her credentials.
If the icon does not display
after checking the checkbox, make sure your site skin is accounting
for the social sharing icons. |
Show Share MailTo Link |
Check this checkbox to show the envelope
icon. Users can click on this icon and mail the selected product
to whomever they want. This will open a blank email in the user’s
default email system.
If the icon does not display
after checking the checkbox, make sure your site skin is accounting
for the social sharing icons. |
Show Share Pinterest Link |
Check this checkbox to show the Pinterest
icon. Users can click on this icon to pin the selected product
to one of their Pinterest boards. When the user clicks this icon,
he/she will be required to log in to Pinterest with his/her credentials.
Please note that in order for images to display on Pinterest,
you must host your product images on a public IP. If not, do not
check this checkbox.
If the icon does not display
after checking the checkbox, make sure your site skin is accounting
for the social sharing icons. |
Show Share Twitter Link |
Check this checkbox to show the Twitter
icon. Users can click on this icon and Tweet the selected product
and share it with their Twitter followers. When the user clicks
this icon, he/she will be required to log in to Twitter with his/her
credentials. Please note that in order for the URL to display
on Twitter, your website must be hosted on a public IP with a
valid internet domain. If not, do not check this checkbox. |
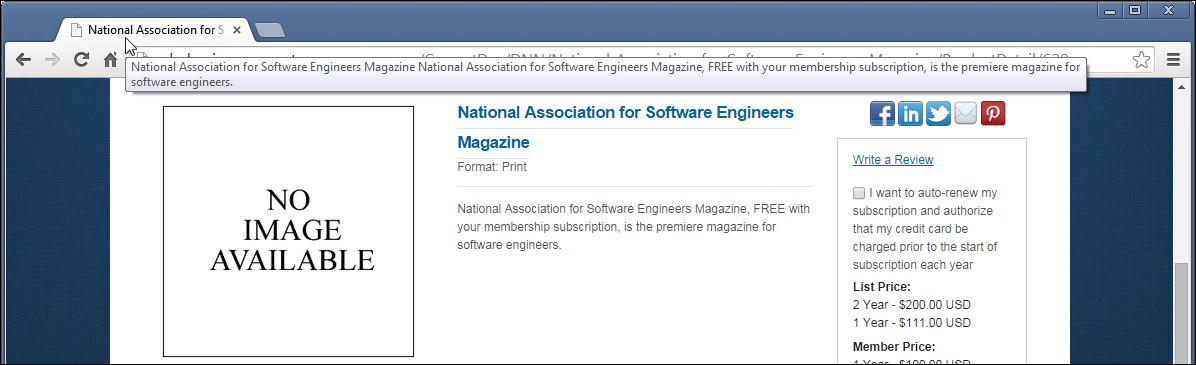
Title Format |
Page titles are often used on search engine
results pages (SERPs) to display preview snippets for a given
page, and are important both for SEO and social sharing.
The title element of a web page is meant to
be an accurate and concise description of a page's content. This
element is critical to both user experience and search engine
optimization. It creates value in three specific areas: relevancy,
browsing, and in the search engine results pages.
As of 7.6.0, to define the page title for
SEO, enter the Title Format value. The recommended value is "{ProductName}",
which is the Invoice Description value defined on the product
setup. The value of this field will show on the browser tab, as
shown below. For more information, refer to Search
Engine Optimization.
For a list of available, useful
values, please refer to the Metadata
Values table.
|
Twitter @Username |
As of 7.6.1, you also have the ability
to define a value to be used as the Twitter Cards site attribute
for the Product Detail and Meeting Detail .NET web controls if
there is no Twitter @Username defined at the product level. For
more information, please see Twitter
Card Attributes. |
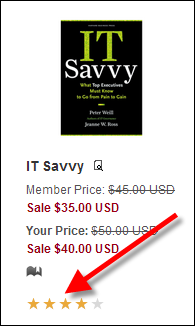
Use Star Ratings |
As of 7.5.2, check this checkbox if you
want the product's star rating to display on the product listing
page, as shown below. For more information on product star ratings,
please see the Create
Product Review Control Overview.
 |
View Cart Page URL |
You should set the PWF parameter to a
value that will take the user to the URL that will display the
product(s) in his/her cart. If this PWF parameter does not exist
or you would like to create a new one, see Setting
up PWF Parameters for more information. |
 This control can be configured to be
responsive to mobile users.
After adding the responsive CSS to this page, your mobile phone user will
see the control on the responsive page similar to the one shown below.
For more information
about using this control on a responsive page, please see Configuring
Responsive CSS for the Product Detail Page.
This control can be configured to be
responsive to mobile users.
After adding the responsive CSS to this page, your mobile phone user will
see the control on the responsive page similar to the one shown below.
For more information
about using this control on a responsive page, please see Configuring
Responsive CSS for the Product Detail Page. 
 In
order for a change or update you made to data in the back office be reflected
on the web for the Product Detail control, you will have to log out or
close ALL of your current browsers and start a new session. For more information,
refer to
In
order for a change or update you made to data in the back office be reflected
on the web for the Product Detail control, you will have to log out or
close ALL of your current browsers and start a new session. For more information,
refer to