Committee Management - Roster Control
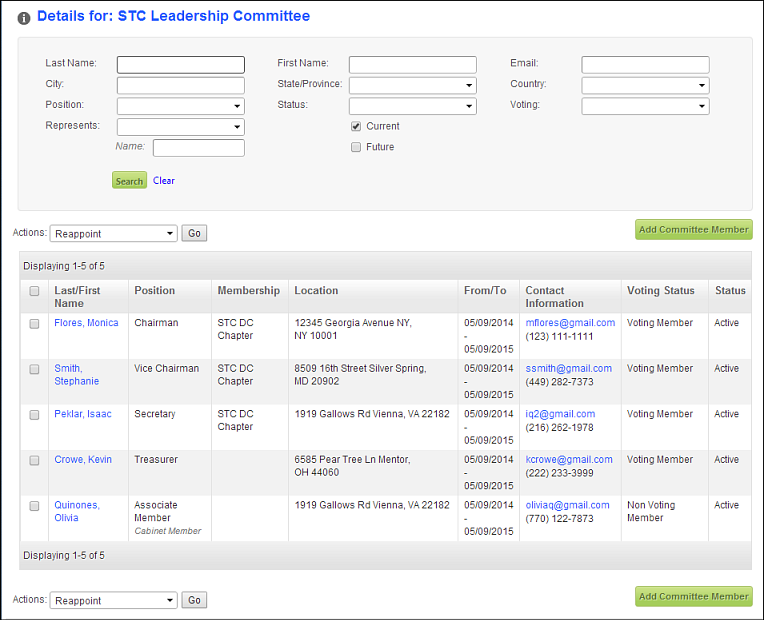
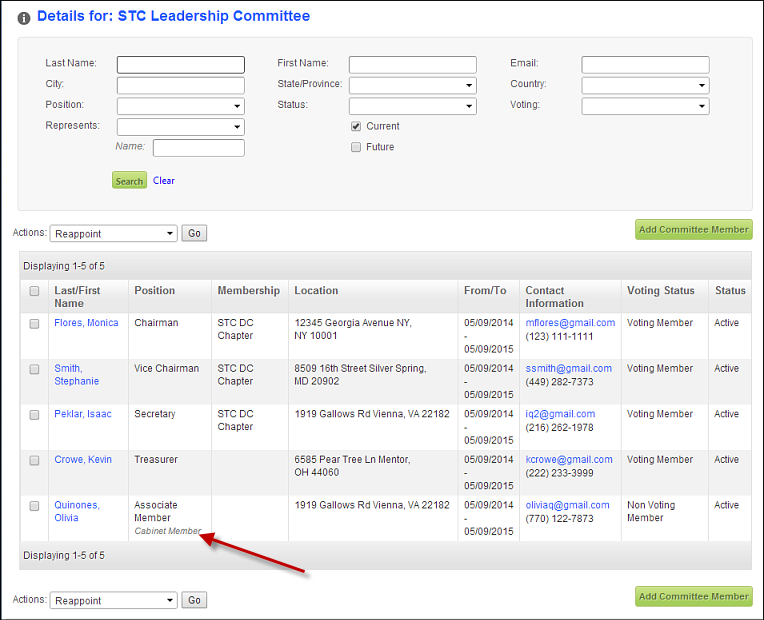
After setting up the Roster control, your committee manager will see the Roster control similar to the one displayed below, for Committee Management.
 The Roster page for Committee Management is sequenced by hierarchy and NOT by alphabetical order. After position hierarchy, the second sort level is last name. In addition, past committee members are NOT accessible on the roster, because the length of this list can be extensive. However, you could run a report to see a list of past committee members. See COM103PE - Analysis of Past Committee Members for more information.

Committee's Name
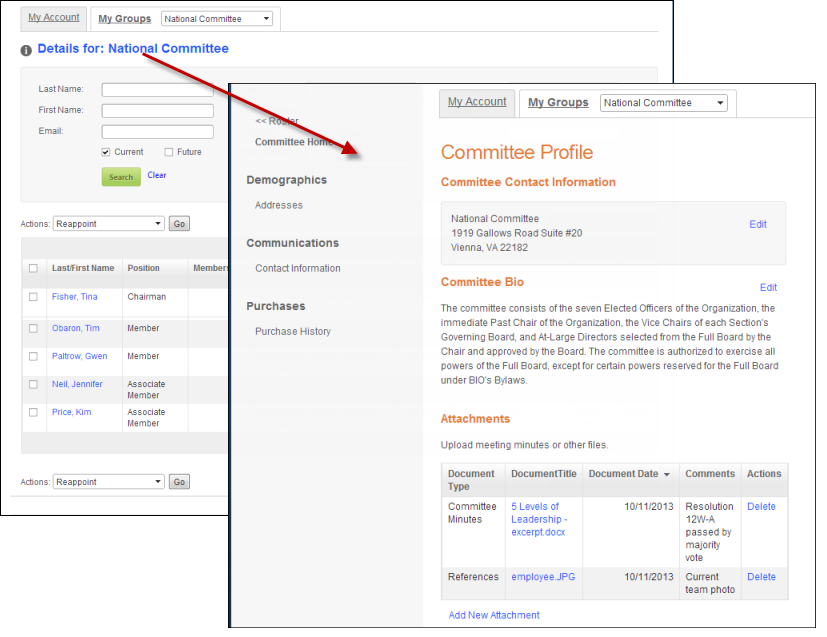
If the Edit Group Profile checkbox is checked on the Organization Segmentation screen in the back office, the committee's name displays on the Roster page as a link. When the committee manager clicks the committee name link, as highlighted below, he/she is redirected to the committee's profile page. The information that the committee manager can edit/view is based on the profile controls you drop on the committee's profile section (e.g., contact information, addresses, pay open orders, etc.). See Committee Profile Page for more information on setting up this page. For more information on where this information is stored in the back office, refer to Adding a Committee Profile.
 If the Edit Group Profile checkbox is NOT checked on the Organization Segmentation screen in the back office, the committee manager is unable to edit/access the group's information on his/her roster, as shown below. See Setting up a Group Manager's Permissions for more information.
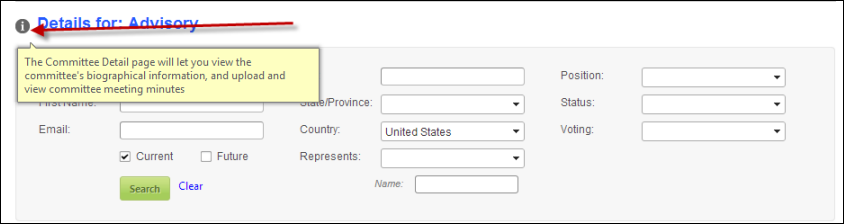
When your committee manager hovers over the information icon, as highlighted below, a message displays that lets the committee manager know what happens if he/she selects the committee's name. The message is configured in the control's settings. See Configuring the Roster Control for more information.
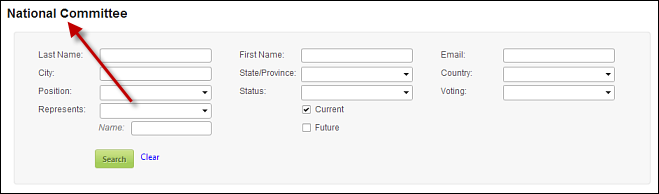
Filter Fields
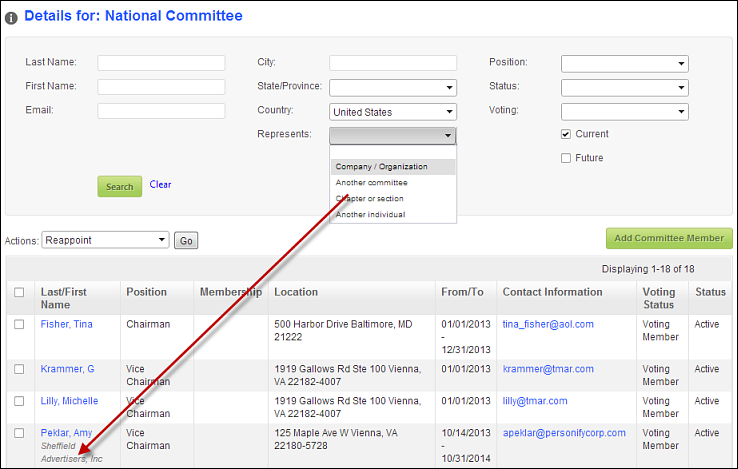
Chapter managers can use these search fields in order to find the committee member(s) that they want to work with. In order for values to display in the State/Province and Country drop-downs, the appropriate country and state codes need to be defined in the back office. For more information, please see Adding Country and State Codes. In order for values to display in the Position, Status, and Voting drop-downs, the following system types and codes need to be web enabled: POSITION, and PARTICIPATION_STATUS, VOTING_STATUS, respectively. See Enabling System Types and Codes for the Web. In addition, if a committee member represents an individual or organization, it will display on the Roster control, as highlighted below. This is defined in the back office on the Relationships screen in CRM360. For more information, refer to Adding a New Relationship to a Constituent's Record in CRM360®.
Name Column
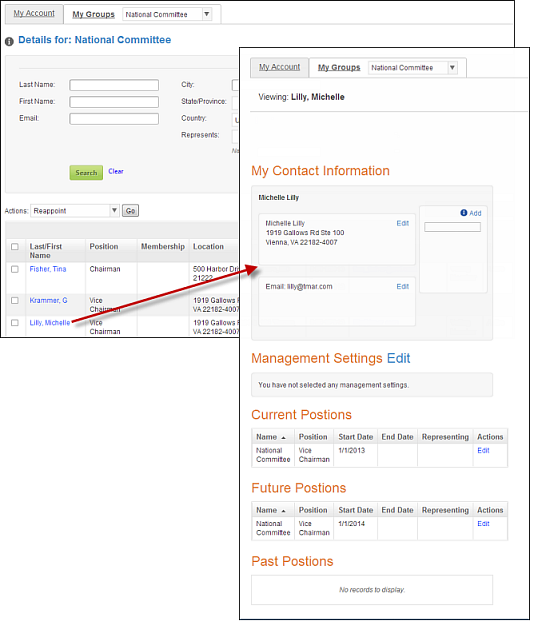
This column displays the names of individuals that belong to this committee. If committee mangers have the correct permission's assigned to him/her, the committee members' names display on the Roster page as a link. See Setting up a Group Manager's Permissions for more information. When the committee manager clicks a group member's name, as highlighted below, he/she is redirected to the committee member's profile page. The information that the committee manager can edit/view is based on the profile controls you drop on the committee member's profile section (e.g., contact information, addresses, pay open orders, etc.). See Committee Member Profile Page for more information on setting up this page.
If the Edit Group Profile checkbox is NOT checked on the Organization Segmentation screen in the back office, the chapter manager is unable to edit/access the chapter's information on his/her roster. See Setting Up Group Manager's Permissions for more information.
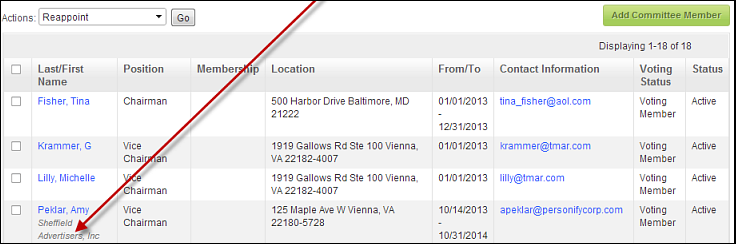
In addition, if a committee member represents an individual or organization, it will display here, as highlighted below. This is defined in the back office on the Relationships screen in CRM360. For more information, refer to Adding a New Relationship to a Constituent's Record in CRM360®.
When your committee manager hovers over the information icon, as highlighted below, a message displays that lets the committee manager know what happens if he/she selects the committee's name. The message is configured in the control's settings. See Configuring the Roster Control for more information.

Position Column
This column displays the positions and if defined, subpositions for the committee members, as highlighted below. The values that display on this column are populated based on the values you define in the back office for the committee member on the Committee Members Detail screen. For more information on how positions and subpositions are defined in the back office, refer to Adding a New Committee Member. Committee managers can also edit or define a committee member's position or subposition by using the Committee Term Details control or the Committee Reappoint control, as long as they have the correct back office permissions.
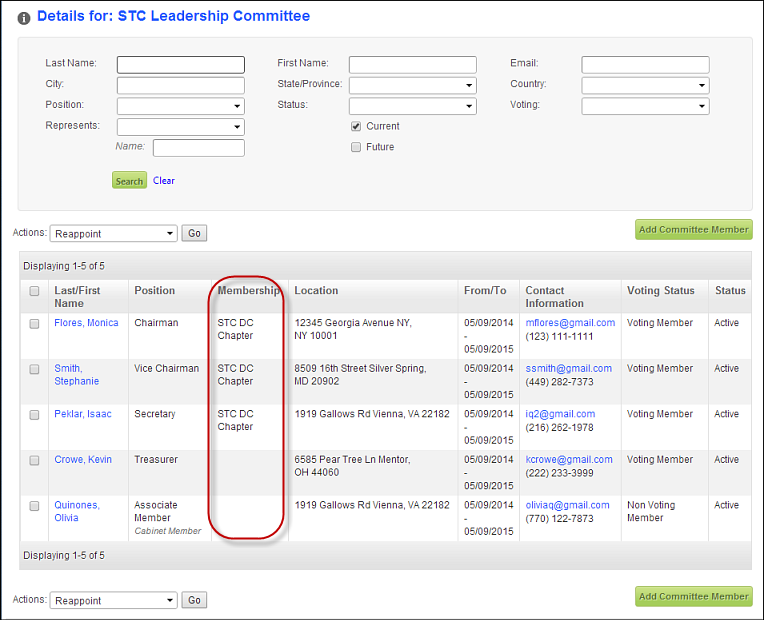
Membership Column
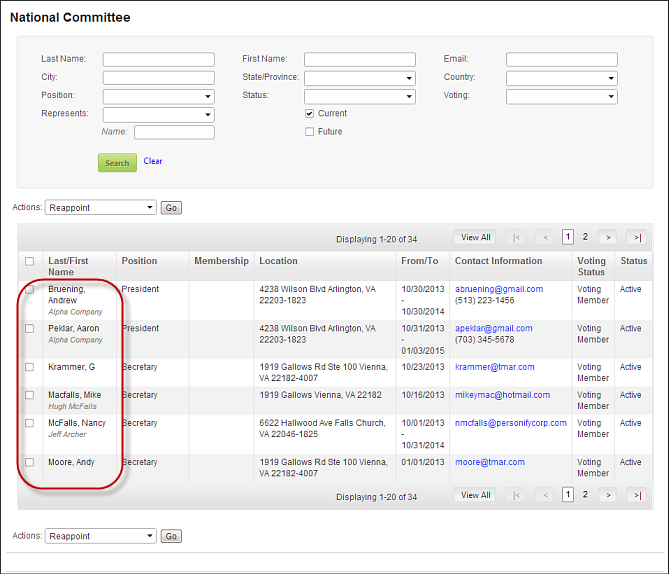
This column indicates the chapter member's type of primary membership. This displays the value entered in the Description field on the General Setup screen, as highlighted below. In order for this information to display, the following conditions MUST be met in the back office:
1. On the General Setup screen:
a. From the Parent Product drop-down, select a Membership Group that was defined as "Primary" on the Membership Structure Maintenance screen.
b. From the Level 1 drop-down, select "National Membership".
c. Enter a Description. This is the name that displays in the Membership column.
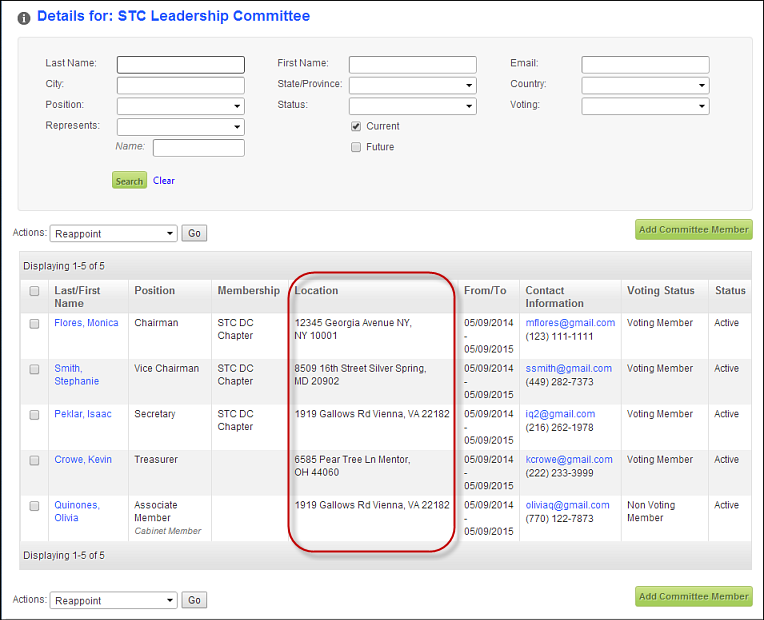
Location Column
The Location column displays the primary address for a committee member. This value is defined on the Contact Information screen in the back office or on the web, using the Address control by either the committee member or committee manager (if he/she has the correct permissions).
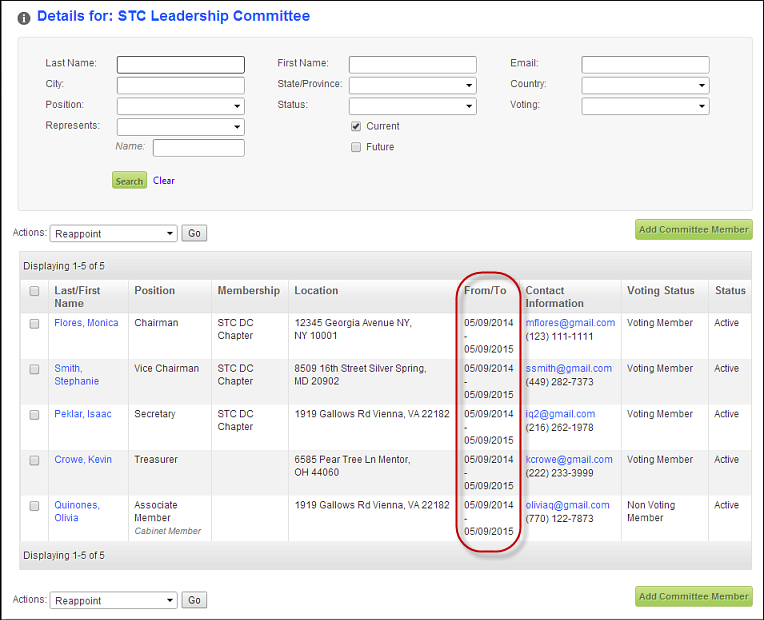
From/To Column
The From/To columns displays the start/end date for how long a committee member holds a particular position and sub position in the committee, as highlighted below. These values are defined in the back office on the Committee Details screen. For more information, refer to Adding a New Committee Member. In addition, committee managers can edit or define a committee member's start/end date by using the Committee Term Details control or the Committee Reappoint control, as long as they have the correct back office permissions.
Contact Information Column
The Contact Information column displays the primary email and phone number for a committee member, as highlighted below. These values are defined on the Contact Information screen in the back office or on the web, using either the Emaill control or the Phone control by either the committee member or committee manager (if he/she has the correct permissions).
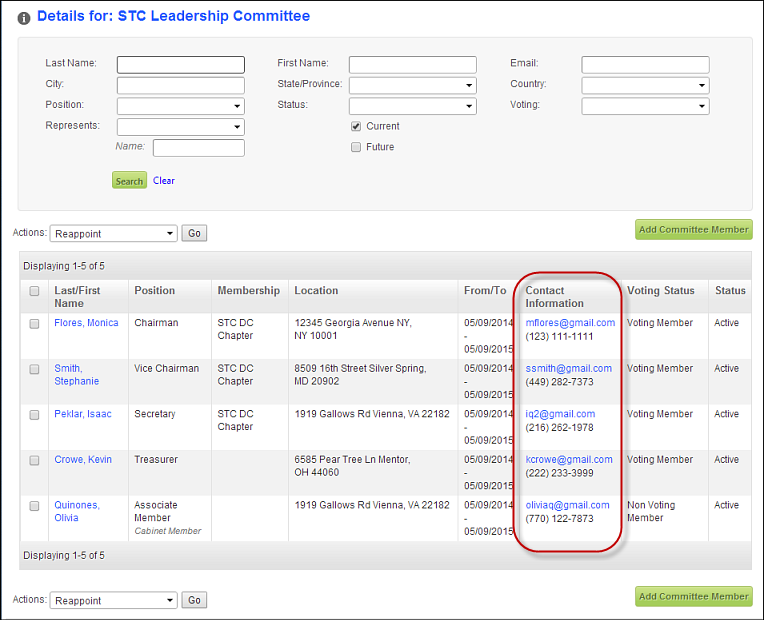
In addition, the email link is interactive. When the group manager selects the email address, a new window opens in the group manager's default email system, as shown below.

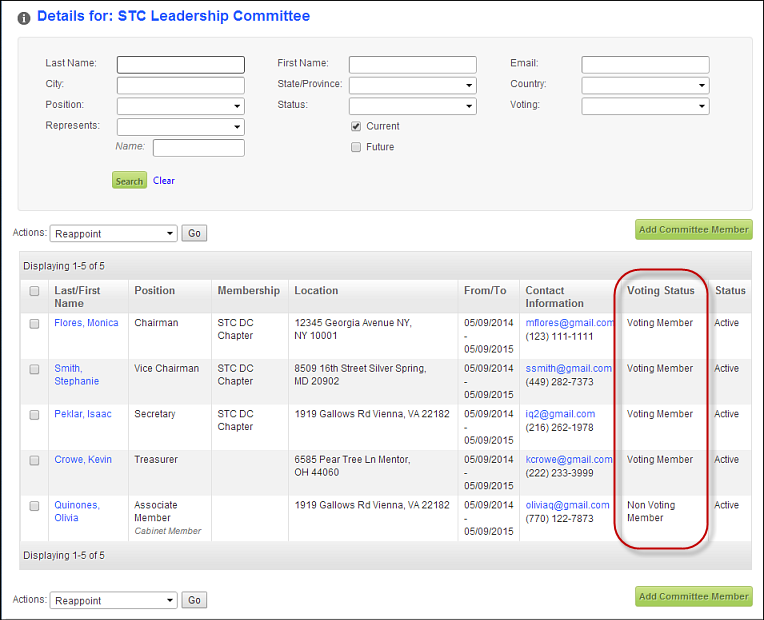
Voting Status Column
This column displays the voting status of the committee member with the committee (i.e., voting member or nonvoting member). This value is defined in the back office on the Committee Details screen. For more information, refer to Adding a New Committee Member. In addition, committee managers can edit or define a committee member's voting status by using the Committee Term Details control or the Committee Reappoint control, as long as they have the correct back office permissions.
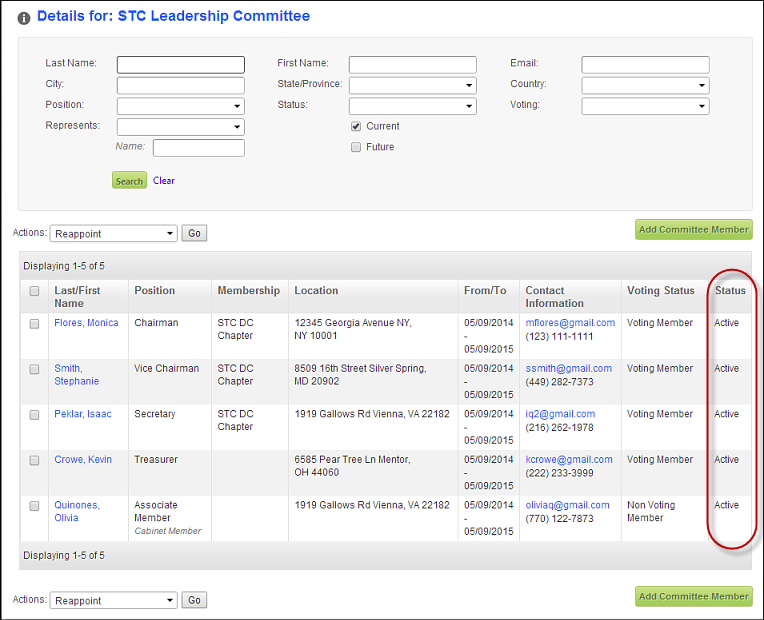
Status Column
This column displays the status of the committee member with the committee. This value is defined in the back office on the Committee Details screen. Status is used to indicate a TEMPORARY leave, (e.g., maternity, an extended vacation, short term disability, a sabbatical, etc.). It does not automatically exclude someone from a committee, since it is expected that the absence will be temporary. This is simply an indicator so group managers and staff can act accordingly (e.g., they do not send meeting invites until the status goes back to Active). This does not END someone’s service; in order to end some ones service, the person’s service END DATE should be updated. For more information, refer to Adding a New Committee Member. In addition, committee managers can edit or define a committee member's status by using the Committee Term Details control or the Committee Reappoint control, as long as they have the correct back office permissions.
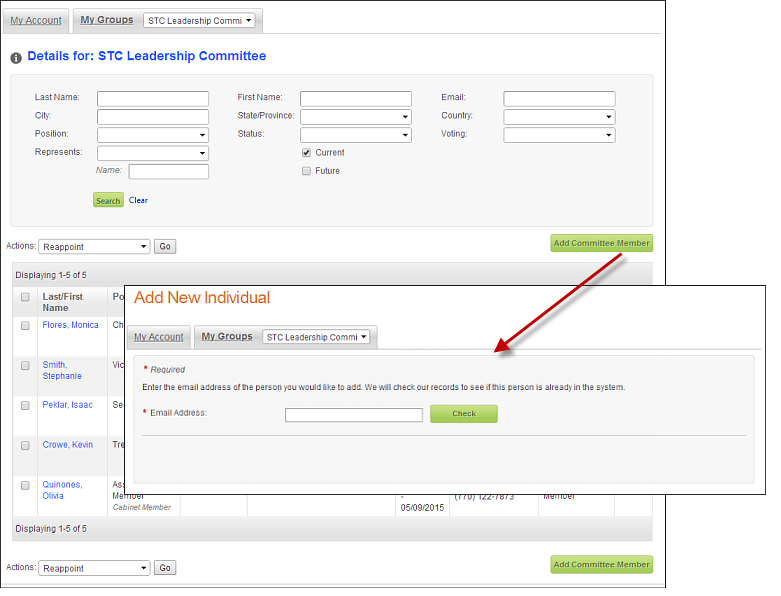
Add Committee Member
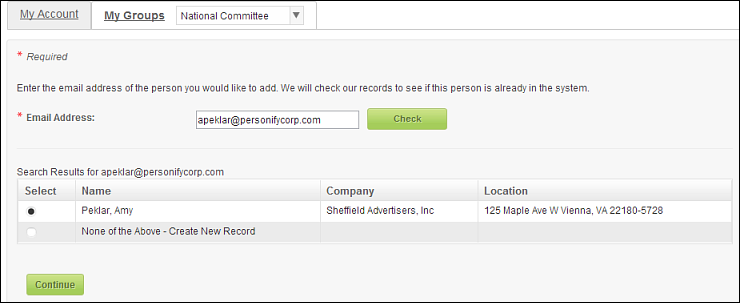
When the committee manager selects Add Committee Member, he/she is redirected to the Add New Individual page, as shown below. Here, the committee manager enters the email address of the individual that he/she wants to add to his/her roster. If you do NOT allow multiple constituents to share the same email address, this check ensures that users do NOT have same email address in your database and helps to prevent duplicate users from being entered into your database. Please note that the system searches on primary email address ONLY. For more information on where this information is stored in the back office, refer to Adding a New Committee Member.
If the URL of the Add New Individual Page field is defined for this control, but the Add Individual to Group field is NOT enabled in the back office, the "Add Committee Member" button does not display and the committee manager is unable to add new individuals to his/her roster. See Setting up a Group Manager's Permissions for more information.
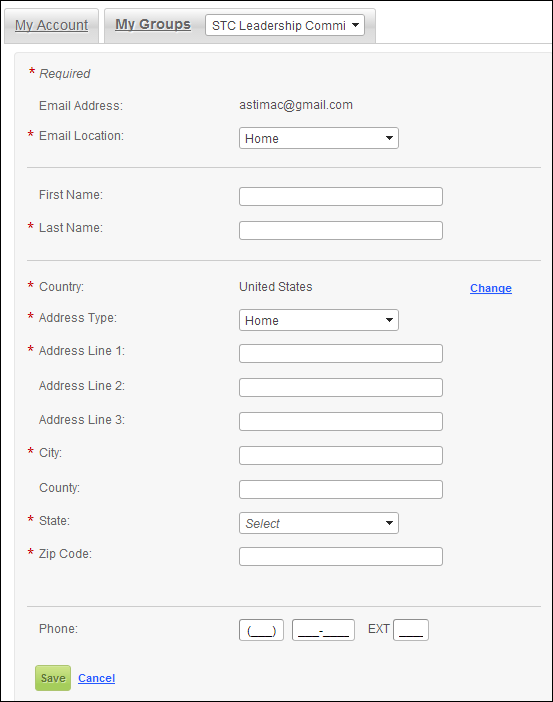
When the committee manager enters the individual's email, the system checks to see if he/she already exists in the database. Please note that the system searches on primary email address ONLY. When the committee manager clicks Add Individual Details, the committee manager is prompted to enter the individual's information, as shown below. When the committee manager clicks Continue, the committee manager is redirected to the Committee Term Detail page.
When a committee manager adds a new committee member that is NOT in the system to his/her roster, a SSO login is created for the new individual. The following are the two ways that you can notify the new individual that a SSO login was created:
1. The first option is to set up a notification, which will notify the new individual that a SSO login was created when he/she was added to the committee. See Setting Up Notification Events for more information.
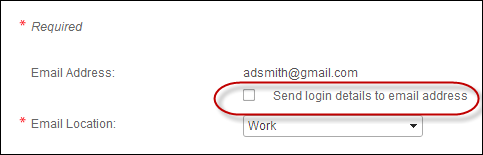
2. The second option is if the committee manager checks the Send login details to email address checkbox, as highlighted below, the committee member will receive an email with a link in it to reset his/her password. This workflow is handled by Single Sign-on (SSO), which is independent of the notifications system. For more information, refer to Setting Up the SSO and IMS Admin Module.
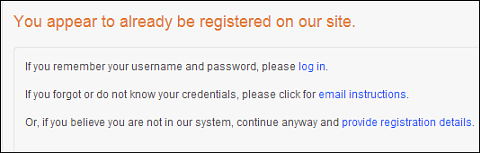
Or, if the committee manager does NOT check the Send login details to email address checkbox and the new individual tries to register for your website, he/she will be redirected to the You appear to already be registered on our site page, as shown below. Here, the new individual can log into your website, retrieve his/her forgotten password, or provide an alternate email address in order to log into to your website. See New Customer Registration Page for more information.
If the individual's primary email is in the system, the page displays as shown below. When the committee manager clicks Continue, the committee manager is redirected to the Committee Term Detail page. A group manager may select the None of the Above- Create New Employee Record radio button if the email was generic to a department/family and has already been claimed by a different person.
Actions
From the Actions drop-down, committee managers can perform the following tasks:
· Reappoint
· Export to File
· Print Roster
· Send Email
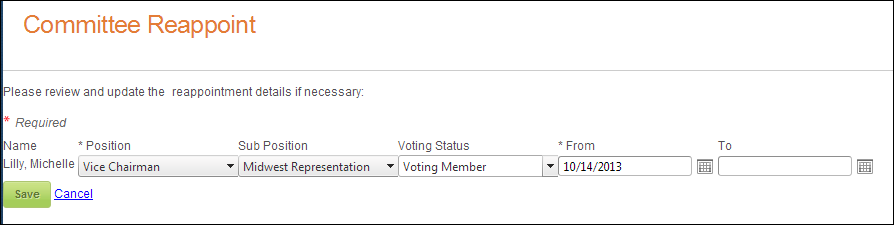
Reappoint
When the committee manager selects Reappoint from the Actions drop-down, he/she is redirected to the Committee Reappoint page, as shown below. For more information on configuring this page, see Overview: Committee Reappoint Control. Here, a committee manager can update and reappoint members from his/her roster to a position on the committee.
The drop-downs (i.e., sub position, position, voting status, etc.) are populated based on the values you define in the back office for the non-fixed COM system types and codes.
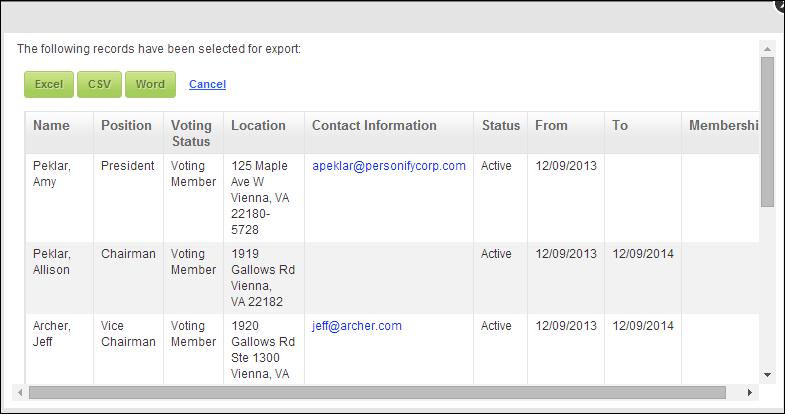
Export to File
When the committee manager selects Export to File from the Actions drop-down, the following window displays. Here, the committee manager can export selected group members on his/her roster to an Excel, CSV, or Word file.
Print Roster
When the committee manager selects Print Roster from the Actions drop-down, the following window displays. Please note that in order for committee managers to be able to print a roster, their popup blockers MUST be turned off.

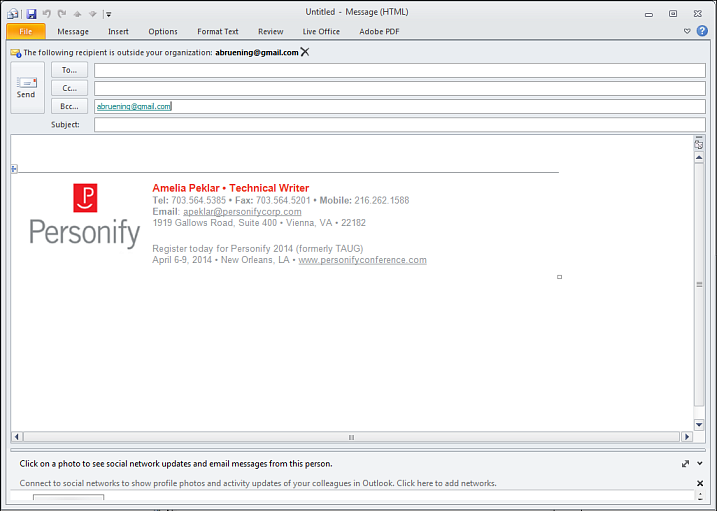
Send Email
When the committee manager selects Send Email from the Actions drop-down, a window in their default email application opens similar to what is show below. This email feature is provided so a group manager can easily reach out to a small subset of their group. It is not intended for large blast emails. Keep in mind that emails with large distribution lists can get caught in spam filters, or worse, put the sender’s address on a watch list. Make sure your group managers understand their options for mass communications (e.g., if they can provide someone at your organization with a list that they wish to mass-market to). For more information, refer to Emailing the Committee.
See Also:
· Web Settings for the Roster Control