Defining the Daily Meeting Registration Workflow
During meeting registration on the web, you can provide web users the
option to purchase a registration only certain days of a conference or
large meeting. If you have set up your conference for this option, when
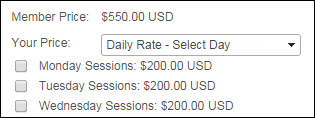
a web user reaches the Registration
Information step, he/she will have the option to select a rate for
just one day from the drop-down. Checkboxes will display similar to what
is shown below and they allow the user to select which day he/she wants
to register for.
Then, on the Select
Sessions step, only sessions that are defined for the selected day
will appear. A user can choose from the sessions he/she wants, and continue
with the registration.
Daily registration products to provide registrations
with two workflows:
1. Multiple
registration products can be purchased. For example, your meeting gives
registrants the option of selecting/purchasing a Monday and a Wednesday
registration.
This functionality permits registration options for Monday, Monday/Tuesday,
Tuesday, Tuesday/Wednesday. As long as the dates are sequential, they
can be reflected as a registration option (an option of Monday/Wednesday
will not restrict Tuesday’s events/sessions from displaying because Personify360
does not "see" Tuesday as being omitted. Please refer
to Creating Containers for additional information.
 Please be
aware that the system does not restrict the purchase of daily registration
products by date. For example, if registration options of Monday, Monday/Tuesday,
and Tuesday are created, there is no process in base that prevents the
registrant from selecting all three options.
Please be
aware that the system does not restrict the purchase of daily registration
products by date. For example, if registration options of Monday, Monday/Tuesday,
and Tuesday are created, there is no process in base that prevents the
registrant from selecting all three options.
2. You can restrict web
users who want to register for a daily rate to only be able to select
one session option, by rendering the available daily sessions as radio
buttons. If you want the system to display daily registration products
with radio buttons during the meeting registration workflow, enter ONLY_ONE
(or any other user defined phrase) in the Repeated
Event field on the Capacity
Definition screen for each session product, as displayed below. The
value entered here is an user defined code that is not tied to any system
types and codes. The system will only allow users select one daily registration.
If one daily session associated with a meeting has been defined to display
radio buttons, all other daily sessions will display radio buttons as
well. For example, if you wanted users to only be able to register for
one fundraising session, you would enter "FND101" in the Repeated Events field for the four
fundraising sessions and users would only be able to register for one
of those four sessions.
 You
can define sessions to allow all daily registrants to register for them,
even if they don’t purchase a registration for that day. For example,
if you want to allow all meeting attendants to come to the closing ceremonies,
you can define it in the back office, and the session will display regardless
of the day selected for registration.
You
can define sessions to allow all daily registrants to register for them,
even if they don’t purchase a registration for that day. For example,
if you want to allow all meeting attendants to come to the closing ceremonies,
you can define it in the back office, and the session will display regardless
of the day selected for registration.
Session
subproducts that are "daily registration" products are sorted
in ascending order by start date, start time, end date, and end time.
 To
see a video demonstrating how to complete this, refer to Video Demo.
To
see a video demonstrating how to complete this, refer to Video Demo.
To define a daily registration product:
1. For the
main meeting product, define a web-enabled daily rate with a $0 price.
See Defining a Web-enabled Daily Rate for more information.
2. Create "containers"
for the days that you want to offer daily rates (e.g., Monday's price
is $100, Tuesday's price is $75, etc.). See Creating
Containers for more information.
3. Create
session products for each day for which you want web users to be able
to register. See Creating Sessions for more information.
Defining a Web-enabled Daily Rate
For information about the fields on the Rates and Pricing screen, refer
to Defining Meeting
Product Rates and Pricing.
To define a web-enabled daily rate with a $0 price:
1. From the
Personify360 main toolbar, select Products > Product
Central.
The Product Maintenance search screen displays.
2. Click Search
to find a product or click Create New
Product.
3. Select Define
Rates and Pricing.
The Rates and Pricing screen displays.
4. Click Add
Rate.
5. Select a Rate
Structure from the drop-down.
6. From the Rate
Code drop-down, select "DAILY".
In order
for "Daily" to display in this drop-down, the Option 1 value
for the MTG "RATE"
system type must be set to "DAILY". See Meeting
System Types and Codes for more information.
7. Check
the Web Enabled Rate checkbox.
In order for this price to display on the web, this checkbox MUST be checked.
8. Click
Add Price.
9. In the
Price text box, enter "0".
10. Click
Save.
Creating Containers
Once you have defined the daily rate for the main meeting product with
a web-enabled daily rate with a $0 price, you need to create a session
product with the daily rate defined for the main meeting for each day
that you want a daily rate. This is not a true session; this product will
serve as a container for all session in the main meeting that fall on
a certain day. You can define this container to span multiple days, but
they must be consecutive. This session product, or container, will appear
as a checkbox once a user selects the daily rate on the Registration
Information step during meeting registration.
If
you define and web-enable multiple web codes for a daily rate, only the
default web rate for that day displays to the web users. However, in the
back office, if you define and web-enable multiple web codes for a daily
rate, staff users can select from the list of rates and they are not automatically
defaulted to chose the rate for the date that they selected.
To create "containers" for the days that
you want to offer daily rates:
1. Return
to the Product Central screen. From the Personify360 main toolbar, select
Products > Product Central.
The Product Maintenance search screen displays.
2. Click Create
New Product.
3. Define
the Product Code.
4. Click
the Parent Product link to select
the meeting you added the Daily rate to.
The Product Chooser window displays.
5. Search
for the meeting you added the daily rate to in the previous step.
6. Enter
a Product Name and Invoice
Description so users will know which day they are registering for.
For example, if you creating this daily rate for Monday, enter "Monday"
in these fields.
7. From the
Product Type drop-down, select
"Breakout Session".
8. From the
Product Class drop-down, select
"Breakout".
9. Ensure
that the Master Product checkbox
is unchecked.
10. Select
the applicable Begin Date & Time.
11. Ensure
that the Multi-Day checkbox
is unchecked.
12. Check
the Daily checkbox.
This is the only place that this checkbox must be checked for the Daily
Registration workflow.
13. Click
Define Rates and Pricing.
The Rates and Pricing Screen displays.
14. Click
Add Rate and define the daily
rate for the component.
Each day must have a daily rate defined for it. If you define and web enable
multiple web codes for a daily rate, only the default web rate for that
day displays to the web users. However, in the back office, if you define
and web enable multiple web codes for a daily rate, staff users can select
from the list of rates and they are not automatically defaulted to chose
the rate for the date that they selected. In addition, if reduced pricing
is offered for a multiple day option, only consecutive days can be reflected
(e.g., Monday/Tuesday NOT Monday/Wednesday), because the workflow cannot
identify a skipped day.
For information on how to create a rate, refer to Defining
Meeting Product Rates and Pricing.
You create
the "container" session products to define daily prices (e.g.,
Monday, Tuesday, and Wednesday); for session products that fall on those
days, if a user selects "daily rate" from the drop-down, the
default daily rate will display for all those session products.
The Meeting
Registration control pulls the name you have defined for the daily rate.
Make sure to name your daily rate something that will let web users know
to select a checkbox with a rate (e.g., "Daily Rate - Select a Day").
15. Make sure the you enable the
product for the web. See Session
Products on the Web for more information.
16. Click
Save.
Creating Sessions
Create sessions products for each day for which you
want web users to be able to register:
1. Create
a session for each day for which you want web users to be able to register.
See Creating
a Session for more
information.
a. Make
sure the you enable the session product for the web. See Session
Products on the Web for more information.
b. The
Daily checkbox does NOT need to
be checked for sessions.
c. If
you want the session to be available to all registrants regardless of
the days they are registered for, check the Available
to All Daily registrants checkbox on the General Setup screen.
Otherwise, Personify360 looks at the sessions begin/end dates to automatically
determine whether or not these sessions will display for the user’s selection.
Since
the daily registration workflow only provides the web user with a single
price point (no drop-down options), the session should only have a single
web-enabled rate code defined for each web-enabled rate structure. The
Daily rate code
is not reflected.
See Also:
· Defining
Capacity and Session Control
· Viewing
a Meeting Session Summary