Pay Now Control Overview
Pay Now is an alternative to the full Checkout
control that can be enabled for some or all products. Pay Now takes
users through a simplified, single step checkout process, whereas the
Checkout control is a three-step process. You can incorporate it into
an existing order workflow (e.g., Member
Join or Meeting
Registration) by adding it as the last step in the workflow process.
It can also be used to pay existing orders (e.g., placing this control
on the Pay
Open Balances page on the My Account page, which would redirect web
users to the Pay Now page).
 If
the web user is logged in and the product detail control has been configured
to enable pay now, the Pay Now button will display on the Product
Detail page. However, the web user does NOT have to be logged in in
order for the Donate Now button to display on the online
donation control.
If
the web user is logged in and the product detail control has been configured
to enable pay now, the Pay Now button will display on the Product
Detail page. However, the web user does NOT have to be logged in in
order for the Donate Now button to display on the online
donation control.
For more information on the web settings for this control, please see
Configuring
the Web Settings for the Pay Now Control.
Prerequisite
Before configuring the Pay Now control, it is important that your back
office configurations are accurate. If not, these configurations will
not display properly on your e-Business website. See Configuring
the Back Office Settings for the Pay Now Control for more information
on the system types and codes that need to be web enabled before setting
up this control.
Customer Impact
On the web, when the logged in web user clicks Pay
Now, the Pay Now page displays similar to what is shown below.
Web users can perform the following from this control:
· Pay
for additional items in cart
· Remove
or back order products that are no longer available
· Select
billing and shipping address
· Select
employer associated with order
· Select
shipping preference
· Apply
a coupon or promo code
· Select
a saved credit card for payment
· Add
a new credit card for payment
· Pay
by eCheck
· Pay
by PayPal
· Process
the order
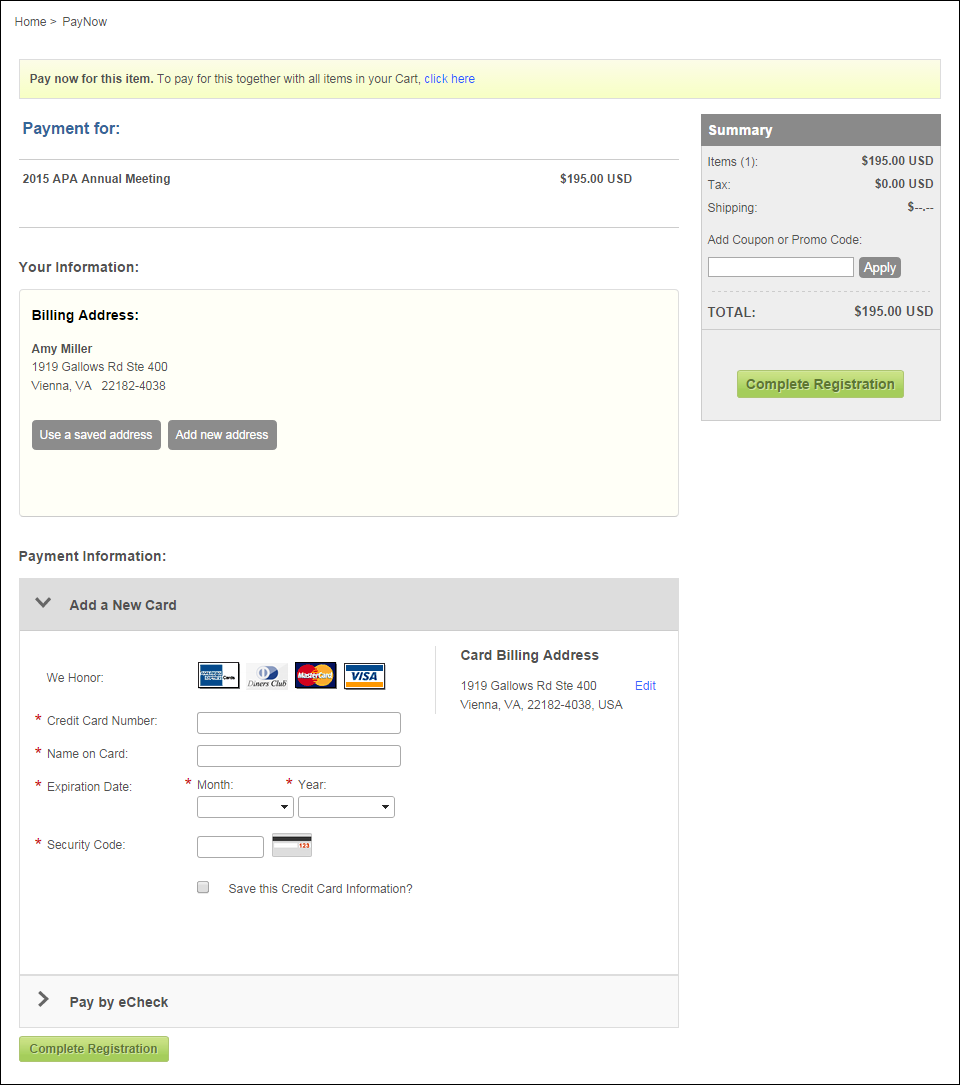
Pay for Additional Items in Cart
As of 7.6.0, if the logged in web user has additional items in his/her
cart, a message will display at the top of the Pay Now control notifying
the web user and providing the option to go to his/her cart to pay for
all items. The URL that opens when the web user clicks this link is defined
in the web settings of the Pay Now control. For more information, please
see Configuring
the Web Settings for the Pay Now Control.

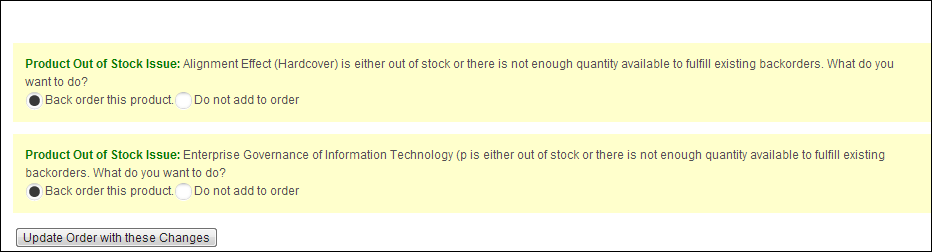
Removing Products that are No
Longer Available
If your web user has products in his order that are no longer available,
it will display as highlighted below. The web user can decide to back
order this product or remove it from his/her order.
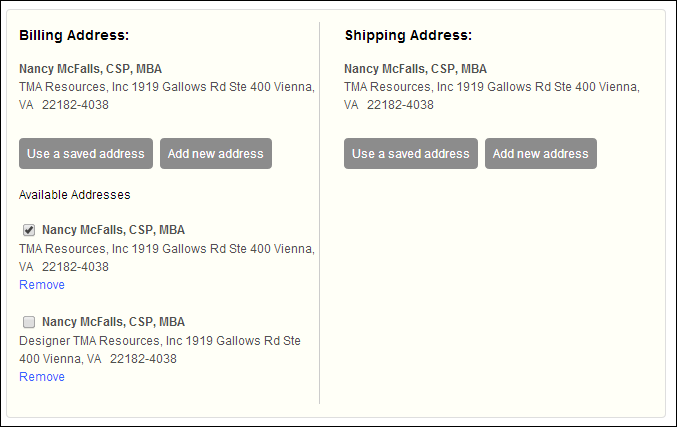
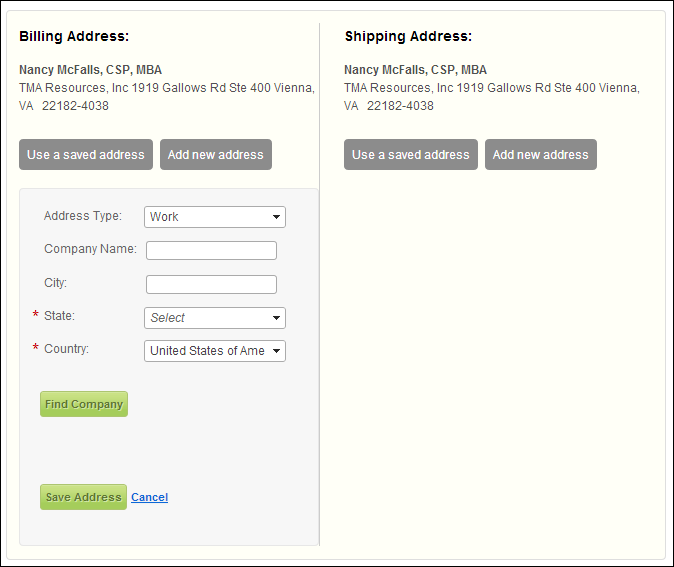
Selecting a Billing and Shipping
Address
The web user's primary address defaults to the billing and shipping
address on the order. If necessary, the web user can select a different
existing address to be used as the billing and/or shipping address or
he/she can add a new address. If the web user clicks Use
a saved address, a list of available addresses displays, as shown
below.
If the web user click Add new address,
the following form displays:
Select
employer associated with order
As of 7.6.0, if the CUS MULTIPLE_CONCURRENT_EMPLOYERS
application
parameter is set to "Y" and the order master ship-to customer
has more than one current employment relationship, the Employer Information
section displays, as shown below. The customer's primary employer will
be selected by default, but he/she can select a different employer to
associate with the order. This is used when engagement scores for companies
includes employee points rolled up to the employer company. However, this
information can also be used for other reporting purposes as this data
is stored in the EMPLOYER_MASTER_CUSTOMER_ID and EMPLOYER_SUB_CUSTOMER_ID
columns in the Order_Master table. For more information, please see Changing
the Employer on an Order.

Selecting a Shipping Preference
From the Select Shipping Preference
drop-down, the web user can select his/her shipping method, as highlighted
below.
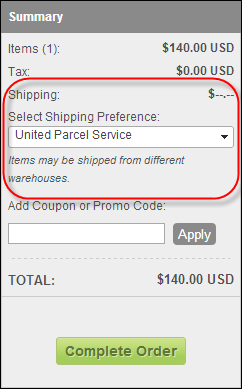
 Please
note that the Display Shipping Options at Pay Now
checkbox on the eBusiness Control screen in Product Maintenance must be
checked in order for the Pay Now control to display shipping options.
For more information, please see Configuring
Back Office Settings for the Pay Now Control.
Please
note that the Display Shipping Options at Pay Now
checkbox on the eBusiness Control screen in Product Maintenance must be
checked in order for the Pay Now control to display shipping options.
For more information, please see Configuring
Back Office Settings for the Pay Now Control.
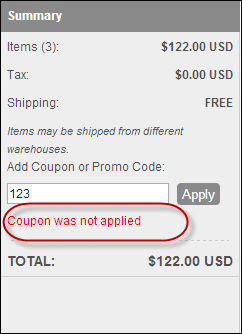
Applying a Coupon or Promo Code
Web users have the option to applying a coupon or promo code to their
order. As of 7.5.2, you can define a market code and/or coupon code that
qualifies the web user for free
shipping. For more information on coupons and promo codes, please
see Configuring
Back Office Settings for the Pay Now Control.
If the web user applies a coupon or promo code that was not accepted,
the page displays, as shown below. Please note that this message is configurable
in the web
settings for this control.
If
the web user applies BOTH a free
shipping coupon AND a free
shipping market code to his/her order, if he/she removes the market
code, the system will remove the free shipping even though the coupon
is still applicable. This is a known issue. The web user must remove the
coupon and re-add it in order for the free shipping to be applied.
Selecting a Saved Credit Card for
Payment
As of 7.5.2, if the checkout control has been configured to allow saved
credit cards (via Allow Saved Credit
Cards? checkbox in web settings), the "Select a Saved Credit
Card" section will display in the Payment step of the checkout process.
From here, web users can update the following information on an existing
credit card is:
· Name
on Card
· Expiration
Date
· Security
Code
Saved
credit cards can NOT be removed or replaced from the checkout process.
If necessary, web users can navigate to the Saved
Credit Cards control in the profile to do so.
Adding a New Card for Payment
Web users have the option to Add a
New Card from this step in the checkout process, as shown
below.
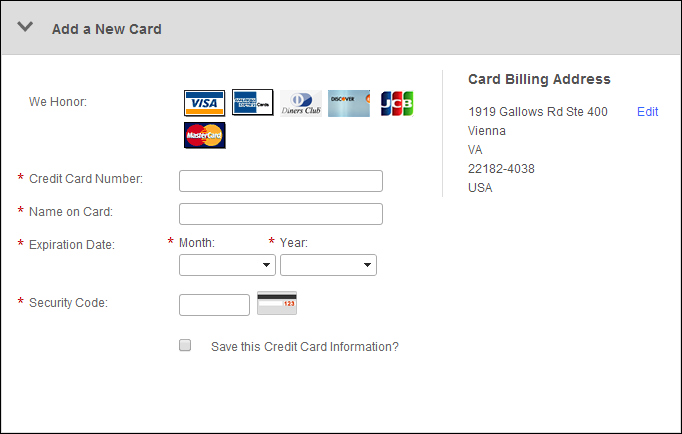
If
the web user checks the Save this Credit
Card Information? checkbox, the credit card will display in the
Saved Credit
Cards control.
Paying by eCheck
eChecks require
US Dollars. If your organization is using multi-currency, eChecks should
NOT be used for portals not using US Dollars as the base currency.
As of 7.5.0, if the open E-commerce batch
includes an e-Check (i.e., the eCheck
checkbox is checked on the Receipt
Types and Cash Accounts screen in Organizational Unit Maintenance)
receipt type, the Pay by eCheck
option displays. Please note that as of 7.6.0, this section will look
differently depending on the payment handler defined for the eCheck receipt
type in the E-commerce batch, as Vantiv eCheck processing is now supported.
For more information, please see Using
eChecks in Personify360.
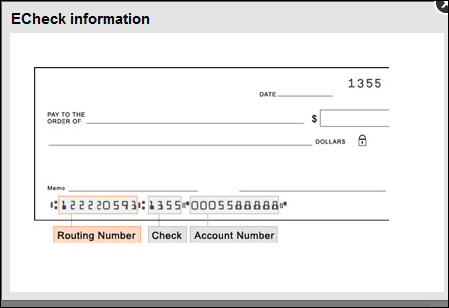
If the web user clicks What's this
from the Bank Routing Number or Bank Account Number fields, the ECheck
Information window displays, as shown below.
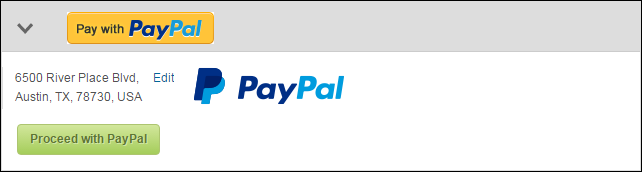
Pay by PayPal
As of 7.6.1, if the open E-commerce batch
includes a PayPal (i.e., the PayPal
checkbox is checked on the Receipt
Types and Cash Accounts screen in Organizational Unit Maintenance)
receipt type, the Pay with PayPal
option displays, as shown below.
Please note that PayPal will not be presented to the web user as an
available payment method if any of the following conditions exist:
An item in the cart is an INV product
on back-order
An item in the cart is an INV product
that is on pre-order
An item in the cart is a DCD/ECD product
that is on pre-order (new functionality as of 7.6.1)
An item in the cart is a FND pledge
product
An item in the cart is a FND recurring
gift product
The auto-renew to credit card option
is selected in the membership join workflow
When the web user opts to make a payment by PayPal, the system will
present the web user with a PayPal login screen so the web user can enter
their PayPal username and password. When the web user then clicks “Continue”
on the PayPal screen, the system will return the web user to the organization’s
payment page and PayPal will return the following information:
Token
PayPal Payor ID
PayPal Txn ID
With this information, the system then gets an authorization for the
payment from the payment handler, which is stored in Ccp_Req_Ans in a
PRE-SALE or PRE-AUTH record along with the PayPal information. CCP610
will then settle the PRE-SALE authorization.
Processing the Order
When the web user clicks Complete Order, the
order is processed and he/she is taken to the Thank You page. See the
Order Summary Control for more
information on how to configure this control.