It is up to each client to determine the appropriate location of this
page, and to create the menu item that will lead web users to this page.
The section below details how to set up this control on your website.
The instructions are intended for a web user with web admin/host privileges.
In addition, this is NOT a standalone control, which means that
in order for it to function, it needs to be incorporated into the Checkout
workflow on the web. For more information, refer to the Standalone
.NET Web Controls section.
Before configuring the Checkout control, it is important that your back
office configurations are accurate. If not, these configurations will
not display properly on your e-Business website. See Configuring
the Back Office Settings for the Checkout Control for more information
on the system types and codes that need to be web enabled before setting
up this control.
The section below explains additional configurations necessary in order
for the Checkout control to display on the web, please see Page Setups.
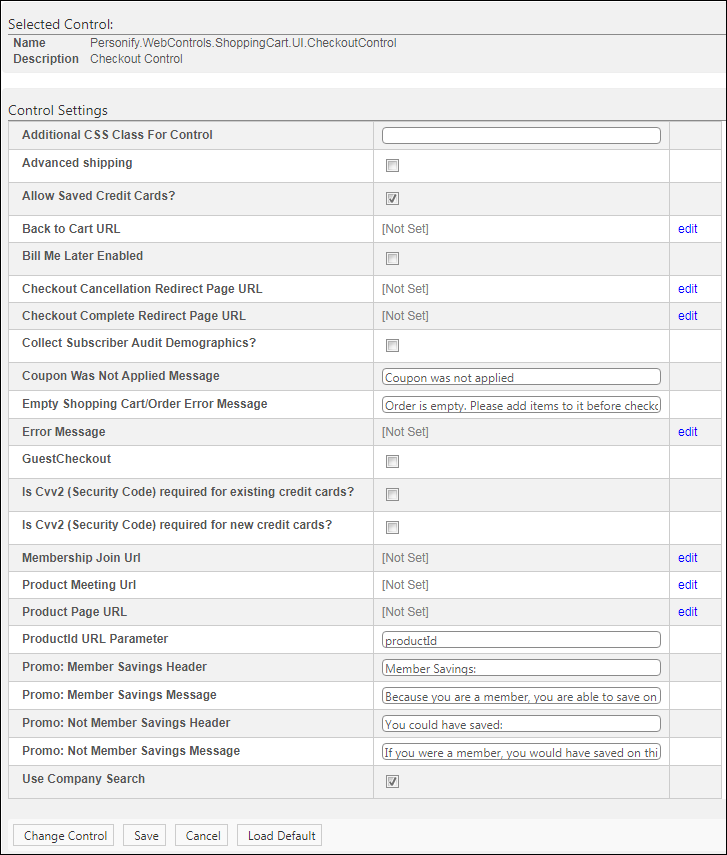
The Control Settings for this control display,
as shown below. For a detailed description of each parameter, please see
the table at the bottom of this section.
Parameter |
Description |
Additional CSS Class For Control |
This option allows you to add an additional
layout to the skin by developing a new DOTNETNUKE style, which
requires an advanced understanding of HTML and CSS. |
Advanced
shipping |
When checked, it allows web users
to later define a different shipping address for each purchased
item, as shown below. If you do NOT want web users to be able
to ship to multiple addresses, leave this checkbox unchecked.
 |
Allow Saved Credit Cards? |
By default, this checkbox is checked.
Uncheck this checkbox if you do NOT want to display saved credit
cards to web user on the payment
information step of the checkout process. |
Back to Cart URL |
You should set the PWF parameter to a
value (e.g., ShoppingCart) that will take the web user to the
Shopping Cart's URL. See Setting
up PWF Parameters to learn more about these parameters and
why your website's redirect URLs are managed there. |
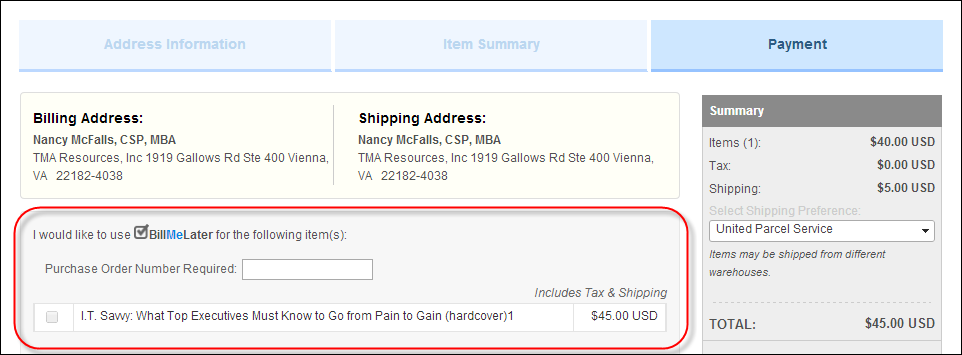
Bill Me Later
Enabled |
When checked, it allows web users to pay
for a purchase at a later date on Step 3 of the checkout process,
as shown below. See Bill
Me Later for more information about the back office setting
required to for a web user to select this option.
 |
Checkout Cancellation Redirect Page URL |
You should set the PWF parameter to a
value (e.g., ShoppingCart) that will take the web user to the
URL when he/she clicks "Cancel" during the checkout
process, as highlighted below. See Setting
up PWF Parameters to learn more about these parameters and
why your website's redirect URLs are managed there.
 |
Checkout Complete Redirect Page URL |
You should set the PWF parameter to a
value (e.g., ThankYou) that will take the web user to the Order
Summary page's URL when he/she clicks "Process Order"
on Step 3 of the checkout process, as highlighted below. See Setting up PWF
Parameters to learn more about these parameters and why your
website's redirect URLs are managed there.
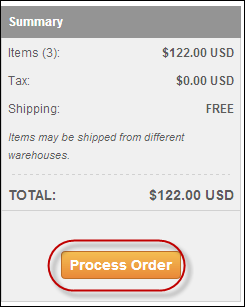 |
Collect Subscriber Audit Demographics? |
As of 7.5.0SP1, if this checkbox is checked,
if a customer is purchasing a new subscription or a subscription
renewal of a BPA-audited publication, or if a member is purchasing
or renewing a membership that comes with a BPA-audited publication
as a member-benefit, the customer will be required to answer subscriber
audit demographic questions before they can successfully check
out. For more information about the screen that displays, please
see Audit
Demographics on the Web. |
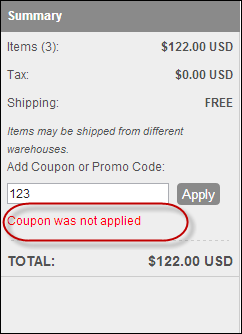
Coupon
Was Not Applied Message |
A web user may enter a coupon or
promo code at checkout that is not valid (e.g., it is expired
or he/she made a typo). You can determine the message that you
would like to display (e.g., "Coupon was not applied").
This message is displays on Step 2 of the checkout process, as
highlighted below.
 |
Empty Shopping Cart/Order Error Message |
Enter the error message that will display
to web users on Step 1 of the checkout process if there are no
items in his/her shopping cart (e.g., "Order is empty. Please
Add items to it before checkout."). |
Error Message |
The error message will display on the
control for the action that was being performed at the time of
the error. If left blank, the default error message, "An
error occurred while performing [Insert Action]. If the problem
persists, please contact the site administrator", will display.
[Insert Action] will be substituted with the action the control
was performing at the time of the error. If you wish to change
the default error message, customize it with a PWF Parameter.
See Setting
up PWF Parameters for more information. |
GuestCheckout |
When checked, web users have the
option to complete the checkout process as a guest web user. If
this checkbox is NOT enabled, web users will be unable to complete
the checkout process as a guest. If you decide to enable this
field, you must create a separate workflow for the guest checkout
process. See Page Setups for the Checkout
Process for more information. |
Is Cvv2 (Security Code) required for existing
credit cards? |
Check this checkbox if a credit card security
code is required for existing credit cards during checkout.
 This value is not stored in Personify360,
so web users will have to re-enter this code for purchases even
if the credit card is saved on file. This value is not stored in Personify360,
so web users will have to re-enter this code for purchases even
if the credit card is saved on file.
|
Is Cvv2 (Security Code) required for new
credit cards? |
Check this checkbox if a credit card security
code is required for new credit cards during checkout.
This value is not stored in Personify360,
so web users will have to re-enter this code for purchases even
if the credit card is saved on file. |
Membership Join Url |
You should set the PWF parameter to a
value (e.g., MbrJoinListing) that will take the web user to the
Membership Listing page's URL when he/she clicks on a membership
product in his/her order, as shown below. See Setting
up PWF Parameters to learn more about these parameters and
why your website's redirect URLs are managed there.
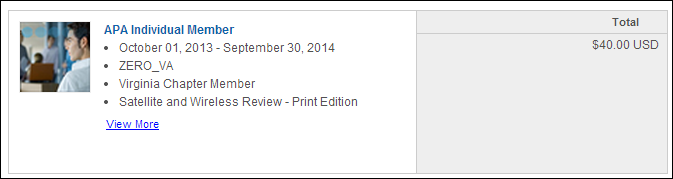 |
Product Meeting Url |
You should set the PWF parameter to a
value (e.g., Meetings) that will take the web user to the Meetings
Details page's URL when he/she clicks on the meeting product in
his/her order, as shown below. See Setting
up PWF Parameters to learn more about these parameters and
why your website's redirect URLs are managed there.
 |
Product Page URL |
You should set the PWF parameter to a
value (e.g., ProductDetails) that will take the web user to the
Product Details page's URL when he/she clicks on a product in
his/her order, as shown below. See Setting
up PWF Parameters to learn more about these parameters and
why your website's redirect URLs are managed there.
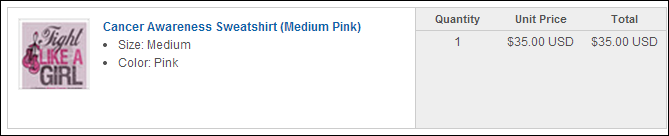 |
ProductId URL Parameter |
Defaults to "productId". Change
this if necessary. This is the name of query string parameter
that will be used to read the product ID. For example, if from
the shopping cart the web user selects to view the details of
product, the system knows which page to redirect the web user
to based of the product's ID number. See Setting
up PWF Parameters to learn more about these parameters and
why your website's redirect URLs are managed there. |
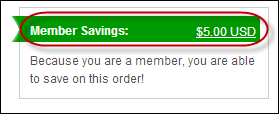
Promo: Member Savings Header |
For example, "Member Savings". This
message should highIight that the web user would save money on
his/her order by being a member of your organization. The header
would display as shown below to your web users on your website.
This displays on step 2 and 3 of the checkout process.
 |
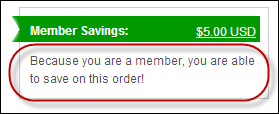
Promo: Member Savings Message |
For example, "Because you are a member,
you are able to save on this order!". This message should
bring attention to the benefits your web user is receiving by
being a member of your organization. The message would display
as shown below to your web users on your website. This displays
on step 2 and 3 of the checkout process.
 |
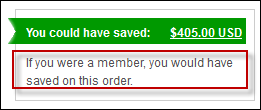
Promo: Not Member Savings Header |
For example, "You could have saved:"
This message should entice web users to want to learn how they
could save more money on their order. The message would display
as shown below to your web users on your website. This displays
on step 2 and 3 of the checkout process.
 |
Promo: Not Member Savings Message |
For example, "If you were a member,
you would have saved on this order." This message should
entice web users to want to learn how they could save more money
on their order. The message would display as shown below to your
web users on your website. This displays on step 2 and 3 of the
checkout process.
 |
Use Company Search |
As
of 7.6.2, this allows web users to search for and select a company
record. If this checkbox is checked, the "Find Company"
button displays on the web, as highlighted below. Please note
the web user must select "Work" from the Address Type
drop-down in order for the Find Company button to display
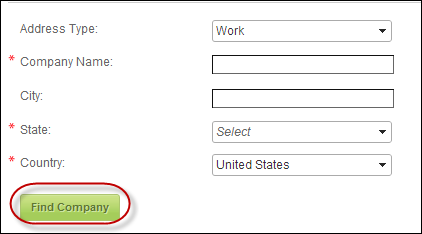 . .
If
this checkbox is not checked, web users will be unable to use
the company search feature shown above.
If you do not have customer records
of company types, do not check this box. See Creating a New Company for
more information.
If the company record does not
exist in the back office, and the web user has to manually enter
the data, a link between the company and user will not exist. |
 As of 7.5.1 FP1, this control can be
configured to be responsive
to mobile users. After adding the responsive CSS to this page, your mobile
phone user will see the control on the responsive page similar to the
one shown below. For more information
about using this control on a responsive page, please see Making
a Page Responsive.
As of 7.5.1 FP1, this control can be
configured to be responsive
to mobile users. After adding the responsive CSS to this page, your mobile
phone user will see the control on the responsive page similar to the
one shown below. For more information
about using this control on a responsive page, please see Making
a Page Responsive.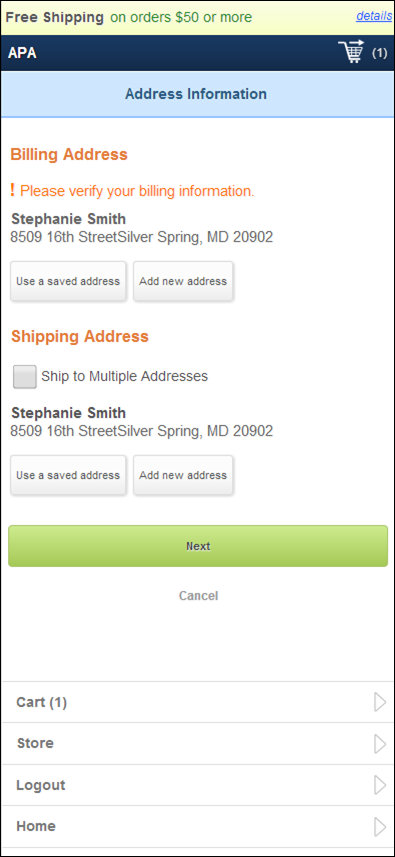
 Please note,
as a best practice, you should apply a one column skin to this page. For
more information, please see
Please note,
as a best practice, you should apply a one column skin to this page. For
more information, please see