To create a new company constituent:
1. From
the Personify360 main menu, select CRM/Orders > CRM360 > Create New
Constituent.
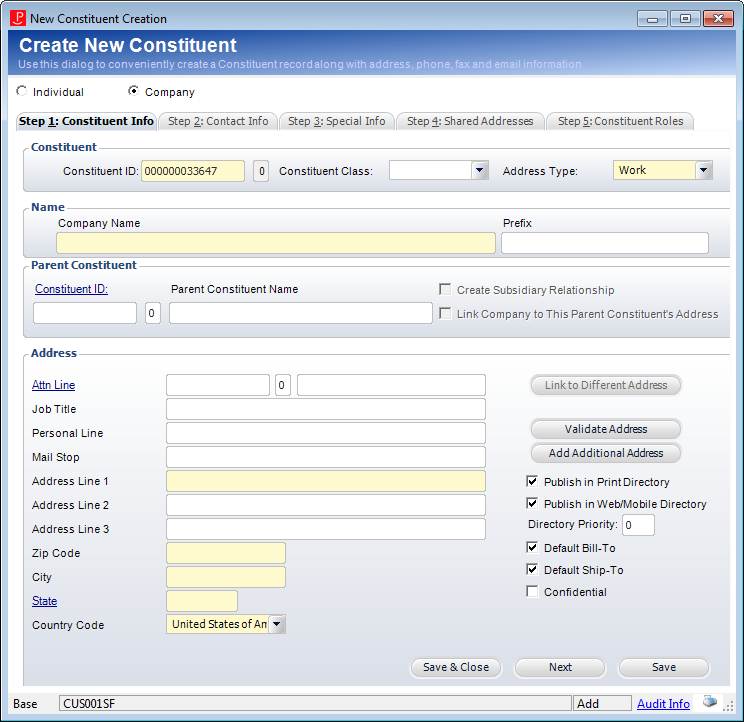
The New Constituent Creation screen displays.
2. From the Step 1: Constituent Info tab, perform the following:
a. Select
the Company radio button.
b. The Constituent ID is generated automatically, but it can be changed if desired.
c. Select the Constituent Class.
d. Select the company’s Address Type.
e. Enter the Company Name.
f. If necessary, select the company’s Prefix. For example, The, A, and etc.
g. From the Parent Constituent section, select the parent constituent by clicking the Constituent ID link and searching for a parent constituent, if necessary.
h. If you
selected a parent constituent, check the Create
Subsidiary Relationship checkbox to create an Employment relationship
for the new company and parent constituent.
This relationship will be automatically created on the Relationships
screen.
i. If you
selected a parent constituent, select whether or not to Link
Company to This Parent Constituent's Address.
If you select this checkbox, the address fields in the Address section
will be automatically populated with the address of the selected parent
constituent.
j. If you selected a parent constituent, you can click the Link to Different Address to select a different address on file for the selected parent constituent.
k. From the
Address section, click the Attn
link to open the Customer Chooser.
Search for and select a customer to be added as the Attention line on mailing
labels.
l. Enter the company’s Job Title, if necessary.
m. Enter
a Personal Line and/or Mail
Stop, if necessary.
The personal line and mail stop are extra ways of identifying the constituent
for mail routing. Depending on the address structure defined by your organization,
these may be used on mailing labels.
n. Enter the company’s Address Line 1.
 Although
the address fields are required, if you selected the Address Type "BLANK",
the system will allow you to save the new constituent without entering
an address.
Although
the address fields are required, if you selected the Address Type "BLANK",
the system will allow you to save the new constituent without entering
an address.
o. Enter Address Line 2, Address Line 3, and/or Address Line 4, if necessary.
p. Enter
the company’s Zip Code.
If more than one city exists for the entered zip code, a pop-up will display
from which you can select the appropriate city.
q. If the system found the zip code entered, the City and State fields will be automatically populated. Otherwise, enter the City and click the State link to search for and select the appropriate state.
r. Enter the County if necessary.
s. Select the Country from the drop-down.
 As of 7.6.1,
countries with the lowest Display Order
(defined on the Country
and State Code Maintenance screen) will be listed first and then alphabetically
by country name.
As of 7.6.1,
countries with the lowest Display Order
(defined on the Country
and State Code Maintenance screen) will be listed first and then alphabetically
by country name.
t. If the
new company's information should be published in any base directory reports,
whether printed or published on the Web (e.g., XBT1202), check the Publish in Directory checkbox.
When unchecked, the e-Business Member Directory web part excludes this
new company information.
u. Enter the priority in which the address will be listed in the directory in the Directory Priority field.
v. By default,
the Default Bill-to checkbox is
checked.
At least one address must be designated as the default bill-to address.
Since this is the constituent's first address in the system, this checkbox
must be selected. Once the constituent is added to the system, you can
add an additional address and designate which of the two is the default
bill-to address on all orders for this constituent.
w. By default
the Default Ship-to checkbox is
checked.
At least one address must be designated as the default ship-to address.
Since this is the constituent's first address in the system, this checkbox
must be selected. Once the constituent is added to the system, you can
add an additional address and designate which of the two is the default
ship-to address on all orders for this constituent.
x. If the new company does NOT want their address to display on the base roster reports (e.g., MBR1212PE), check the Confidential checkbox.
y. Click
Validate Address.
The Address Validation screen displays with the status of the validation.
Click Accept. See Validating a Customer
Address for more information.
To add another
address for the company, click Add Additional
Address. See Adding
a New Address to Constituent's Record in CRM360 for more information.
3. Click
Next.
The Contact Info tab displays, as shown below.
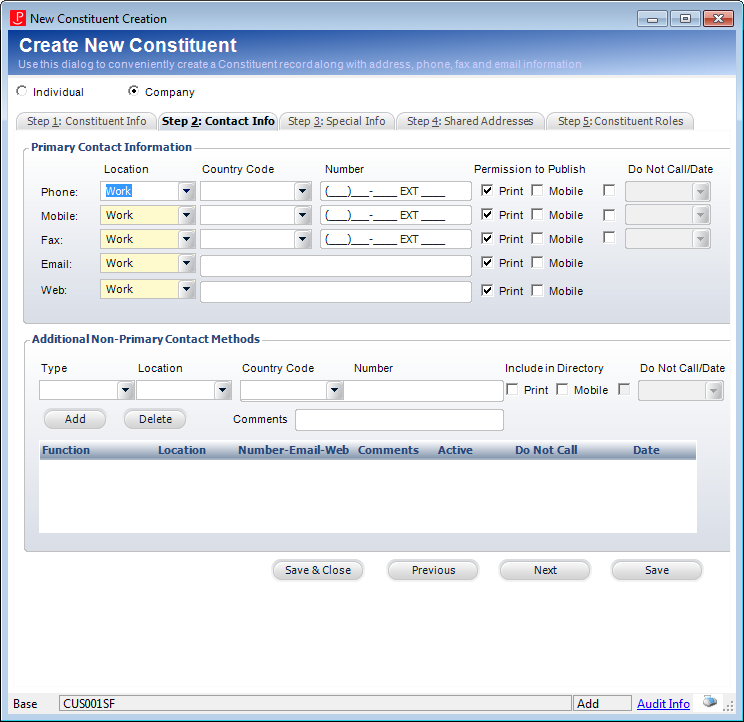
4. From the Step 2: Contact Info tab, perform the following:
a. Enter the contact information, including Location, Country Code, and Number for each of the following contact information categories:
· PHONE
· MOBILE
When
creating a new customer, if an email address is defined for the customer,
a 7 character, random web password, which could contain either numbers
or letters or a combination of both, will be created for the new customer.
Additionally, as of 7.5.2, a notification will be sent to the customer,
which contains a link to reset his/her randomly generated password. However,
if the customer's email address is being used as the username of another
customer, then when the customer is created with same email address, the
system will NOT send a notification to the customer to reset their password.
If an email address is NOT entered for the new customer, an SSO login will
NOT be created. If an email address IS entered for the new customer, the
system will create a SSO login for the customer. For more information
on the default SSO settings when creating a new constituent, please see
Customer Creation and SSO.
· WEB
· FAX
b. Check the Permission to Publish checkbox for "Print" or "Mobile" next to the appropriate contact information, if you want the information to display in a directory.
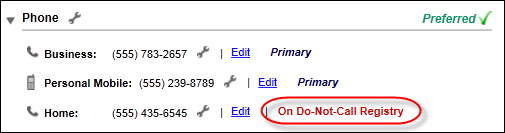
c. Check the Do Not Call checkbox next to the appropriate contact information, if necessary.
d. In the
Additional Non-Primary Contacts Methods section, select the Type
from the drop-down menu, fill out the appropriate fields, and click Add.
The fields in this section change depending on the Type selected. You can
also select whether you want to include the contact in the directory.
Once you add the contact, you can check the Do Not Call checkbox in the
table cell.
5. Click
Next.
The Special Info tab displays, as shown below.
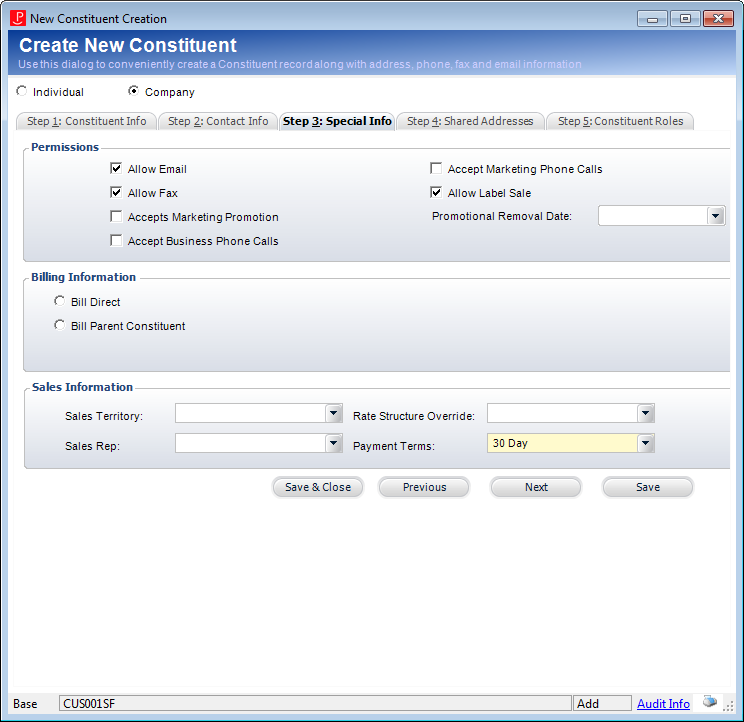
6. From the Step 3: Special Info tab, perform the following:
a. Select the appropriate permissions. The options include:
· Allow Email
· Allow Fax
· Accepts Marketing Promotion
· Accepts Business Phone Calls
· Accepts Marketing Phone Calls
· Allow Label Sale
· Promotional Removal Date
b. From the Billing Information section, select the appropriate billing information method, either by Bill Direct or Bill Parent Constituent.
c. From the Sales Information section, select the Sales Territory, Sales Rep, Rate Structure Override, and Payment Terms.
7. Click Next.
You must
save the constituent before proceeding to the next tab. If you have not
saved the new constituent, you will be prompted to do so. If you have
not yet validated the address, the Address Validation screen displays.
See Validating a Customer Address
for more information.
The Shared Addresses tab displays, as shown
below.
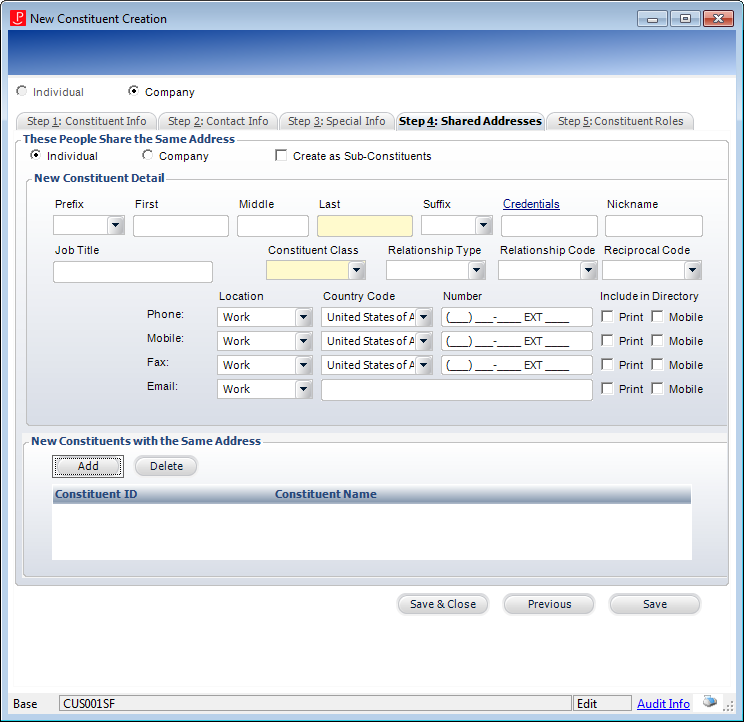
8. From the Step 4: Shared Addresses tab, perform the following:
a. As of 7.5.2, select whether the new constituent is an Individual or Company.
b. Select whether you want to Create as Sub-Constituent.
c. Enter
the new constituent's detail information and click Add.
Please note that the fields in the New Constituent Detail section will
change based on your selection of Individual or Company.
If "Individual"
is selected, only those codes which are available for SUBSYSTEM = ‘CUS’,
TYPE = ‘CUSTOMER_CLASS’ AND ACTIVE = ‘Y’ AND OPTION_1 like ‘%I%' will
display in the Constituent Class
drop-down and only those codes which are active and available for Record
Type = ‘I’ (i.e., where Cus_Relationship_Type.FOR_RECORD_TYPE like ‘%I%’
will display in the Relationship Type
drop-down.
Similarly, if "Company" is selected, only those codes which are
available for SUBSYSTEM = ‘CUS’, TYPE = ‘CUSTOMER_CLASS’ AND ACTIVE =
‘Y’ AND OPTION_1 like ‘%C%' will display in the Constituent
Class drop-down and only those codes which are active and available
for Record Type = ‘C’ (i.e., where Cus_Relationship_Type.FOR_RECORD_TYPE
like ‘%C%’ will display in the Relationship
Type drop-down.
d. Repeat the steps above to add additional new constituents with the same shared address.
If an employment
relationship is created with an individual, the relationship record will
be marked as "Primary Employer".
9. As of
7.4.0SP1, if the CUS REQ_USE_OF_CONSTITUENT_ROLES
application
parameter is set to "Y", the Step
5: Constituent Roles tab displays, as shown below. If not, click
Save & Close to save the new
constituent.
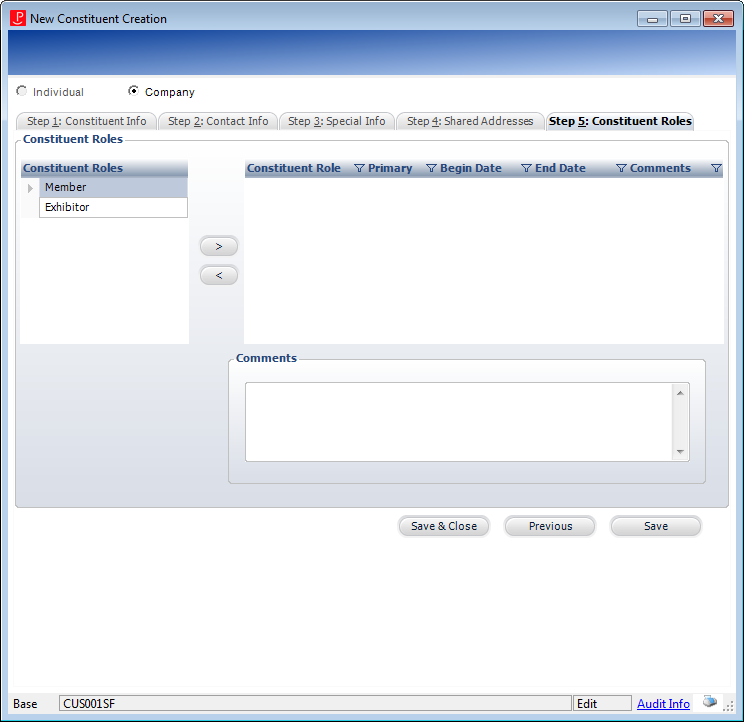
10. From the Step 5: Constituent Roles tab, perform the following:
a. Highlight the role code in the Constituent Roles box that you want to assign.
b. Click the right arrow (>) to add the code.
c. Select the End Date in which the role no longer applies.
d. Enter any Comments about the assignment or ending role.
11. Click Save & Close.
Parameter |
Description |
|---|---|
Step 1: Constituent Info |
|
Constituent ID |
Text box. Is automatically generated, but can be changed if desired. |
Constituent Class |
Drop-down. Select the constituent class. The values in this drop-down menu are populated based on the non-fixed CUSTOMER_CLASS system type for the CUS subsystem. |
Address Type |
Drop-down. Select the address type. The values in this drop-down menu are populated based on the non-fixed ADDRESS_TYPE system type for the CUS subsystem. |
Company Name |
Text box. Enter the company's name. |
Prefix |
Text box. If necessary, enter the company's prefix (e.g. A, The, etc.) |
Constituent ID |
Link. From the Parent Constituent section, select the parent constituent by clicking the Constituent ID link and searching for a parent constituent, if necessary. |
Create Subsidiary Relationship |
Checkbox. Check this to create an Employment
relationship for the new company and parent constituent, as shown
below. This relationship will be automatically created on the
Relationships
screen. |
Link Company to This Parent Constituent's Address |
Checkbox. If you selected a parent constituent,
select whether or not to Link
Company to This Parent Constituent's Address. |
Link to Different Address |
Button. If you selected a parent constituent, you can click this button to select a different address on file for the selected parent constituent. |
Attn Line |
Link. From the Address section, click
the Attn link to open
the Customer Chooser. |
Job Title |
Text box. Enter the company's job title, if necessary. |
Personal Line |
Text box. Enter a personal line,
if necessary. |
Mail Stop |
Text box. Enter a mail stop, if necessary. |
Address Line 1 |
Text box. Enter the company's address line 1.
|
Address Line 2, 3, and 4 |
Text box. Enter address line 2, address line 3, and/or address line 4, if necessary. |
Zip Code |
Text box. Enter the company's zip code. |
City |
Text box. If the system found the zip code entered, the City and State fields will be automatically populated. Otherwise, enter the City and click the State link to search for and select the appropriate state. |
State |
Text box. If the system found the zip code entered, the City and State fields will be automatically populated. Otherwise, enter the City and click the State link to search for and select the appropriate state. |
County |
Text box. If necessary, enter the constituent's county. |
Country Code |
Drop-down. Select the country from the drop-down.
|
Include in Print Directory |
Checkbox. If the new company's information should be published in any base directory print reports, check this checkbox. |
Include in Web/Mobile Directory |
Checkbox. If the new company's information should be published in any base web directory reports, check this checkbox. When unchecked, the e-Business Member Directory web part excludes this new customer information. |
Direct Priority |
Text box. Enter the priority in which the address will be listed in the directory in this field. |
Default Bill-to |
Checkbox. By default, this checkbox is checked. At least one address must be designated as the default bill-to address. Since this is the company's first address in the system, this checkbox must be selected. Once the company is added to the system, you can add an additional address and designate which of the two is the default bill-to address on all orders for this constituent. |
Default Ship-to |
Checkbox. By default this checkbox is checked. At least one address must be designated as the default ship-to address. Since this is the company's first address in the system, this checkbox must be selected. Once the company is added to the system, you can add an additional address and designate which of the two is the default ship-to address on all orders for this company. |
Confidential |
Checkbox. If the new company does NOT want their address to display on base roster reports (e.g., MBR1212PE), check this checkbox.
|
Validate Address |
Button. Click this button to validate
the address.
|
Add Additional Address |
Button. To add another address for the company, click this button. See Adding a New Address to Constituent's Record in CRM360 for more information. |
Step 2: Contact Information |
|
Phone |
Drop-downs. Enter the contact information, including Location, Country Code, and Number. See Adding a New Phone Number to a Constituent's Record in CRM360® for more information. |
Mobile |
Drop-downs. Enter the contact information, including Location, Country Code, and Number. See Adding a New Phone Number to a Constituent's Record in CRM360® for more information. |
Drop-downs. Enter the contact information, including Location, Country Code, and Number. See Adding a New Email Address to a Constituent's Record in CRM360® for more information.
|
|
Fax |
Drop-downs. Enter the contact information, including Location, Country Code, and Number. See Adding a New Fax Number to a Constituent's Record in CRM360® for more information. |
Web |
Drop-downs. Enter the contact information, including Location, Country Code, and Number. See Adding a New Web/Social Media Information to a Constituent's Record in CRM360® for more information. |
Permissions to Publish |
Checkbox. Check this checkbox for "Print" or "Mobile" next to the appropriate contact information, if necessary. When checked, this indicates the new constituent gives permission to publish the selected contact information. |
Do Not Call |
Checkbox. Check this checkbox next to
the appropriate contact information, if necessary. Today’s date
is automatically selected as the start date in which the contact
information cannot be called. The contact information cannot be
called for purposes of soliciting or promoting a product, service,
membership, and etc. If this checkbox is selected, "On Do-Not-Call
Registry" will display to the right of the contact method
on the Contact
Information screen in CRM360, as highlighted below. |
Additional Non-Primary Contacts Methods |
Fields. In this section, select the Type from the drop-down, fill out the appropriate fields, and click Add. The fields in this section change depending on the Type selected. You can also select whether you want to include the contact in the directory. Once you add the contact, you can select the Do Not Call checkbox in the table cell. |
Step 3: Special Info |
|
Allow Email |
Checkbox. When checked, it indicates emailed
communications can be sent to this constituent. When unchecked,
no emailed communications can be sent to this constituent with
the exception of automated system notifications. If this checkbox
is unchecked, "Do Not Solicit" will display in red text
to the right of the Email communication method on the Contact
Information screen in CRM360, as shown below. |
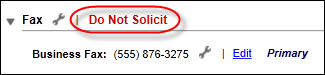
Allow Fax |
Checkbox. When checked, it indicates faxed
communications can be sent to this constituent. When unchecked,
no faxed communications can be sent to this customer, regardless
of whether the communication is considered promotional solicitation
or not. If this checkbox is unchecked, "Do Not Solicit"
will display in red text to the right of the Fax communication
method on the Contact
Information screen in CRM360, as shown below. |
Accepts Marketing Promotions |
Checkbox. When checked, it indicates marketing promotions can be sent to this company. |
Accepts Business Phone Calls |
Checkbox. When checked, it indicates the company can receive business phone calls. |
Accepts Marketing Phone Calls |
Checkbox. When checked, it indicates the company can receive marketing phone calls. |
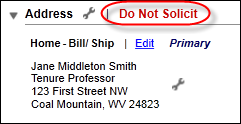
Allow Label Sale |
Checkbox. When checked, it indicates the
company wants to be included in label sets sold to third parties.
If this checkbox is uncheck, "Do Not Solicit" will display
in red text to the right of the Address communication method on
the Contact Information screen in CRM360, as shown below. |
Promotional Removal Date |
Checkbox. When selected, it indicates the date in which the company wants to be removed from promotional lists. |
Bill Direct |
Radio button. From the Billing Information section, select the appropriate billing information method either by Bill Direct or Bill Parent Constituent. |
Bill Parent Constituent |
Radio button. From the Billing Information section, select the appropriate billing information method either by Bill Direct or Bill Parent Constituent. |
Sales Territory |
Drop-down. From the Sales Information section, select the Sales Territory. |
Sales Rep |
Drop-down. From the Sales Information section, select the Sales Rep. |
Rate Structure Override |
Drop-down. From the Sales Information section, select the Rate Structure Override. |
Payment Terms |
Drop-down. From the Sales Information section, select the Payment Terms. |
Step 4: Shared Addresses |
|
Individual |
Radio button. As of 7.5.2, select whether the new constituent is an Individual or Company. |
Company |
Radio button. As of 7.5.2, select whether the new constituent is an Individual or Company. |
Create as Sub- Constituent |
Check box. Select whether you want to this constituent as a subconstituent. |
New Constituent Detail |
Fields. Enter the new constituent's detail
information and click Add.
|
Step 5: Constituent Roles |
|
Constituent Roles |
Field. Highlight the role code in the Constituent Roles box that you want to assign. Click the right arrow (>) to add the code.
|
End Date |
Field. Select the End Date in which the role no longer applies. |
Comments |
Field. Enter any Comments about the assignment or ending role. |