 You
MUST have a proper named user license in order to be able to view the
report(s) online.
You
MUST have a proper named user license in order to be able to view the
report(s) online.The Individual Activity Profile - CSM1002 report provides a list of the selected employees' activities. This report provides a list of activities for the employees within the group selected for the report. Group managers are only allowed to select a group for the report that they are currently managing. For every employee included in the report, the report lists the following information:
· Membership Information
· Meeting Registrations
· File Purchases
· Subscriptions
· Inventory Product Purchases
· Other Product Purchases
· Certification Registrations
· Committee Service
Parameters are provided to allow the group manager to select one, some, or all employees within a user-specified group. The group manager can also specify a date range, which will limit selected orders, registrations, and committee service to the dates specified by the group manager.
The section below details how to set up the Report control to display the Individual Activity Profile - CSM1002 report on your website. The instructions are intended for a user with web admin/host privileges.
This report must be deployed in the BusinessObjects server before group managers are able to run this report on the web. See BusinessObjects Installation for more information. In addition, this control uses the service operation "GetOnlineReportGenerateURL" from data services. The control uses this URL, which connects to the BusinessObjects server, to open or render the report in the current page in the form of PDF. Through the service operation "GetOnlineReportGenerateURL", data services generate the URL. See Personify Data Services for more information.
You
MUST have a proper named user license in order to be able to view the
report(s) online.
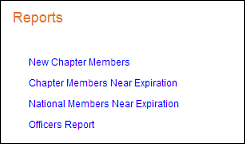
 For
every Crystal or Webi-PDF report that you want a group manager to be able
to run, you will have to create a new page, and configure the Report control
for the report you want to run on that page. For example, if you want
a logged in web user to be able to run five different reports on your
website, you will have to create five different pages and configure the
control five different times on each page. As a best practice, create
a landing page that contains links to the separate pages that contain
the different reports, as shown below. If you are using DNN, you can use
the Links Module. See Configuring
the Links Module for more information. The only exception to this
is for Webi-HTML reports, which open right on the page (i.e., Analysis
of Chapter Member Health).
For
every Crystal or Webi-PDF report that you want a group manager to be able
to run, you will have to create a new page, and configure the Report control
for the report you want to run on that page. For example, if you want
a logged in web user to be able to run five different reports on your
website, you will have to create five different pages and configure the
control five different times on each page. As a best practice, create
a landing page that contains links to the separate pages that contain
the different reports, as shown below. If you are using DNN, you can use
the Links Module. See Configuring
the Links Module for more information. The only exception to this
is for Webi-HTML reports, which open right on the page (i.e., Analysis
of Chapter Member Health).
To configure the web settings for the Report control:
1. Add the
"PersonifyBoReport" control to the desired page. For more information,
please see Adding a Page on
Your Site Using DNN.
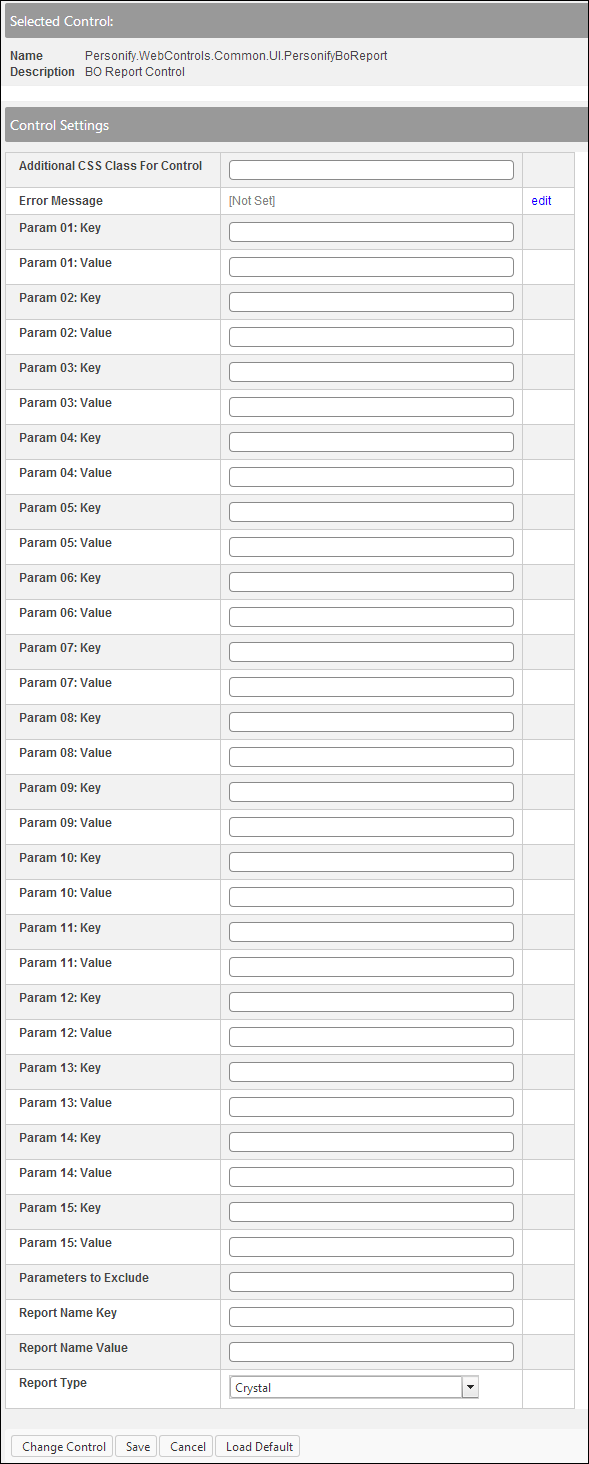
The Control Settings for this control display, as shown below.
 Text fields
have a 250 character limit.
Text fields
have a 250 character limit.
2. If
necessary, in the Additional CSS Class for Control
field, enter the CSS class.
This option allows you to add additional layout to the skin by developing
a new DOTNETNUKE style, which requires an advanced understanding of HTML
and CSS. See Applying
a Default Site Container for information.
3. If
necessary, select or create a new Error Message.
The error message will display on the control for the action that was being
performed at the time of the error.
a. If left blank, the default error message, "An error occurred while performing [Insert Action]. If the problem persists, please contact the site administrator", will display. [Insert Action] will be substituted with the action the control was performing at the time of the error.
b. If you wish to change the default error message, customize it with a PWF Parameter. See Setting up PWF Parameters to learn more about these parameters and why your website's redirect URLs are managed there.
Although
there are more fields listed on the Report control, the settings listed
are the only values necessary in order to run this report on the web.
4. In the Param 01: Key field,
enter "@GroupMasterId".
This is the report parameter key. This is the group master customer ID
for which the report is being run.
5. In the Param 01: Value field,
enter "pb_AFMRosterBag%$%GroupMCID".
This is the report parameter value. See Logic
Behind the Report Control for more information.
6. In the Param 02: Key field,
enter "@GroupSubId".
This is the report parameter key. This is the sub master customer ID for
which the report is being run.
7. In the Param 02: Value field,
enter "pb_AFMRosterBag%$%GroupSCID".
This is the report parameter value. See Logic
Behind the Report Control for more information.
8. In the Param 03: Key field,
enter "@EmployeeName".
This is the report parameter key. This is to filter by specific employee
name.
9. Leave the Param 03: Value
field, empty.
This is the report parameter value.
10. In the Param 04: Key field,
enter "@ActivityFromDate".
This is the report parameter key. This allows users to narrow the list
of orders, certifications, and committee service selected for report.
11. Leave the Param 04: Value
field empty.
This is the report parameter value.
12. In the Param 05: Key field,
enter "@IncludeMemberships".
This is the report parameter key. This allows users to specify whether
membership orders should be included.
13. In the Param 05: Value field,
enter "Y".
This is the report parameter value.
14. In the Param 06: Key field,
enter "@IncludeRegistrations".
This is the report parameter key. This allows users to specify whether
meeting registrations orders should be included.
15. In the Param 06: Value field,
enter "Y".
This is the report parameter value.
16. In the Param 07: Key field,
enter "@IncludeINVProductPurchases".
This is the report parameter key. This allows users to specify whether
inventory orders should be included.
17. In the Param 07: Value field,
enter "Y".
This is the report parameter value.
18. In the Param 08: Key field,
enter "@IncludeOtherOrders".
This is the report parameter key. This allows users to specify whether
other orders where the subsystem is not MTG, MBR, ECD, SUB, or INV should
be included.
19. In the Param 08: Value field,
enter "Y".
This is the report parameter value.
20. In the Param 09: Key field,
enter "@IncludeCRTRegistrations".
This is the report parameter key. This allows users to specify whether
certification registration should be included.
21. In the Param 09: Value field,
enter "Y".
This is the report parameter value.
22. In the Param 10: Key field,
enter "@IncludeCommitteeService".
This is the report parameter key. This allows users to specify whether
committee membership should be included.
23. In the Param 10: Value
field, enter "Y".
This is the report parameter value.
24. Leave the Param 11-15 Value and Key fields empty.
25. Leave the Parameters to Exclude and Report Name Key fields empty.
Although
there are more fields listed on the Report control, the settings listed
are the only values necessary in order to run this report on the web.
26. In the Report Name Value
field, enter "CSM1002".
The "Report Name Value" field tells BusinessObjects the type
of report you want to render. It needs to be an EXACT match, since BusinessObjects
is searched based on the report's name in order to render the report on
the web. If you do NOT know this value, the report will not run and no
results will be rendered. See BusinessObjects
for more information.
27. From the Report Type drop-down, select "Crystal".
28. Click Save.
See Also:
· Overview: Report Control for Group Management
· Configuring the Web Settings for the Report Control