 If
a maximum number of pages has been set for your site, the Add Page button
is disabled when the maximum number of pages is reached. If this
happens you will need to contact your Host to allow you to add more
pages.
If
a maximum number of pages has been set for your site, the Add Page button
is disabled when the maximum number of pages is reached. If this
happens you will need to contact your Host to allow you to add more
pages.You can choose to add a new page to your site or copy an existing page. For additional information about configuring pages using DNN, refer to the DNN documentation site.
If
a maximum number of pages has been set for your site, the Add Page button
is disabled when the maximum number of pages is reached. If this
happens you will need to contact your Host to allow you to add more
pages.
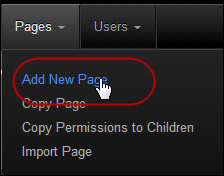
1. From the
tool bar, select Pages > Add New Page, as
highlighted below.
The Page Details screen displays.
2. In the Page Name text box, enter a name for you page. This will display in the menu. Please note that this is the ONLY required field and if you choose to create the new page now, it will accept all the defaults and add the page in a neutral language.
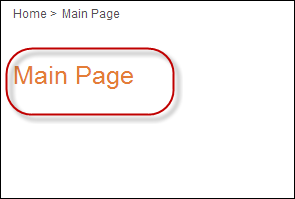
3. If necessary,
in the Page Title text box, enter a title for
your page. This will display in the browser window title, as shown below.
4. If necessary, in the Description text box, enter a description for your page.
5. If necessary, in the Keywords text box, enter keywords for your page. Please note that if you enter multiple keywords, they MUST be separated by commas. This feature is used by some internet search engines (e.g., Google) to help index your site's pages.
6. If necessary, from the Tags drop-down, select an item to tag to this page.
7. If necessary, from the Parent Page drop-down, select the page that you would like this page to be a child of.
8. If necessary, from the Insert Page section, select whether you want to insert the page Before, After, or Add to End from the page you selected from the drop-down.
9. If necessary, from the Page Template drop-down, .select which template you would like to use.
10. If necessary, check
the Include in Menu checkbox, if you want your
page to be included in the main navigation menu, as shown below. If the
page is NOT included in the menu, you can still access it or link it based
on the page's URL.

11. Select
the Copy tab.
The Copy Page window displays, as shown below.
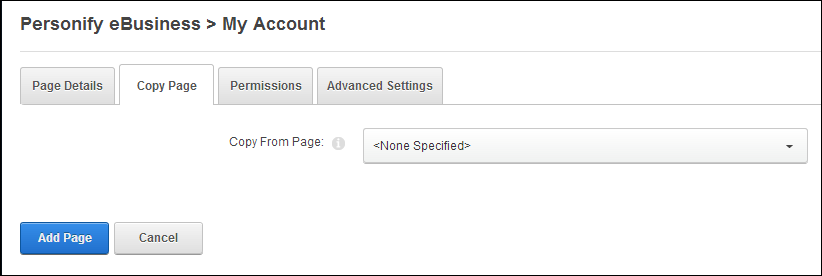
12. From the Copy From Page drop-down, select the page that you would like to copy modules from.
13. Select
the Permissions tab
The Permission window displays, as shown below.

If
permissions are NOT displayed, this means you are not authorized
to manage permissions. In this scenario, the new page will inherit
permissions from its parent page.
14. You have to set the right page permissions in order for your web users to be able to view and/or edit a page in your e-Business site. The default permissions are visible and editable by Administrators ONLY.
a. There are the following usernames/roles options available:
i. All Users: applies to registered and unregistered web users.
ii. Host: applies to web users who have host permissions.
iii. Registered Users: are web users who are registered for your web site.
iv. Unauthenticated Users: are web users who are NOT registered for or logged into your web site.
v. IMS Roles: e.g., Personify Staff, Personify Member, etc.
b. Select from the following permissions that you want to assign the role/username with:
i. Check the View Page checkbox, if you would like the web user to be able to view this page. For example, if you would like Unauthenticated Users to be able to view this page, check the View Page checkbox.
· If this checkbox is NOT selected, the permissions are not specified and the web users are unable to view this page unless they belong to another role/username, which has been granted permissions to view this page.
ii. Check the Edit Page checkbox, if you would like the web user to be able to have full administrative rights for this page.
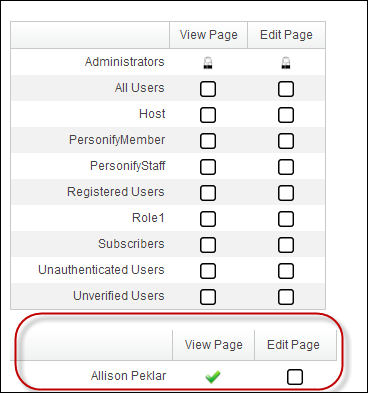
15. In the
Username text box, enter the username of a web
user that you want to grant or deny page permissions to and click the
Add link, as shown below.

The username is added to the Page Permissions section, as highlighted below.
Select whether you want to the user to be able to view and/or edit this
page. The web user(s) you add apply to this page only.
16. If
necessary, select
the Advanced Settings tab and
complete any of the optional advanced page settings.
See the DNN
documentation site for additional information.
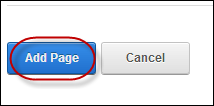
17. Click
Add Page, as highlighted below.
See Also:
· Adding a DNN Web Control Container Module
· Adding a .NET Web Control to a Page Using DNN
· Using DNN as Your CMS Platform