Configuring the Web Settings for the Membership Join Options Control
Please note that the Membership Join Options control is a "composite"
control, meaning that it contained other controls by default. Therefore,
when this control is dropped on a page, the Membership
Detail, Membership
Zip Linked Chapter, and Membership
Benefits controls are automatically included as part of this control
and no additional configuration is needed for those controls. The control
settings for this control are automatically cascaded to the control settings
for each of these other controls. The Membership
Detail, Membership
Zip Linked Chapter, and Membership
Benefits controls are provided as separate controls in case you want
to customize a separate process to include these controls.
 This
is NOT a standalone control, which
means that in order for it to function, it needs to be incorporated into
a workflow. In order for this control to work as part of the online membership
join process, you must set the Membership Join
Step 2 URL parameter
in the control settings for the Membership
Join Registration Control.
This
is NOT a standalone control, which
means that in order for it to function, it needs to be incorporated into
a workflow. In order for this control to work as part of the online membership
join process, you must set the Membership Join
Step 2 URL parameter
in the control settings for the Membership
Join Registration Control.
 As of 7.6.1, this control can be configured
to be responsive to mobile users.
After adding the responsive CSS to this page, your mobile phone user will
see the control on the responsive page similar to the one shown below.
For more information
about using this control on a responsive page, please see Configuring
Responsive CSS for the Login Page.
As of 7.6.1, this control can be configured
to be responsive to mobile users.
After adding the responsive CSS to this page, your mobile phone user will
see the control on the responsive page similar to the one shown below.
For more information
about using this control on a responsive page, please see Configuring
Responsive CSS for the Login Page.
To configure the web settings for the Membership Join
Options control:
1. Add the "MembershipJoinOptionsControl" to
the desired page. For more information, please see Adding
a .NET Web Control to a Page.
The following Control Settings display for this control, as shown below.

 Text fields
have a 250 character limit.
Text fields
have a 250 character limit.
2. If necessary, in the
Additional CSS Class for Control field, enter
the CSS class.
3. From the Cancel
Return URL line, click edit.
The Select/Edit Personify Web Parameter screen displays.
a. Click
the select link next to the appropriate PWF
parameter.
4. Select the Default
Delivery Method.
5. If necessary, check
the Enable Rate Code Change checkbox.
6. If necessary, select
or create a new Error Message.
7. If necessary, from
the Image Directory line, click edit.
The Select/Edit Personify Web Parameter screen displays.
a. Click
the select link next to the appropriate PWF
parameter.
8. From the Membership
Join Step 3 URL line, click edit.
The Select/Edit Personify Web Parameter screen displays.
a. Click
the select link next to the appropriate PWF
parameter.
9. From the Order
Create URL line, click edit.
The Select/Edit Personify Web Parameter screen displays.
a. Click
the select link next to the PWF parameter.
10. By default, the ProductID URL Parameter is set to "productId".
Change this if necessary.
11. By
default, the RateCode URL Parameter is
set to "RateCode". Change this if necessary.
12. Check the Show
Contribution Amount If Zero checkbox, if necessary.
13. Check the SIG
Amount if Zero checkbox, if necessary.
14. Click Save.
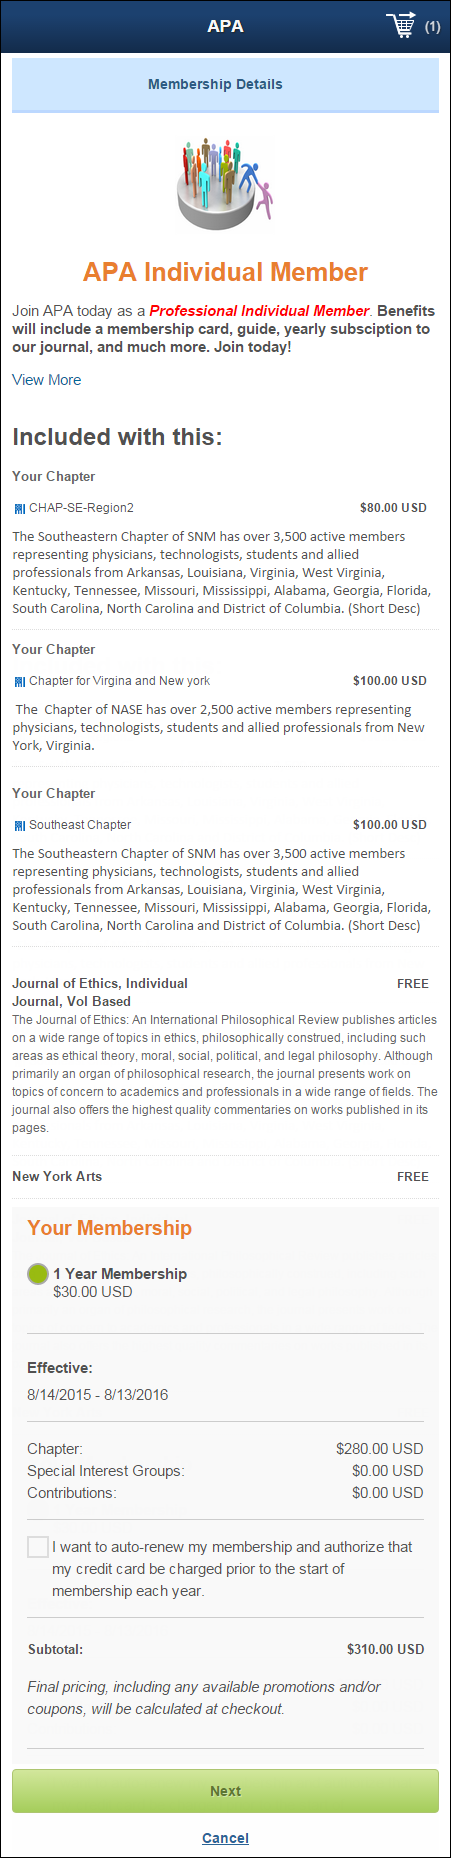
Control Setting |
Description |
Additional CSS Class for Control |
Enter the CSS class, if necessary. This
option allows you to add additional layout to the skin by developing
a new DOTNETNUKE style, which requires an advanced understanding
of HTML and CSS. |
Cancel Return URL |
You should set the PWF parameter to the
URL that will open when the user clicks "Cancel". Best
practice is to bring the user back to the page that contains the
Membership Listing control.
If this PWF parameter does not exist or you would like to create
a new one, see Setting
up PWF Parameters for more information. |
Default Delivery Method |
Select the whether you want the default
delivery method to be digital or print. This will be the default
delivery method that displays to you user. For example if you
select "D", digital will be the default option and the
user can switch to print, as highlighted below.
 |
Enable Rate Code Change |
Checking this option will allow the user
to change the rate code in the buy box, where all web-enabled
rate codes will be displayed. The rates are sorted by priority
set in the back office. |
Error Message |
If necessary, select or create a new error message.
The error message will display on the control for the action that
was being performed at the time of the error. If left blank, the
default error message, "An error occurred while performing
[Insert Action]. If the problem persists, please contact the site
administrator", will display. [Insert Action] will be substituted
with the action the control was performing at the time of the
error. If you wish to change the default error message, customize
it with a PWF parameter. See Setting
up PWF Parameters for more information. |
Image Directory |
This is the name of the image to display
if the Membership Product does not have a small image defined.
The default image is “not_available.gif", as shown below,
and this ensures that the image exists in the image directory.
If you would like to change this default image, replace the not_available.gif
file in the image folder with the default image file of your
choice.
 |
Membership Join Step 3 URL |
You should set the PWF parameter to the
page on your site that contains the third step in the membership
join process (i.e., the Make
a Bigger Impact control). If this PWF parameter does not exist
or you would like to create a new one, see Setting
up PWF Parameters for more information. |
Order Create URL |
You should set the PWF parameter to a
value that will take the constituent to that URL in your site
when he/she creates an order. If this PWF parameter does not exist
or you would like to create a new one, see Setting
up PWF Parameters for more information. |
ProductID URL Parameter |
By default, this is set to "productId",
but if the environment's redirection logic uses a different Query
String name set it here. |
RateCode URL Parameter |
By default, this is set to "RateCode",
but if the environment's redirection logic uses a different Query
String name set it here. |
Show Contribution Amount if Zero |
This defaults to checked so the contributions
amount displays in the buy box when there is no cost. |
Show SIG Amount if Zero |
This defaults to checked so that the special
interest groups amount displays in the buy box when there is no
cost. If this is unchecked, the special interest groups price
will NOT display in the buy box if there is no cost. This should
be unchecked if you do not have any special interest groups. |