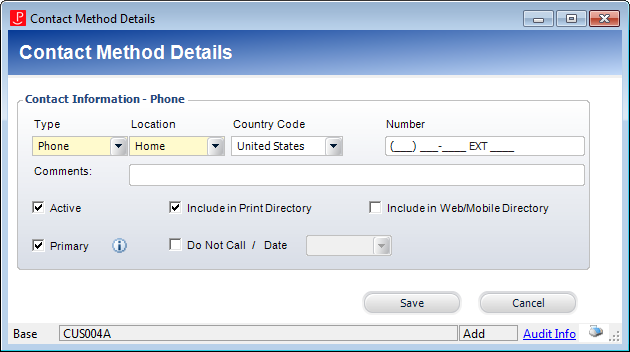
The Contact Method Details window displays, as shown below.
The following solicitation preferences are defined at the "Phone" communication method level:
· Do Not Allow System Notifications
Additionally, phone communication records can be marked as On the Do-Not-Call Registry.
To add a new phone number to a constituent:
1. From the Background Information task category in CRM360, click Contact Information.
Additionally, from the CRM360 header, you can click the Edit Contact Information link.
The Contact Information screen displays below the header in CRM360.
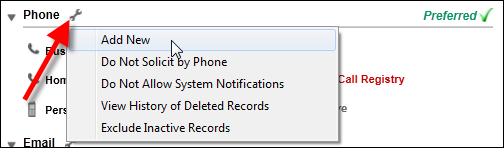
2. From the Phone section, click the wrench icon and select Add New, as shown below.
The Contact Method Details window displays, as shown below.
3. By default, "Phone" is selected as the Type. If necessary, change this to "Mobile".
Values are populated based on the fixed CUS "COMM_TYPE" system type.
4. By default, "Home" is selected as the Location. Change this if necessary.
Values are populated based on the non-fixed CUS "COMM_LOCATION" system type.
 Only one phone number can exist with the same Type and Location.
5. By default the Country Code is set to the default defined for the organization/organization unit of the logged in user. Change this if necessary.
Values are populated based on the options defined on the Country and State Code Maintenance screen. Depending on the option selected, the associated phone code displays to the right of the Country Code field. This code is defined on the Country and State Code Maintenance screen. For more information, please see Adding Country and State Codes.
6. Enter the constituent's phone Number.
When your area code is less than the maximum numbers allowed, use your mouse to click to the appropriate phone number field. You cannot click Tab to go to the next field.
7. Enter any Comments, if necessary.
8. By default, the Active checkbox is checked. Change this if necessary.
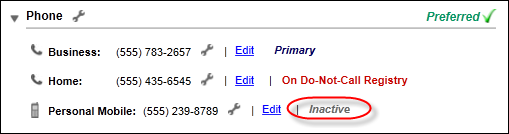
If you uncheck this checkbox, "Inactive" will display to the right of the phone number on the Contact Information screen, as highlighted below. You can choose whether or not to include inactive records in the Phone display.
 As of 7.6.0, inactivating a primary phone number will also mark the phone number as non-primary.
9. By default, the Include in Print Directory checkbox is checked. Change this if necessary.
When checked, this indicates the constituent’s phone number will be included in external directory reports.
10. Check the Include in Web/Mobile Directory checkbox, if necessary.
When checked, this indicates the constituent’s phone number will be included in external directory reports on the web.
11. By default, the Primary checkbox is checked. Change this if necessary.
Note that only one phone number can be primary per Type. For example, you can have a primary Phone/Home number and a primary Mobile/Personal Mobile number, but you cannot have a primary Phone/Home and a primary Phone/Business.
12. Check the Do Not Call checkbox and select a Date from the drop-down, if necessary.
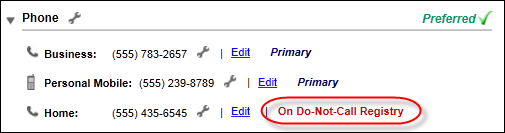
When checked, "On Do-Not-Call Registry" will display to the right of the phone number on the Contact Information screen, as highlighted below.
13. Click Save.