 This
screen does NOT include solicitation preferences, which are defined on
the Contact Information
screen.
This
screen does NOT include solicitation preferences, which are defined on
the Contact Information
screen.From the Opt-In/Opt-Out Selections screen, you can view all options to which the customer has opted in or out on the web via the Opt In/Out Preferences control. When a new opt-in record is created for an interest area, the system creates a record for the customer in the CUS_OPT_IN table. If the customer later opts out of the interest area, an end date is also updated in the CUS_OPT_IN record.
If the Option Type is INTEREST_AREA, then the system looks at the "CUS" OPT_IN_INTEREST_AREA App_Code and compares available interest areas against what the customer has already opted into or out of.
This
screen does NOT include solicitation preferences, which are defined on
the Contact Information
screen.
In 7.4.2, the opt-in interest area feature was changed to support storing both codes and subcodes so that interest areas can be grouped. To update your data to work with the new 7.4.2 structure, subcodes can be manually created. To continue to use the same codes as subcodes, just create a subcode record that matches the code value. See Adding Subcodes for more information on how to create a subcode.
Alternatively, your IT administrator can write a simple SQL script to create
the App_Subcode records as described below:
Create records in App_Subcode
From App_Type, App_Code
Where App_Type.SUBSYSTEM = ‘CUS’
And App_Type.TYPE = ‘OPT_IN_INTEREST_AREA’
And App_Type.SUBSYSTEM = App_Code.SUBSYSTEM
And App_Type.TYPE = App_Code.TYPE
Set App_Subcode values as follows:
App_Subcode Field |
Value to be Set |
|---|---|
SUBSYSTEM |
CUS |
TYPE |
OPT_IN_INTEREST_AREA |
CODE |
App_Code.CODE |
SUBCODE |
App_Code.CODE |
SCREEN_RESTRICTION |
NULL |
DESCR |
App_Code.DESCR |
ACTIVE_FLAG |
Y |
STATUS_CHANGE_DATE |
Getdate() |
OPTION_1 |
EMAIL, FAX, MAIL |
OPTION_2 |
NULL |
OPTION_3 |
NULL |
ADDOPER |
USER_ID of person creating the record |
ADDDATE |
Getdate() |
MODOPER |
NULL |
MODDATE |
NULL |
CONCURRENCY_ID |
0 |
ACCESSPOINT_CODE |
NULL |
AVAILABLE_TO_WEB_FLAG |
Y |
USER_INSTRUCTION |
NULL |
DISPLAY_ORDER |
0 |
 A powerful
feature of Personify360’s Marketing application is that marketing lists
can be created based on customer opt-in records. Prior to 7.6.1, unless
a customer knew to sign up for opt-in choices from the web, staff had
to manually opt them in, after first identifying customers who were missing
opt-in records. As of 7.6.1, certain opt-in records can be automatically
created for new individual customers so that those customers will automatically
receive certain organization marketing communications. This reduces the
manual setup burden on membership managers who email communications related
to activities of their organization to members and interested constituents
using Marketing lists based on customer opt-in records. In order for the
system to automatically create certain opt-in records for new individual
customers, the Auto Populate
checkbox
must be checked on BOTH the subcode(s) and code(s) defined for the CUS
"OPT_IN_INTEREST_AREA"
system type.
A powerful
feature of Personify360’s Marketing application is that marketing lists
can be created based on customer opt-in records. Prior to 7.6.1, unless
a customer knew to sign up for opt-in choices from the web, staff had
to manually opt them in, after first identifying customers who were missing
opt-in records. As of 7.6.1, certain opt-in records can be automatically
created for new individual customers so that those customers will automatically
receive certain organization marketing communications. This reduces the
manual setup burden on membership managers who email communications related
to activities of their organization to members and interested constituents
using Marketing lists based on customer opt-in records. In order for the
system to automatically create certain opt-in records for new individual
customers, the Auto Populate
checkbox
must be checked on BOTH the subcode(s) and code(s) defined for the CUS
"OPT_IN_INTEREST_AREA"
system type.
To add opt-in/opt-on preferences:
1. From the
Constituent Preferences task category in CRM360,
click Opt-In/Opt-Out.
The Opt-In/Opt-Out Selections screen displays on the Participation tab,
as shown below.

2. Use the following options in the Filter section to sort through the records:
· Opt-In Category: values in the drop-down are populated based on the codes defined for the non-fixed CUS "OPT_IN_INTEREST_AREA" system type.
· Opt-In Choice: values in the drop-down are populated based on the subcodes defined for the codes defined for the non-fixed CUS "OPT_IN_INTEREST_AREA" system type. Please note that if a subcode is NOT defined for a code, the opt-in choice will NOT display in the drop-down.
· Opted-In: indicates whether or not the constituent has opted in.
3. Click
Add More Options.
The Unsubscribed Options screen displays, as shown below. Values in the
Option Type column are populated based on the codes defined for the non-fixed
CUS "OPT_IN_INTEREST_AREA"
system type. Values in the Option Name column are populated based on the
subcodes defined for the codes of the "OPT_IN_INTEREST_AREA"
system type. Please note that if a subcode is NOT defined for a code,
the option type will NOT display on the screen below.
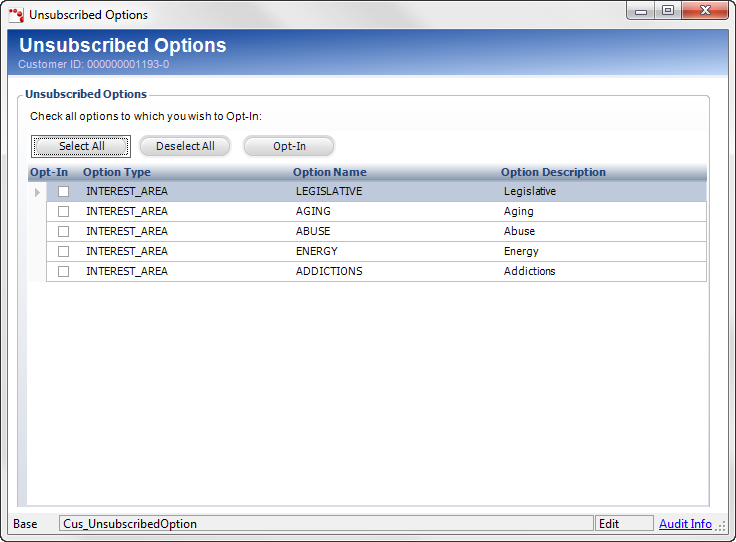
4. The options
selected indicate that the constituent has opted into receiving that option.
Highlight the appropriate options in which the constituent would like
to opt in and click Opt-In.
The Unsubscribed Options window closes and the fields in the Details section
of the Opt-In/Opt-Out Selections are enabled. The Opt-In Category and
Opt-In Choice fields automatically populate with the selected option and
are read-only.
5. By default, the Opted-In Date is set to today. Change this if necessary.
6. If necessary,
select the Deliver To method from the drop-down.
This option indicates how the customer wants to receive information about
the selection. Options in the Deliver To drop-down are populated based
on the value(s) in the Option 1
field of the code(s) defined for the non-fixed CUS "OPT_IN_INTEREST_AREA"
system type.
7. If you
uncheck the Opted-In checkbox, the Opted-Out
Date automatically populates with the date and you can select the
Opt-Out Reason.
Values in the drop-down are populated based on the codes defined for the
non-fixed CUS "OPT_OUT_REASON"
system type.
8. Enter any Comments, if necessary.
9. Click
Save.
Click the Main Page link to return to the overview
page.