Copying a Membership Product
If you need to create multiple membership products that have similar
setups, Personify360 offers a Copy Product functionality to make this
process easier and less time-consuming. The Copy Product functionality
allows you to take the setup of an existing inventoried product and copy
over any or all of its parameters, including GL accounts and pricing setups,
by simply checking off the parameters you want to recreate for the copied
product.
This functionality is available for all Product Types and appears as
a task (Copy this Product) through the Related Tasks taskbar when viewing
a product on its Product Maintenance (PRODUCTCENTRAL) screen.
The Copy Product screen consists of two tabs:
· 1 – New Product to be Created
Used to set up the general product information, such as Product Code and
Product Description.
· 2 – Copy Parameters
Used to define the parameters that should be copied from the old product
to the new product. The Copy Parameters functionality allows you to copy
any or all parameters of a product including the following:
o GL Account
Parameters
§ System
Accounts
§ Revenue
Accounts
o Copy
Parameters
§ Rates
and Prices
§ Components
§ Cancellation
Fees
§ Shipping
Fees
§ Web Text
Info
§ Ebubs
Controls
§ Categories/Keywords
§ Relationships
o Subsystem-Specific
Parameters
§ Membership
Subscription Benefits
§ Linked
Customer
 If
a Renew to this Product has been defined on the Rate
Code Extensions screen, the system will copy the product from the source
product if it is different from the source product. If the renew-as
product is same as the source product, the system will make the renew-as-product
the same as the new product being created.
If
a Renew to this Product has been defined on the Rate
Code Extensions screen, the system will copy the product from the source
product if it is different from the source product. If the renew-as
product is same as the source product, the system will make the renew-as-product
the same as the new product being created.
For example, Product A has a renew-as product of product C. Product A is
copied to product B. The renew-as product for Product B is Product
C. Product A has a renew-as product of Product A. Product A is copied
to Product B. The renew-as product for Product B is Product B.
To create a new product by copying an existing:
1. From the
Personify360 main toolbar, select Products > Product
Central.
The Product Maintenance search screen displays.
2. Click
Search to find a product or click Create New Product.
3. From the Related Tasks
task category, click Copy this Product.
The Product Copy screen displays with information on the original product
appearing at the top of the screen, as shown below.
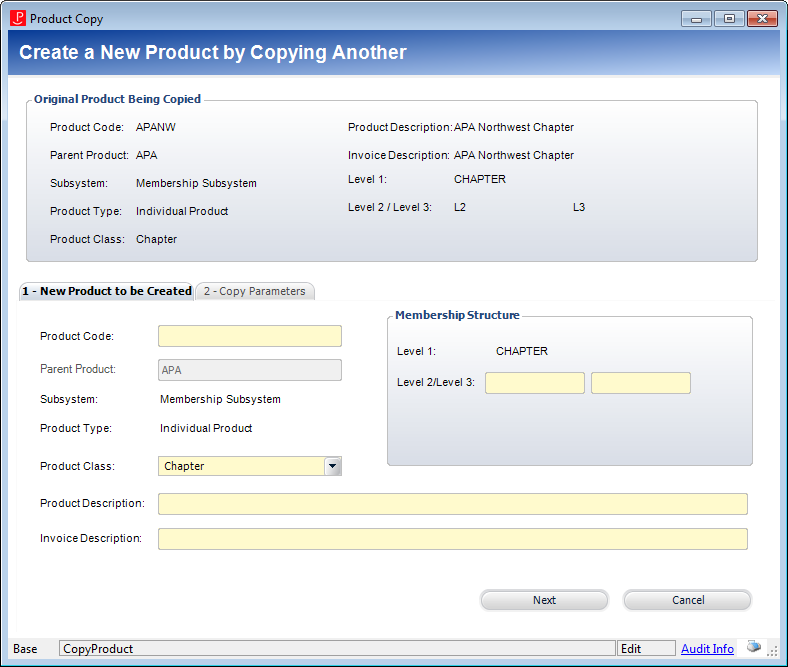
4. On the
New Product to be Created tab, enter the Product Code
of the new product.
The Product
Code MUST be different from the original product.
5. Please
note that as of 7.5.2, the Parent Product and Level
1 cannot be changed.
This value defaults from the original product, but may be changed as needed.
6. Select
the Product Class of the new product.
This value defaults from the original product, but may be changed as needed.
7. Enter
the Product Description and Invoice Description.
8. You MUST
enter the Level 2/Level 3 membership structures.
The Level
2/Level 3 MUST be different from the original product.
The Copy
Product functionality for membership products does not allow you set the
availability dates. Make sure you modify these as needed after you finish
creating the copied product.
9. Click
Next.
The Copy Parameters tab displays, as shown below.
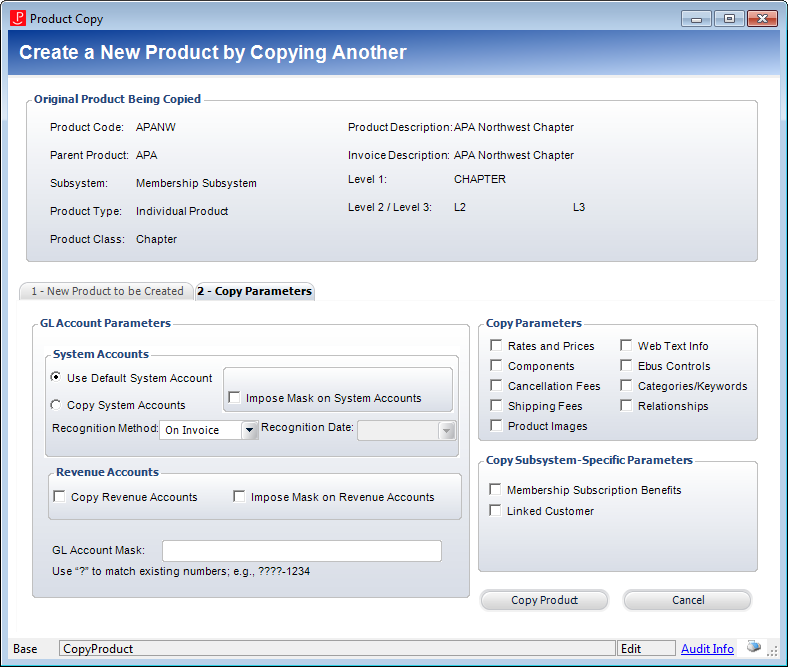
10. On the
Copy Parameters tab, select the appropriate radio button in the System
Accounts section.
· Use Default System Account
When selected, the system pulls the Product_Account values from the FGL_Product_Account_Default
table for the subsystem. If this option is selected but no default system
accounts have been defined, then the system accounts for the new product
will be blank.
· Copy System Accounts
When selected, the system copies the Product_Account record from the original
product.
11. If necessary,
check the Impose Mask on System Accounts checkbox.
When checked, you must enter a GL Account Mask
so the system validates that the resulting account exists in the Financial
General Ledger Account Master table. If it does not exist in the table,
then a warning is issued and the user must define these accounts manually.
12. Select
the Recognition Method from the drop-down.
13. Select the Recognition Date from
the drop-down.
Note that this field will be disabled unless “On Specific Date” is chosen
from the Recognition Method drop-down.
14. Check
the appropriate checkboxes in the Revenue Accounts section.
· Copy Revenue Accounts
When checked, the system copies the records from the Product_Revenue_Distribution.
· Impose Mask on Revenue Accounts
When checked, you must enter a GL Account Mask
so the system validates that the resulting account exists in the Financial
and Accounts Receivable system. If it does not exist in the table, then
a warning is issued and the user must define these accounts manually.
15. If you
selected the "Impose
Mask on System Accounts" or "Impose
Mask on Revenue Account" checkbox(es), enter the GL
Account Mask.
GL account numbers are created with segments that represent the same type
of item for all GL account numbers. You can define the pattern for the
GL account here. For example, the current revenue account is 1-678-4800,
where “4800” is specific to the current product and the revenue account
for the new product is 1-678-4900. Therefore, the GL Account Mask would
be ?-???-4900.
When the Impose Mask on System Accounts or Impose Mask on Revenue Account
checkbox(es) are selected and a GL Account Mask is entered, the system
will accept a mask and then update the account based on this mask. The
system must validate that the resulting account is a valid account.
16. Check
the appropriate checkboxes of the parameters to copy.
The parameters include the following:
· Rates and Prices:
defined on the Rates
and Pricing screen.
· Components: defined on the Components
screen.
· Cancellation
Fees: defined on
the Cancellation
Fees screen.
· Shipping
Fees: defined on
the Shipping
Fees screen.
· Product
Images: defined on the Product
Images screen.
· Web Text
Info: defined on
the Brief
Description and Long
Description screens.
· Ebus
Controls: defined
on the eBusiness
Control, Related
Links, Related Roles,
and Search
Engine Optimization (as of 7.6.2) screens.
· Categories/Keywords: defined on the Search
Categories screen.
· Relationships: defined on the Related Products,
Related Customers,
Related Files,
Fundraising
Links, and Product
Segmentation screens.
17. If necessary,
check the Membership Subscription Benefits checkbox.
These are the benefits set up on the Rate
Code Extensions screen. When checked, if more than one subscription
benefit record for the same rate structure, rate code, and subscription
product exists, only the most current record is copied. The Begin Date
is set to the “Product Available Date” and the End Date is set as “Null.”
18. If necessary,
check the Linked Customer checkbox.
This is the cross-reference defined for the original product, typically
chapter products, to a subgroup record. A value is needed here for MBR700 to work. On the Subgroups
screen, this value must exist to calculate the membership total. Multiple
products can be linked to the same subgroup record. When checked, this
links the new product to the original product’s linked subgroup.
19. Review
all your fields, and after review, click Copy Product.
If no errors occur, the new product opens on the Product Maintenance screen.
If you receive an error stating, "Another object with the same key
already exists,” return to the “New Product to be Created” tab and make
sure you entered a Product Code different from the original product’s
code.
Since the
Copy Product functionality for membership products defaults the availability
dates from the original product, make sure to update the dates as necessary
before validating your new product.
This process
does not automatically validate the product. You still need to click Validate
Setup, as with other product setups, to finalize the product. For more
information, please see Validating
a Membership Setup.
While the
Copy Product functionality can copy the Web Text Info from the original
product’s e-Business control, you should open the new product’s setup
and review the e-Business to ensure it’s active and appears only when
desired.