 Additionally, as of 7.5.2, bank account information can be shared across multiple constituents. For example, a husband and wife might have a joint bank account. Therefore, you can add the bank account information to both constituent records.
As of 7.5.2, you can add and maintain a constituent's EFT bank account information in CRM360. Additionally, from this screen, you can view information about scheduled payments being paid by EFT that have been rejected by EFT681. For more information, please see Viewing a Constituent's Rejected Payment History.
Additionally, as of 7.5.2, bank account information can be shared across multiple constituents. For example, a husband and wife might have a joint bank account. Therefore, you can add the bank account information to both constituent records.
To add EFT bank account information:
1. From the Financial Data task category in CRM360, click EFT Bank Acct Information.
The Bank Account Information and Rejected Payment History tabs displays. For more information on the Rejected Payment History tab, please see Viewing a Constituent's Rejected Payment History.
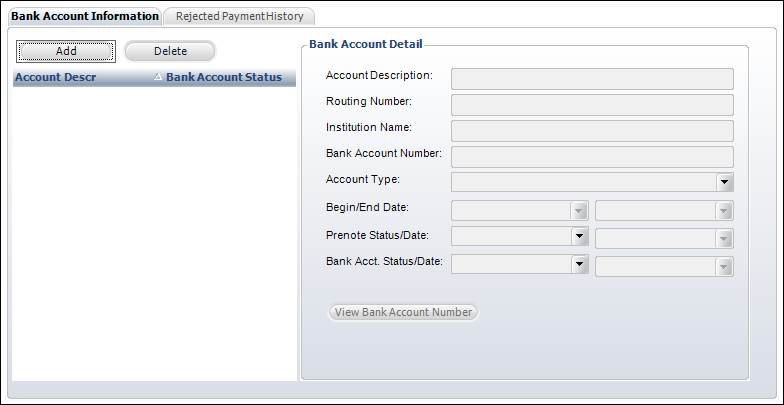
2. Click Add.
3. Enter a user-friendly Account Description.
4. Enter the Routing Number.
5. Enter the name of the bank in the Institution Name field.
6. Enter the Bank Account Number.
Once the record is saved, the system encrypts the number, which means you will only be able to read the last four digits.
If you have rights to the VIEW_BANK_ACCOUNT_NO security access point, you will see the View Bank Account Number button at the bottom of the screen. Click this button to display the constituent's unencrypted bank account number.
7. Select the Account Type from the drop-down.
Values in the drop-down are populated based on the fixed codes defined for the ORD "ACCOUNT_TYPE" system type.
8. By default, the Begin Date is set to today. Change this if necessary.
This should be set to the first date the customer began using their bank account for direct-debit payments.
9. If necessary, select an End Date.
This should be set to the date the customer wants to discontinue using this bank account. When an end date is selected, a message will display prompting you to select a bank account status of "Closed" or "Do not use". The option selected will be automatically populated in the Bank Acct. Status field and today's date will be set as the Bank Acct. Status Date.
Only a bank account where the begin date is less than or equal to the current date and end date is null or end date greater than or equal to the current date can be selected for use on a payment schedule being paid by direct-debit.
10. Select the Prenote Status from the drop-down.
This status identifies whether the system needs to prenote the bank account before the first payment can be processed. Values in the drop-down are populated based on the fixed codes defined for the EFT "PRENOTE_STATUS" system type.
11. The Prenote Status Date is read-only and is automatically populated by the EFT681 process.
This is the date the pre-note status was last updated. Once the bank account is pre-noted once, the bank account will not need to be pre-noted again for any future payment schedule.
12. Select the Bank Acct. Status from the drop-down.
When a direct-debit payment is rejected, this field will be updated by EFT681 based on the ACH code. Values in the drop-down are populated based on the fixed codes defined for the EFT "BANK_ACCOUNT_STATUS" system type.
Please note that once the bank account status is set to "CLOSED", you cannot change the status again. Additionally, once a bank account is CLOSED, if orders are already associated with the account, you will not be able to delete/re-add the account.
13. The Bank Acct. Status Date field is read-only and is automatically populated when an End Date is selected or when the bank account status is changed to "CLOSED".
14. Click Save.