If a payment schedule has not been previously defined, the Payment Schedules Parameters screen displays, as shown below.

Even if a product is not defined to automatically create a payment schedule, a payment schedule can still be created manually for an individual order. The Payment Schedules screen allows you to define a payment schedule associated with a specified product order. You can enter the schedule manually or you can have the system generate a schedule for you based on the order line total, frequency, and number of payment to be made. The following pay frequencies assume a payment schedule of one-year and automatically generated the number of periods accordingly: Fixed Amount, Monthly, Weekly, Quarterly, or Semi Annual. Although the periods are based on an assumed one year schedule, the number of periods can be changed. Fixed Amount and Immediate pay frequencies both default to one scheduled payment. Manual pay frequency defaults to zero scheduled payments in order to allow you to manually add each scheduled payment. For more information about the fields on the Payment Schedule screens, see the table below.
An important concept to remember about scheduled payments is that the sum of all “Due Amounts” for all scheduled payments must equal the order line total amount, and the sum of all due percentages must equal 100%.
As of 7.5.2, upon any manipulation of the order line's price or cycle range, the payment schedule will completely regenerate accounting for the receipts existing for the order line. This was done to ensure data integrity for payment schedules and to focus on the intended use of payment schedules, which is to collect payment per a defined schedule over a given length of time.
To define a payment schedule:
1. On the
Order Entry screen, select the Tasks tab.
The task bar displays.
2. From the
Work with Line Items task category, click Work with
Payment Schedule.
If a payment schedule has not been previously defined, the Payment Schedules
Parameters screen displays, as shown below.
3. Select
the Pay Frequency from the drop-down.
The following options are available:
· Fixed Amount: used when the customer wants to create a payment schedule where the payment amount is the same for all of the payments. When this pay frequency option is selected, the user is able to define the number of scheduled payments via the Number of Payments field, which defaults to 1, but the user is expected to change. The system will calculate the End Date accordingly.
· Manual: allows the user to manually create each scheduled payment. By default, no scheduled payments are created. If this option is selected, fields in the Parameters section are disabled. Note that the payment schedule total percentage due must equal 100% and the total scheduled amount must sum up to the base total amount for the order line.
· Monthly: by default, creates 12 scheduled payments. This can be changed from the Number of Payments field. If this option is selected, fields in the Parameters section are enabled. As of 7.4.2, for MBR and SUB product orders, the Number of Payments field will populate based on the cycle Begin and End date. For example, if the membership length is 8 months, the Number of Payments will default to 8 when a "Monthly" payment schedule is created.
· Quarterly: by default, creates four scheduled payments. If this option is selected, the fields in the Parameters section are enabled. As of 7.4.2, for MBR and SUB product orders, the Number of Payments field will populate based on the cycle Begin and End date.
· Schedule: the payment schedule will be created based on the schedule defined for the product in the order line. This option is only available for Exhibition products.
· Semi Annual: by default, creates two scheduled payments. This can be changed from the Number of Payments field. If this option is selected, fields in the Parameters section are enabled.
· Weekly: by default, creates 52 scheduled payments. This can be changed from the Number of Payments field. If this option is selected, fields in the Parameters section are enabled.
· Yearly: by default, creates one scheduled payment. This can be changed from the Number of Payments field. If this option is selected, fields in the Parameters section are enabled. As of 7.4.2, for MBR and SUB product orders, the Number of Payments field will populate based on the cycle Begin and End date.
· Immediate: This should only be used when a scheduled payment is automatically created for an order line because the product is defined to create a payment schedule, but the customer wants to pay the order immediately. If this option is selected, fields in the Parameters section are disabled, and all scheduled payments are deleted. In earlier versions of Personify, a pay frequency of Immediate would generate a single scheduled payment, but no payment schedule is needed if the order line is being paid immediately.
4. Select
the Auto Pay Method from the drop-down.
The following options are available:
· None
· Credit Card
· Direct Debit
5. If you selected Fixed Amount, Monthly, Weekly, Quarterly, or Semi Annual from the Pay Frequency drop-down, define the following parameters:
a. Enter
the Number of Payments.
This is the number of payments the customer will make payments, which defaults
based on the Pay Frequency selected on an assumed one-year schedule.
b. Select the First Payment Date from the drop-down.
6. Click
OK.
The Payment Schedules screen displays, as shown below. Scroll to the bottom
of the payment schedule to see the number of payments and the total amount
scheduled.
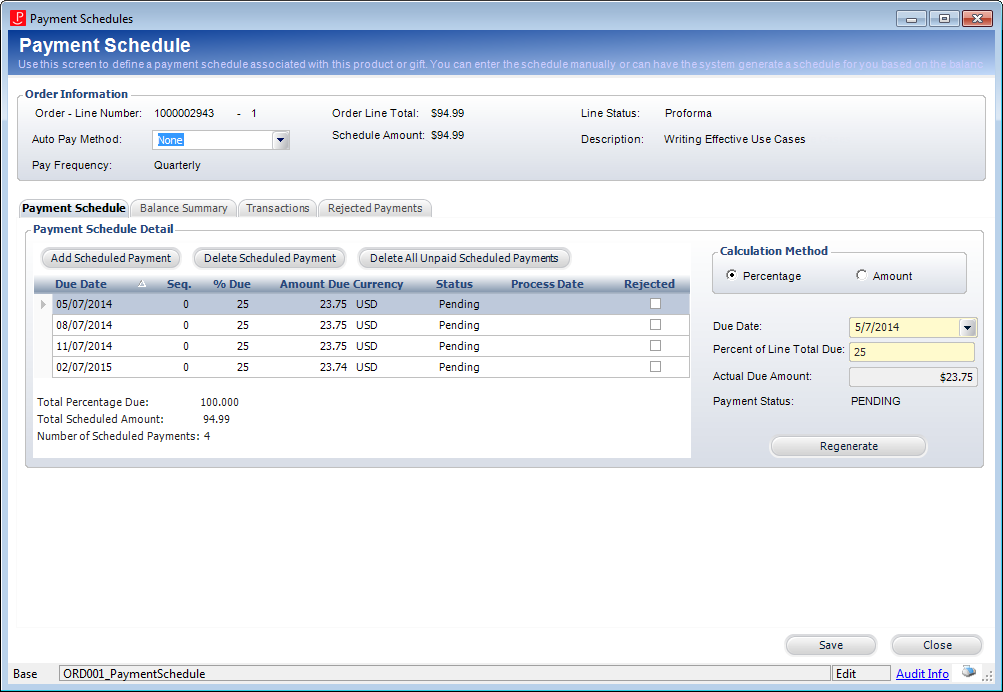
 If a partial
payment (txn type 1, 2, and 3) was taken prior to creating the payment
schedule, that payment will display as the first scheduled payment in
the grid and will be marked "Paid", as shown in the image above.
If a partial
payment (txn type 1, 2, and 3) was taken prior to creating the payment
schedule, that payment will display as the first scheduled payment in
the grid and will be marked "Paid", as shown in the image above.
7. Depending on the option selected from the Auto Pay Method drop-down, the appropriate section will display at the bottom of the Payment Schedules screen. Please see Managing Credit Card Payments or Managing Direct Debit Payments for more information.
8. Click Save.
Screen Element |
Description |
|---|---|
Payment Schedule Parameters screen - Order Information section |
|
Order - Line Number |
Read-only. Displays the order number and line number associated with the payment schedule. |
Line Status |
Read-only. Displays the status of the line for which the payment schedule is being defined. |
Order Line Total |
Read-only. As of 7.4.2, displays the total of the selected order line for which the payment schedule is being created.
|
Payment Schedule Parameters screen - Pay Method And Frequency section |
|
Pay Frequency |
Drop-down. Displays the payment frequency selected on the Payment Schedule Parameters screen. This field is validated against fixed ORD app type code: “PAY_FREQUENCY”. |
Auto Pay Method |
Drop-down. Displays the automatic payment method selected on the Payment Schedule Parameters screen. If “Credit Card” is selected, the Auto Payment Methods for Renewals and Installment Payments section is displayed below. If “Direct Debit” is selected, the Bank Routing Information section is displayed below. This option can be changed at any time. This field is validated against fixed ORD app type code: “AUTO_PAY_METHOD”. |
Payment Schedule Parameters screen - Parameters section |
|
Number of Payments |
Text box. Defaults based on the Pay Frequency selected. As of 7.4.2, for MBR and SUB product orders, this field will populate based on the cycle Begin and End date. |
First Payment Date |
Drop-down. Defaults to today. This indicates the date in which the first payment is due. |
Payment Schedule Detail |
|
Add Scheduled Payment |
Button. Adds a scheduled payment row to the grid. Please note that as of 7.4.2, this button will be disabled if a payment schedule was created for an exhibition product on the Product Maintenance screen. For more information, please see Defining an Exhibition Payment Schedule. |
Delete Scheduled Payment |
Button. When clicked, the highlighted row from the grid and its accompanying information is deleted. The payment schedule total must sum up to the base total amount for the product. If a scheduled payment is deleted, a new scheduled payment must be added OR the remaining scheduled payment amounts must be updated. Please note that as of 7.4.2, this button will be disabled if a payment schedule was created for an exhibition product on the Product Maintenance screen. For more information, please see Defining an Exhibition Payment Schedule. |
Delete All Unpaid Scheduled Payments |
Button. When clicked, all scheduled payments that have not been paid will be deleted. If the payment frequency needs to be changed after a payment scheduled has already been defined, all unpaid scheduled payments can be deleted and a new payment frequency can be defined. See Regenerating the Payment Schedule for more information. Please note that as of 7.4.2, this button will be disabled if a payment schedule was created for an exhibition product on the Product Maintenance screen. For more information, please see Defining an Exhibition Payment Schedule. |
Due Date |
Table column. Displays the due date for the scheduled payment. |
Seq. |
Table column. Displays the sequence number for the scheduled payment. This number will typically be “0” unless a partial payment is made and the scheduled payment is split. See Making a Partial Payment for more information. |
% Due |
Table column. Displays the calculated percent due, based on the schedule amount and selected payment frequency. |
Amount Due |
Table column. Displays the dollar amount due for the scheduled payment. |
Currency |
Table column. Displays the currency based on the product for which the payment scheduled is defined. |
Status |
Table column. Displays the payment status of the scheduled payment. |
Process Date |
Table column. Displays the due in which the scheduled payment was processed. |
Rejected |
Checkbox. If a pending credit card or EFT scheduled payment was not successfully processed when the FAR680 or EFT680 batch process was run, the batch process will check the Rejected checkbox and update the Status to “Pending”. |
Calculation Method |
Radio buttons. If the Percentage radio button is selected, the Percent of Line Total Due field is enabled and the Actual Due Amount field is disabled. If the Amount radio button is selected, the Actual Due Amount field is enabled and the Percent of Line Total Due field is disabled. |
Due Date |
Drop-down. Displays the due date for the highlighted scheduled payment. This date can be changed. As of 7.4.2, for scheduled payments that have been split due to partial payment, the Due Date field is disabled and cannot be changed. |
Percent of Line Total Due |
Text box. Displays the percent of the line total due for the highlighted scheduled payment. This field is only enabled if “Percentage” is selected from the Calculation Method section. This amount can be changed. The system multiples the Order_Detail.BASE_TOTAL_AMOUNT times the percentage entered by the user to get the Actual Due Amount. As of 7.4.2, for scheduled payments that have been split due to partial payment, the Due Date field is disabled and cannot be changed. |
Actual Due Amount |
Text box. Displays the actual amount due for the highlighted scheduled payment. This field is only enabled if “Amount” is selected from the Calculation Method section. This amount can be changed. |
Payment Status |
Read-only. Displays the payment status for the highlighted scheduled payment. If a scheduled payment has not been paid, the Payment Status will display “PENDING”. If a scheduled payment has been paid, the Payment Status will display “PAID”. If any write-offs are created on the order line, the system updates the last scheduled payment(s) to change the payment status from PENDING to WRITEOFF. If the write-off amount equals a partial pending scheduled payment amount, the system will create a split scheduled payment, with both a PENDING and a WRITEOFF amount. |
Regenerate |
Button. When clicked, the payment schedule will be updated with any changes made to a scheduled payment.
|