Defining Online Member Directory Detail Page Information
The Member
Directory Detail control displays data about a selected record from
the online member directory search
results.
 Due
to data
harvesting concerns, Personify recommends that you do NOT display
contact information in the search
results. If you want to display contact information, force your web
users to drill into the detail page to see that information. Additionally,
you may want to consider implementing techniques that mask, hide, or obscure
contact information on the detail page (e.g., provide a "contact"
action that leverages a member's email address without displaying it outright).
Please note that something like this would require a minor change in the
stored procedure.
Due
to data
harvesting concerns, Personify recommends that you do NOT display
contact information in the search
results. If you want to display contact information, force your web
users to drill into the detail page to see that information. Additionally,
you may want to consider implementing techniques that mask, hide, or obscure
contact information on the detail page (e.g., provide a "contact"
action that leverages a member's email address without displaying it outright).
Please note that something like this would require a minor change in the
stored procedure.
To define detail page information:
1. Using
the Membership Manager persona, from the Personify360 main toolbar, select
Membership / Product Set-up > System
Admin > Online Directory Setup.
The Online Directory Setup search screen displays.
2. Search for and open
the appropriate directory. If you have not already created a directory,
please see Setting Up an Online
Member Directory.
The Online Directory screen displays. For more information on the fields
in the Online Directory Configuration section, please see Setting
Up an Online Member Directory.
3. Select the Detail
Page tab.
4. From the
Data Returned by Detail Page SP
list, select a table name, as shown below, and perform the following:
By default,
the FIRST table in the stored procedure will ALWAYS contain the ONLY fields
that can display in the header on the detail page. If you are NOT using
the stored procedure provided by base, please ensure that the first table
in your stored procedure contains the fields that you want to display
in the header. Whether or not the field displays in the header is based
on the Display in Results checkbox.

a. Enter
the Section Caption.
b. Select
the Display Type from the drop-down.
5. From the
Data Returned by Detail Page SP
list, select a field name, as shown below, and perform the following:
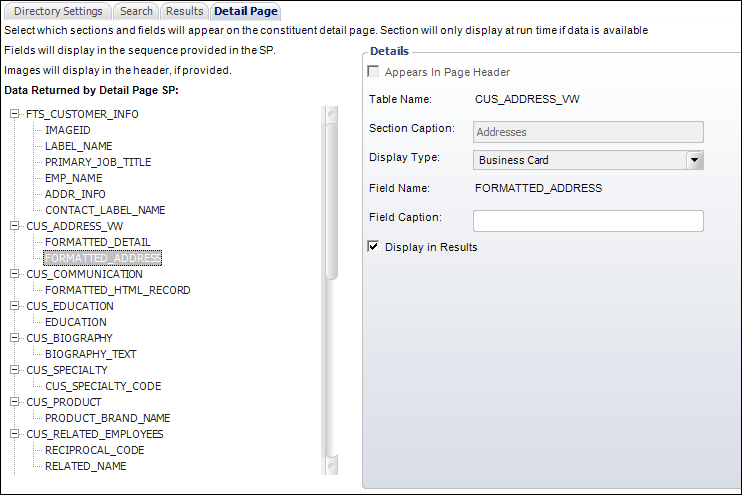
a. Enter
the Field Caption.
b. If necessary,
check the Display in Results checkbox.
6. Click
Save.
Screen Element |
Description |
Data Returned by Detail Page SP |
Grid. Displays the tables and fields in
the stored procedure selected from the Detail Page SP. |
Details (for tables) |
Appears In Page Header |
Read-only. This checkbox indicates that
this information displays in the header of the detail page and
is only applicable for fields (not tables). |
Table Name |
Read-only. The name of the table returned
by the stored procedure. |
Section Caption |
Text box. This caption allows you to define
a label for the fields that display in the section of the selected
table. For example, if you select the ADDRESS table, any fields
that are defined to "Display in Results" will be grouped
together under the section caption defined here, as shown below.

 This field will be disabled for
the first table and associated fields in the Data
Returned by Detail Page SP list, as this table is
reserved for the header, which does not need a caption. This field will be disabled for
the first table and associated fields in the Data
Returned by Detail Page SP list, as this table is
reserved for the header, which does not need a caption.
|
Display Type |
Drop-down. Indicates if the data in this
table is 1:1 or 1:many. "Business Card" will be selected
for 1:1 data. "Grid (allow multiples)" will be selected
for 1:many data.
 Select "Grid" if the
underlying table is returning multiple rows; select "Business
Card" if the table is returning one row per customer. Select "Grid" if the
underlying table is returning multiple rows; select "Business
Card" if the table is returning one row per customer.
If "Grid" is selected, fields will
display in columns, as shown below.

If "Business Card" is selected,
fields will display in a list, as shown below.

If you are only displaying one
column of data (e.g., contact information) and "Grid"
is selected as the display type, horizontal lines will display
below each piece of data when viewing the page on a mobile device,
as shown below. Therefore, if you do NOT want these lines to display,
it is recommended that you set the display type to "Business
Card".
 |
Details (for fields) |
Appears In Page Header |
Read-only. This checkbox indicates that
this information displays in the header of the detail page. This
checkbox will only be checked for fields in the FIRST table returned
by the Data Returned by Detail
Page SP, as this table is reserved for the header. If you
do NOT want a particular field to display in the header, uncheck
the Display in Results
checkbox. |
Table Name |
Read-only. The name of the table in which
the selected field is located. |
Section Caption |
Read-only. The caption defined for the
table in which the selected field is located. |
Display Type |
Read-only. The display type for the table
in which the selected field is located. |
Field Name |
Read-only. The name of the selected field
returned by the stored procedure. |
Field Caption |
Text box. This caption allows you to define
a label to display for the selected field, as shown below.

This is optional and can be used for fields
that are not self-explanatory. For example, you may not want to
add a Field Caption of "Address" for an address field,
because address data is self-explanatory. However, you may want
to add a Field Caption of "Birthday" for a birthdate
field, since a date field with no label might be confusing.
This field is not applicable
for the fields in the first table in the Data
Returned by Detail Page SP list, as this table is reserved
for the header, which does not need a caption. |
Display in Results |
Checkbox. Check this checkbox if the selected
field should display on the detail page.
 If you select to include address
information (e.g., the FORMATTED_ADDRESS field in the ADDRESS
table as referenced in the base Detail page stored procedure),
the city, state, and country for the CUS_ADDRESS_DETAIL record
with a PRIORITY_SEQ value of 0 (i.e., the primary address) will
display in the header and the city and state will display in the
details. If you select to include address
information (e.g., the FORMATTED_ADDRESS field in the ADDRESS
table as referenced in the base Detail page stored procedure),
the city, state, and country for the CUS_ADDRESS_DETAIL record
with a PRIORITY_SEQ value of 0 (i.e., the primary address) will
display in the header and the city and state will display in the
details.
|