 The
system will determine the sort order of results. If proximity search was
conducted, then results will be displayed by distance in ascending order;
otherwise, results will be displayed by last name.
The
system will determine the sort order of results. If proximity search was
conducted, then results will be displayed by distance in ascending order;
otherwise, results will be displayed by last name.Staff with a basic understanding of Personify360 can select which fields will be leveraged in the online member directory search results. From the Results tab, the administrator can defined what data source(s) are the results coming from, what fields will be visible, in what sequence should results fields be displayed, what caption should be provided, and, if distance search is on, distance should be available for display.
The
system will determine the sort order of results. If proximity search was
conducted, then results will be displayed by distance in ascending order;
otherwise, results will be displayed by last name.
 Due
to data harvesting concerns, Personify recommends that you do NOT display
contact information in the search results. If you want to display contact
information, force your web users to drill into the detail
page to see that information.
Due
to data harvesting concerns, Personify recommends that you do NOT display
contact information in the search results. If you want to display contact
information, force your web users to drill into the detail
page to see that information.
The Member Directory control displays the free text, as well as the advanced search (if defined), results.
To define search results:
1. Using
the Membership Manager persona, from the Personify360 main toolbar, select
Membership / Product Set-up > System
Admin > Online Directory Setup.
The Online Directory Setup search screen displays.
2. Search for and open
the appropriate directory. If you have not already created a directory,
please see Setting Up an Online
Member Directory.
The Online Directory screen displays. For more information on the fields
in the Online Directory Configuration section, please see Setting
Up an Online Member Directory.
3. Select the Results
tab, as shown below. For detailed information about the fields on this
screen, please see the table below.
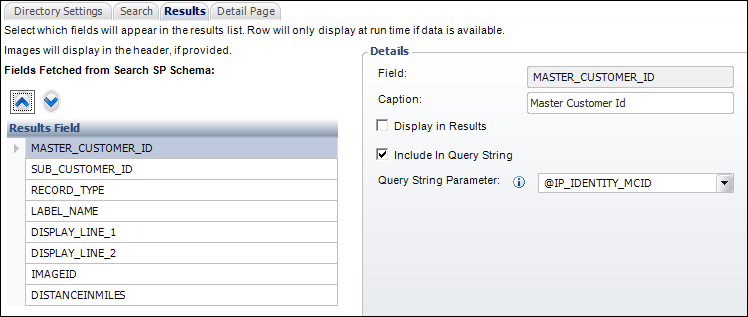
4. Select the appropriate field from the Results Field grid.
5. The Field text box displays the name of the field as provided in the stored procedure and is read-only.
6. If necessary, change the field Caption.
7. If necessary, check the Display in Results checkbox.
8. If necessary, check the Include in Query String checkbox.
This is only
applicable if the Encrypt Query String
checkbox is checked in the Online
Directory Configuration section above.
9. If you checked the "Include in Query String" checkbox, select the Query String Parameter.
10. If necessary, use the up and down arrow buttons to move the selected field to the desired location in the list. The order listed in the Results Field grid determines how the fields will display in the search results on the web.
11. Click Save.
Screen Element |
Description |
|---|---|
Up and Down arrows |
Buttons. Use these buttons to move the field selected from the Results Field grid to the desired location in the list. The order listed in the Results field grid determines how the fields will display in the search results on the web. |
Results Field |
Grid. Displays a list of field fetched from Search SP Schema. Select which fields will appear in the results list. Row will only display at run time if data is available. Images will display in the header, if provided. |
Details |
|
Field |
Read-only. This is the name of the field as defined in the stored procedure. This field cannot be edited.
This value is stored in the COLUMN_NAME column in the MBR_DIR_SETUP_RESULT table. |
Caption |
Text box. This is the name of the field that will display in the results, as shown below. This is optional and can be used for fields that are not self-explanatory. For example, if you want to show the main contact for a company, you can prefix that person's name with "Main Contact" to provide context.
This value is stored in the COLUMN_CAPTION column in the MBR_DIR_SETUP_RESULT table. |
Display in Results |
Checkbox. If checked, the selected field will display in the search results. By default, this checkbox is unchecked and, therefore, must be checked in order for the selected field to display in the search results.
A value of "Y" (if checked) or "N" (if unchecked) is stored in the DISPLAY_IN_RESULTS_FLAG field in the MBR_DIR_SETUP_RESULT table. |
Include in Query String |
Checkbox. Indicates that a result should be included in the query string to access the detail page. When checked, the Query String Parameter field becomes enabled.
The following fields are REQUIRED to be included in query string: · Master Customer ID · Sub Customer ID · Record Type
A value of "Y" (if checked) or "N" (if unchecked) is stored in the INCLUDE_IN_QUERY_STRING_FLAG field in the MBR_DIR_SETUP_RESULT table. |
Query String Parameter |
Drop-down. Indicates the query parameter to pass in the string to access the detail page. To enable this field, select the “Include in Query String” checkbox. The query parameter to be included in the string used to access the detail page should be defined here. For example, the Master Customer Id and Sub Customer Id for a constituent.
This value is stored in the QUERY_STRING_PARAMETER column in the MBR_DIR_SETUP_RESULT table. |
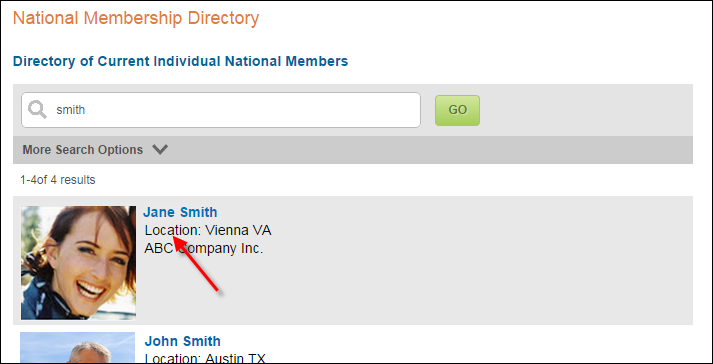
 If you select to include address
information (e.g., DISPLAY_LINE_1 from the base Search and Results
stored procedure), the city and state for the CUS_ADDRESS_DETAIL
record with a PRIORITY_SEQ value of 0 (i.e., the primary address)
will display.
If you select to include address
information (e.g., DISPLAY_LINE_1 from the base Search and Results
stored procedure), the city and state for the CUS_ADDRESS_DETAIL
record with a PRIORITY_SEQ value of 0 (i.e., the primary address)
will display. This has to match the corresponding
input parameter name of the detail SP.
This has to match the corresponding
input parameter name of the detail SP.