 Since
the system now stores masked credit card numbers, only the partial credit
card number displays, even if the lockbox file sent from the agency included
the full credit card numbers.
Since
the system now stores masked credit card numbers, only the partial credit
card number displays, even if the lockbox file sent from the agency included
the full credit card numbers.LCK100 is a process which automatically accepts receipts into a system by creating records in the lockbox holding table. It is designed to upload the lockbox batches, which are typically received from financial institutions. LCK100 reads and validates the ASCII lockbox file based on the mapping tables, creates the batch control record, loads a batch detail, runs error checks against each record, and posts information without the errors.
The way this works is an association receives the batch control information on a report or email from the financial institution when a file is transferred electronically. From here, the accounting department creates a batch control record with the totals and deposit date provided by the financial institution or the LCK100 process creates the batch based on the parameter settings. The user may then run LCK100 in LIST mode to verify that the batch(es) being read match the batch control record. The accounting department may also run the application in POST mode to post the transactions against the given order.
Within the Batch Control and Maintenance screen, Lockbox batches are created by the user or by the process (based on the parameter setting), which means that batches are ultimately closed through this screen manually (by the user) or automatically (by the process). Additionally, the user can utilize this screen to modify batch totals when transactions must be removed from a lockbox batch for any specified reasons. For example, errors that cannot be resolved need to be removed.
There are three setups you will need to perform before running the LCK100
process:
1. Setting Up Lockbox Parameters
2. Setting Up Lockbox File Mapping
3. Setting Up Lockbox Receipt Type Mapping
If you run this process and receive an error message, it may be because
it does not match what you defined in the back office. Double-check that
your specifications in back office are aligned with what you are submitting
and try to run the process again. You may also receive errors if the customer
doesn't match correctly, the order number isn't right, or a credit card
doesn't go through. The error message will let you know what the issue
is and wyou will need to go back and fix these before attempting to run
the process again.
How often this report is run is dependent upon the use case. This may be something you need to run daily or once a week; it is really up to how often it is necessary. Additionally, while there are no reports that need to be run before or after this process, you will need to make sure you have taken the steps defined above to ensure your process runs successfully.
The first step in daily (or otherwise scheduled) lockbox processing is uploading the bank file(s) and processing it in LIST mode. Running this process in List mode is similar to running other processes in Edit mode. It puts the data into the lockbox holding table, creates the batch, and produces a report, but receipts will not be created until the transactions are posted. Personify recommends users review the lockbox files for errors before entering the receipts and posting them in Personify360. For more information, please see Reviewing and Correcting Lockbox Receipts.
Since
the system now stores masked credit card numbers, only the partial credit
card number displays, even if the lockbox file sent from the agency included
the full credit card numbers.
As of the 7.2.2 release, the LCK100 process picks up the AUTH_REFERENCE field value from input file (this value is defined on the Lockbox File Mapping (LCK001) screen). In LIST mode, this field value is inserted in the LCK_HOLDING_DETAIL table. In POST mode, this field value is inserted in the CCP_REQ_ANS and FAR_RECEIPTS tables.
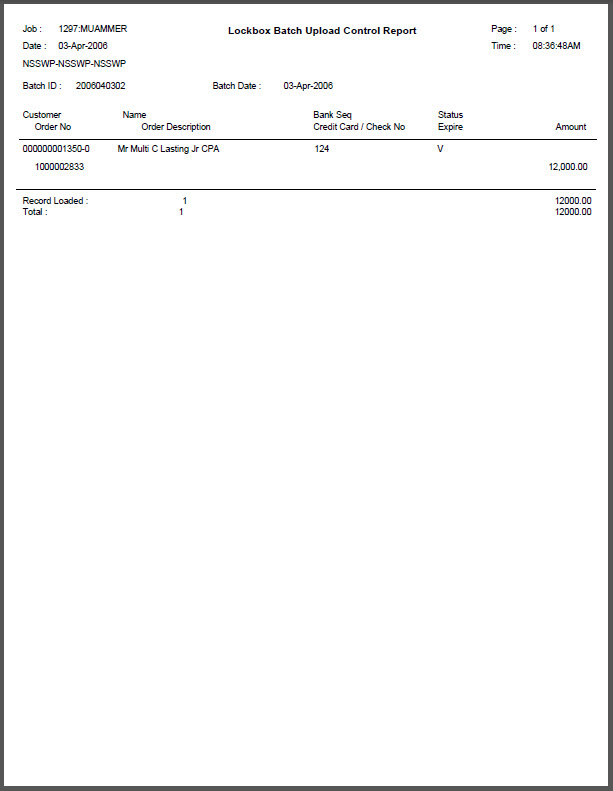
This batch process reads and validates the ASCII lockbox file based on the mapping tables, creates the batch control record, loads a batch detail, runs error checks against each record, and posts the information without the errors. A settled batch is created and a detail report output is generated.
As
of 7.4.1SP1, the GetProrateFactor stored procedure called by LCK100 has
been updated to allow for rounding up to 6 decimal points.
To run LCK100 in LIST mode:
1. Create a Lockbox Batch (optional):
a. From the Personify360 main toolbar, select Accounting > Batch Control.
b. Click Create New Batch.
c. Create a batch in Batch Control, ensuring the Batch Type is “Lockbox Batch.”
2. From the Personify360 main toolbar select Reporting > Job Submission.
3. Click
Search and select the application "LCK100".
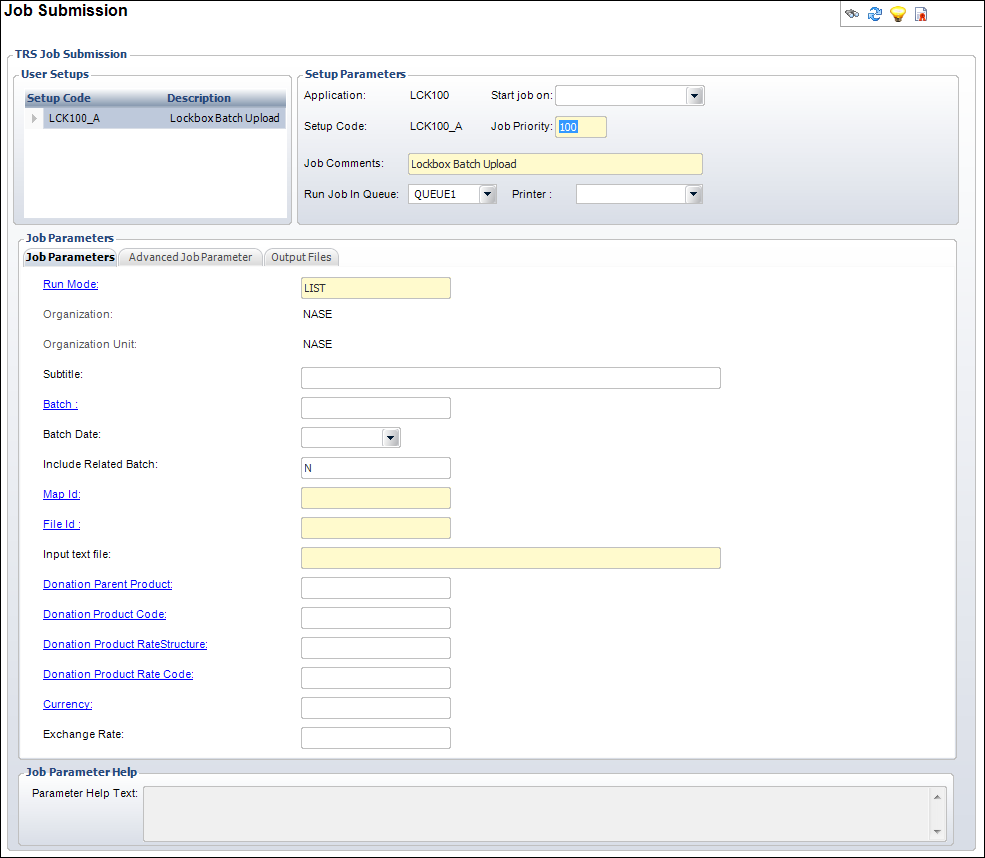
This will take you to the TRS Job Submission screen, as shown below.
4. From the
task bar, click Upload Input File.
A window will open prompting you to either enter the File Name or to search
for the latest bank file using the Browse button, as shown below.

5. After
selecting the bank file, click Upload File.
A message will confirm a successful upload. In the Job Parameters section:
a. If the batch was created in advance you can indicate the Batch ID by clicking the link and selecting the appropriate batch number.
b. Enter
the Batch Date.
The Batch Date should match the deposit date.
Only enter
the Batch Date if the transaction date of receipts is provided on the
file but should be overridden, or if it is not provided on the file and
should be anything other than the present date.
c. Enter the appropriate Map ID.
d. Enter
a File ID.
If the bank provides the data in the file, the system will validate it.
If not, enter a numeric value.
e. Enter the full name of the latest file (e.g., lockbox.txt) into the Input Text File field.
6. From the
task bar, click Run This Report Now.
The process will automatically create a batch for the receipts on the file.
It will figure out the control count and control amount based on the receipts
on the file. The process will apply the money to each line in the order
up to the line amount according to priority or line number if all priorities
are the same.
7. Review your report.
a. From the toolbar select Reporting > Job and Report Status.
b. Run a
search for your report and select it.
The report’s details and status will be available on screen.
c. If there are no errors on the report, run the process in POST mode.
d. If there
are errors on the report, email the report to the staff member who will
be correcting them.
This will notify the person that the process has been completed and is
ready for him/her to correct the errors. The person performing the corrections
will typically be someone in Customer Service or in the department for
which the payments are being received. The person would need to know how
to enter orders for payments.
Screen Element |
Description |
|---|---|
Setup Parameters |
|
Application |
Read-only. The abbreviation and numerical representation of the name of the report/process application. The application should read LCK100. |
Setup Code |
Read-only. The abbreviation and numeral definition for the user-defined report/process setup. |
Start Job On |
Drop-down. Specifies the date the job will start. |
Job Priority |
Text box. This is the priority assigned to this job. The TRS daemon accesses jobs by priority, i.e., if two jobs are in the queue and one has priority 100 and the other one has a zero priority, then the 100 is picked up first. This can usually be kept zero in the TRS database table, however, while submitting the job, the TRS Job Parameter Setup screen assigns a default priority of 100 if it is zero, otherwise, it would carry the non-zero value from this table. |
Job Comments |
Text box. Enter comments concerning this job. This will default as Lockbox Batch Upload. |
Run Job in Queue |
Drop-down. Select the queue in which the job can be run. Only change the default value if the system administrator specifies a different value. |
Printer |
Drop-down. A list of printer selections. The printer to which the output will be sent. |
Job Parameters |
|
Run Mode |
· LIST– reads the input file provided and uploads the data in the holding tables. · POST– post the receipts and apply the money to the orders. |
Organization |
The Organization ID for which you want to run the report. |
Organization Unit |
The Organization Unit ID for which you want to run the report. |
Subtitle |
This field is used to enter in a subtitle that appears underneath the report heading. |
Batch |
An optional batch number can be given to the process to process only records from one batch. |
Batch Date |
An optional batch date can be given to the process, to set the batch date of newly created batch. |
Include Related Batch |
Whether or not to include all batches related to the File Id of the selected batch. |
Map Id |
Indicate the input file format by specifying the MAP Id for the format. |
File Id |
Enter a numeric value. This will be used if your file has errors to identify which upload attempt they were in. |
Input text file |
Enter the file name which can be used for uploading the receipts. |
Donation Parent Product |
Select the Product to use when creating donation order lines. Donation products can be either a Fund Raising product or a Membership product with a contribution product class. Donation order lines are only created when the amount received is greater than the order invoiced amount.
|
Selection Criteria |
Additional filter criteria for selection of records. Filter should be on fields from LCK_HOLDING_MASTER. |
Donation Product Code |
Select the Product to use when creating donation order lines. Donation products can be either a Fund Raising product or a Membership product with a contribution product class. Donation order lines are only created when the amount received is greater than the order invoiced amount. |
Donation Product Rate Structure |
Select the Rate Structure of the Fund Raising or Membership product to use when creating donation order lines. |
Donation Product Rate Code |
Select the Rate Code of the Fund Raising or Membership product to use when creating donation order lines. |
Currency |
Enter Currency Code. If entered then this would take precedence over currency code specified in input file. |
Exchange Rate |
Enter exchange rate for input currency. If entered then this would take precedence over exchange rate specified in input file. |
 If a donation order line already
exists on the order, the system will NOT create a new donation
order line to apply the overpayment. Instead, the overpayment
will be applied to the existing donation order line.
If a donation order line already
exists on the order, the system will NOT create a new donation
order line to apply the overpayment. Instead, the overpayment
will be applied to the existing donation order line.