 Files
must be a fixed length (not delimited).
Files
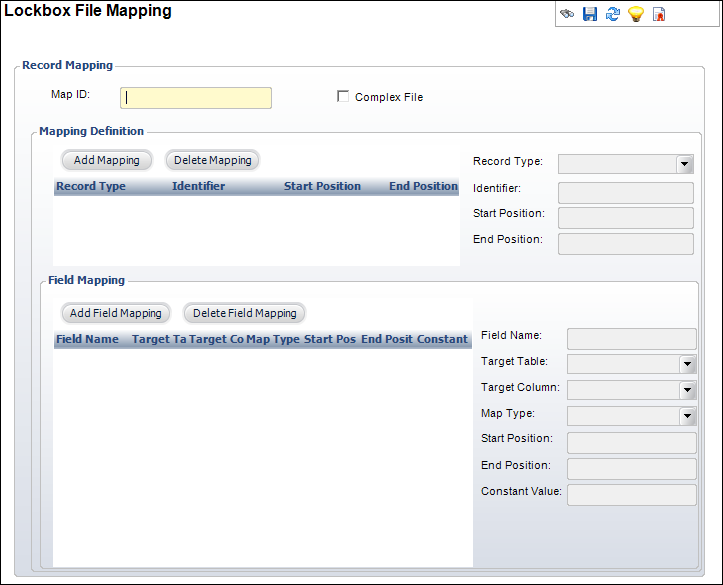
must be a fixed length (not delimited).The Lockbox File Mapping screen allows you to define a mapping for every field in the lockbox file to the LCK_Holding_Master and LCK_Holding_Detail tables. These tables store the uploaded data from the lockbox file, which can then be viewed and corrected before posting.
Files
must be a fixed length (not delimited).
If you have a complex file, then you must define a header and footer, including the Record Type Header and the Record Type Detail. For Record Type Header, the following should be set:
· Identifier = H
· Start Position = 1
· End Position = 1
· Change the corresponding mapping of the fields (such as extending it by 1)
For Record Type Detail, the following should be set:
· Identifier = H
· Start Position = 1
· End Position = 1
· Change the mapping of all the fields
To set up the lockbox mapping file:
1. From the Personify360 main toolbar, select Accounting > Lockbox > Lockbox File Mapping.
2. Click
Create New Mapping.
The Lockbox File Mapping (LCK001a) screen displays.
3. Enter a Map ID (user-defined alphanumeric value).
4. If this is not a complex file, meaning there is no header or footer, click Add Mapping and the system will add the Map ID to the Mapping Definition table.
· Fields will only be read by the system if mapped.
· Extraneous fields do not need to be mapped.
· A header may be required if the Auto Create Batch is being used.
5. If this is a complex file, meaning a header or footer WILL be included, check the Complex File checkbox and click Add Mapping.
a. Select Record Type from the drop-down.
b. Enter
a Record Identifier.
The value used must exist in the file.
c. Enter the Start Position.
d. Enter the End Position.
e. Click
Save.
The system will add the Map ID to the Mapping Definition table.
6. To define lockbox fields provided on the bank file and map them to the system:
a. Click Add Field Mapping.
b. Enter a Field Name.
c. Select a Target Table from the drop-down.
d. Select a Target Column from the drop-down.
e. Select a Map Type from the drop-down.
f. Enter a Start Position.
g. Enter an End Position.
7. Click Save.
8. From the Lockbox Setup task category, click Validate Setup.
Screen Element |
Description |
|---|---|
Map ID |
Text box. A user-defined alphanumeric value used to help identify the Record Mapping. |
Complex File |
Checkbox. Identifies whether the Record Mapping has a header or footer. |
Mapping Definition |
|
Add Mapping |
Button. Adds new mapping to the table. |
Delete Mapping |
Button. Removes mapping from the table. |
Record Type |
Drop-down. Displays the type of record the mapping will be. Field is read-only and defaults to Detail if the record is not flagged as a Complex File. Values in the drop-down are populated based on the fixed codes defined for the LCK "RECORD_TYPE" system type. |
Identifier |
Text box. For example, H, D, or F. The value used must exist in the file. The field is read-only if the record is not flagged as a Complex File. The Header line should have a first character of “H”, the footer line should have a first character of "F", and the detail lines should have a first character of “D.” |
Start Position |
Text box. This value identifies the start position of the Record Identifier. The field is read-only if the record is not flagged as a Complex File. |
End Position |
Text box. This value identifies the end position of the Record Identifier. The field is read-only if the record is not flagged as a Complex File. |
Field Mapping |
|
Add Field Mapping |
Button. Adds a new Field Mapping to the table. A Mapping Definition is required before a Field Mapping can be created. |
Delete Field Mapping |
Button. Removes a Field Mapping from the table. |
Field Name |
Text box. Names the lockbox column. |
Target Table |
Drop-down. Select the intermediate table to which the file will be loaded from either Detail Lockbox (LCK_HOLDING_DETAIL) or Master Lockbox (LCK_HOLDING_MASTER). Values in the drop-down are populated based on the fixed codes defined for the LCK "TABLE_NAMES" system type. |
Target Column |
Drop-down. Defines the column to which the Field Mapping will be sent. The following columns are required at a minimum: · Actual Amount · Bank Seq · Master Customer ID · Order No · Receipt Type · Sub Customer ID
As of the 7.2.2 release, the AUTH_REFERENCE column was added. When receipts are processed in lockbox, token information is stored so that if users have access to the merchant account, then they can refund using the AUTH_REFERENCE provided. |
Map Type |
Drop-down. There are three choices of Map Types: · Column – if the mapping fields are provided on the file, you would select Column and designate a start and end position for the field mapping. · Constant – if a required field is not provided on the file you would need to select Constant and then enter a value in the Constant Value field. For example, if the SUB_CUSTOMER_ID is always “0,” then you would select a Map Type of Constant and enter “0” as the Constant Value. · Sequence – if your bank has provided you with a sequence number you would select Sequence. This is generally used for auditing purposes. Values in the drop-down are populated based on the fixed codes defined for the LCK "MAP_TYPE_CODE" system type. |
Start Position |
Text box. The start position of the field on file. |
End Position |
Text box. The end position of the field on file. |
Constant Value |
Text box. Only enabled when "Constant" is selected from the Map Type drop-down. For Example, enter a value of “0” if the SUB_CUSTOMER_ID is not provided. |