 For
a volume based SUB product, click Auto-Generate Issues.
For more information, please see Automatically
Generating Issues for a Volume-Based Subscription Product.
For
a volume based SUB product, click Auto-Generate Issues.
For more information, please see Automatically
Generating Issues for a Volume-Based Subscription Product.The system uses a sequence of numbers to calculate the number of issues in a subscription and for other internal purposes. You can also create your own identifier for each issue (e.g., Volume 1 Number 1). Defining the issue equates to defining the revenue recognition period.
For
a volume based SUB product, click Auto-Generate Issues.
For more information, please see Automatically
Generating Issues for a Volume-Based Subscription Product.
An automated method to generate issue records creates a series of “skeleton” issue records. You can specify how many records to create, the interval between them (weekly, biweekly, monthly, bimonthly), and the date to start. The system will complete the task with the information you specified. Typically, you will have to update the resulting records with their own issue ID, etc., but this process will save time and make setup easier.
You
must define the issues to validate the product.
To generate individual issues:
1. From the
Personify360 main toolbar, select Products > Product
Central.
The Product Maintenance search screen displays.
2. Click Search to find a product or click Create New Product.
3. From the
Define the Product task category, click Issue Maintenance.
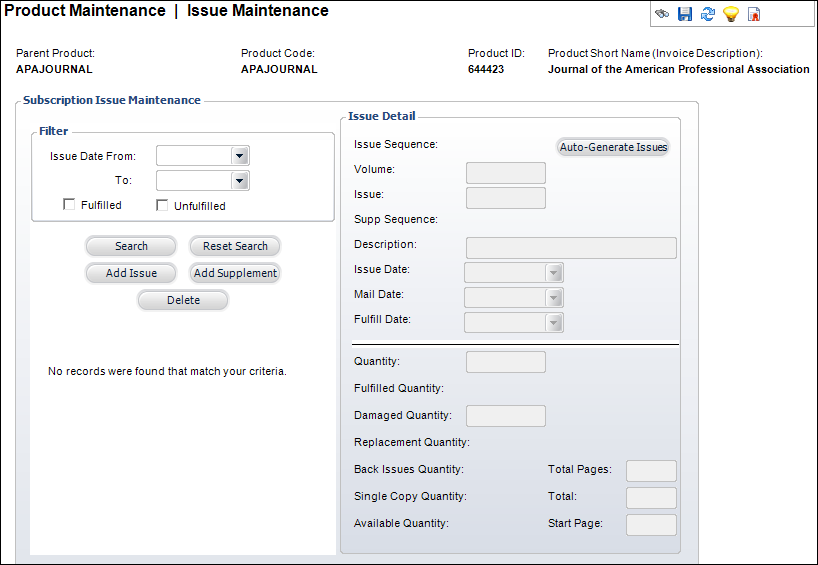
The Issue Maintenance screen displays, as shown below. Issues in the grid
are sorted by Issue Date.
4. Click
Add Issue.
Please note that you cannot add an issue that is later than the date of
the last issue in the volume.
5. Enter
the code of the Issue.
The system-generated number is sequential.
6. Enter the Description of the issue.
7. Select the Issue Date from the drop-down.
If you select
the last day of a month as the issue date, then every subsequent issue
will have the issue date set to the last day of the month, whether the
last day of the month is the 28th, 29th, 30th or 31st. If you set the
issue date to a date that is less than the last day of the month, then
the issue date for every subsequent issue will be set to that date, or
the last day of the month, if that month doesn't have that date. For example,
you set the Issue Date for the
July issue to be July 30, which is not the last day of the month, then
each subsequent issue will have the issue date set to the 30th of that
month, except February, which would be set to either February 28 or February
29, depending on whether the issue is in a leap year or not.
8. If necessary, select the Mail Date from the drop-down.
9. Enter
the Quantity of issues.
Please note that the quantity must be greater than the sum of the fulfilled,
damaged, back issue, and single copy quantities.
10. If necessary, enter the Damaged Quantity of issues.
11. If necessary, enter the number of Total Pages.
12. If necessary, enter the number of Total Ad Pages.
13. If necessary, enter the Start Page.
14. Click Save.
15. To add a supplemental issue, perform the following:
A supplement
can be created as long as the issue date is not greater than the issue
date of the last issue in the volume. However, you can create a supplement
with the same issue date as the issue date of the last issue in the volume.
a. Highlight
the issue you want to add a supplement to and click Add
Supplement.
A supplemental issue is generated.
b. Follow the steps above.
c. Click Save.
Screen Element |
Description |
|---|---|
Auto-Generate Issues |
Button. Opens the Auto-Generate Publication Issues screen to auto-generate a series of issues. This is for a volume based SUB products. For more information, please see Automatically Generating Issues for a Volume-Based Subscription Product. |
Issue |
Text box. This is the code of the issue. The system-generated number is sequential. |
Description |
Text box. The description of the issue. |
Issue Date |
Drop-down. The print date for the selected issue.
|
Mail Date |
Drop-down. The mail date for the selected issue. |
Quantity |
Text box Is populated with the number of issues produced or to be distributed. The formula is the following: Quantity – Fulfilled Quantity = Available Quantity. |
Damaged Quantity |
Text box. Enter the damaged quantity. |
Total Pages |
Text box. The total number of pages in the selected issue. |
Total Ad Pages |
Read-only. The number of pages in the selected issue dedicated to advertising. |
Start Page |
Text box. The first page of the issue. |