Line of Code
Description
<add name="IMSConnectionString " connectionString="xxxx;Database=SSO_DEMOQA;uid=SSO;pwd=SSO;" providerName="System.Data.SqlClient" />
Connection string to SSO database
<add key="SSOWebReferenceURL" value="http://pd-ebusinessqa.mc.tmaresources.com/SSO_DEMOQA/webservice/service.asmx" />
SSO Web service URL
<add key="IMSWebReferenceURL" value="http://pd-ebusinessqa.mc.tmaresources.com/IMS_WebService_DEMOQA/IMService.asmx" />
IMS Web Service URL
<add key="EnableSSO" value="Y" />
Always set to Y.
<add key="EnableIMS" value="Y" />
Always set to Y.
<add key="LoginMode" value="INLINE" />
Choose from Login Mode = "INLINE" or "REDIRECT". For REDIRECT, the user is redirected to the SSO Web Site for Login. For INLINE, the DNN Module Personify – Login Module is responsible for logging the user in.
<add key="SSOLoginURL" value="http://pd-ebusinessqa.mc.tmaresources.com/SSO_DEMOQA/Login.aspx" />
Login URL of the SSO web site.
<add key="SSO_BASE_URL" value="http://pd-ebusinessqa.mc.tmaresources.com/SSO_DEMOQA/" />
Base URL of the SSO web site.
<add key="SSO.FailedPasswordAttemptCount" value="3"/>
As of 7.6.2, the number defined for this value indicates the number of login attempts allowed before the user will be locked.
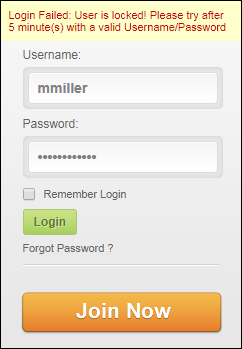
 The message that displays is
configured in the SSOMessages.resx
resource file.
The message that displays is
configured in the SSOMessages.resx
resource file.
<add key="SSO.FailedPasswordAttemptWindow" value="5"/>
As of 7.6.2, the number defined for this value indicates the number in minutes in which the user is locked. When this time passes, the failed login attempt count will reset to 0 and the user can attempt to log in again with a valid username/password.
The message that displays is
configured in the SSOMessages.resx
resource file.
 If
your association currently runs on IIS 7, you must also go to the bottom
of the web.config XML file and add the following line of code to the <httpModules>
section:
If
your association currently runs on IIS 7, you must also go to the bottom
of the web.config XML file and add the following line of code to the <httpModules>
section: