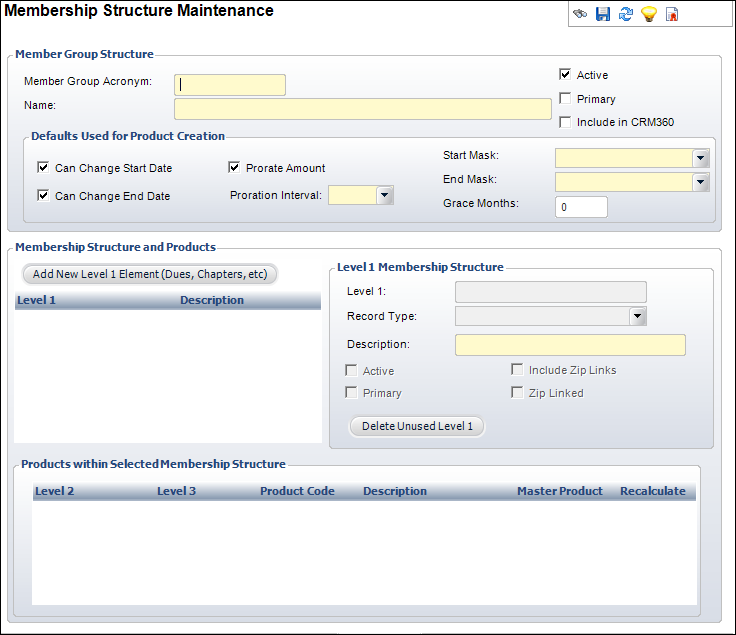
The Membership Structure Maintenance screen displays, as shown below.
To create a member group:
1. From the
Personify360 main toolbar, select Membership/Product
Set-up > Product Central.
The Product Maintenance search screen displays.
2. From the Product Related
Tasks task category, click Define Membership Structure.
The Membership Structure Maintenance search screen displays.
3. On the Membership Structure
Maintenance search screen, click Create New Membership
Group.
The Membership Structure Maintenance screen displays, as shown below.
4. Enter the Member Group Acronym.
5. Enter the member group Name. This is the long name of the acronym.
6. Select if this member group is Active.
7. Select the Primary checkbox if this member group is the highest level of membership that the association has to offer.
 Only one
member group can be designated as primary per organization unit.
Only one
member group can be designated as primary per organization unit.
8. Select whether or not
this member group should Include in CRM360.
This option gives organizations a way to identify memberships of non-primary
member groups that should be displayed in the Involvement section on the
CRM360® and Donor360® screens. In addition, this
flag is used to limit output for the MBR700
batch process. When checked, the MBR700 batch process will generate
member count records (stored in the MBR_COUNT table) for memberships in
the member group. As of 7.5.2, this checkbox is defaulted as checked for
ALL new member groups (primary and non-primary). By defaulting this checkbox
to checked, there is less risk that expected data will be missing when
running MBR700.
9. Select the Can Change Start Date checkbox if the member group start date can be changed during the creation of a new membership order. This is usually performed as an override to the Start Mask setup.
10. Select the Can Change End Date checkbox if the member group end date can be changed during the creation of a new membership order. This is usually performed as an override to the End Mask setup.
11. Select the Prorate Amount checkbox if your association has any of the following rules:
12. The membership period is on a calendar basis and those who join after the first of the year will get charged less than the full year rate.
· A first
year membership could be less than 12 months, which would be accomplished
by changing the start date or end date.
If the Prorate Amount checkbox is checked, this prorate amount setting
can be changed for any specific member product rate code.
· If the
Prorate Amount checkbox is checked, choose the Proration
Interval from the drop-down.
The interval options are Day, Month, or Year. The dues amount calculation
will break down the total dues amount by the day, month, or year to give
the reduced dues amount.
13. Select the Start Mask and End Mask from the drop-downs.
14. Enter the Grace Months. Keep the default of zero if there are no grace months.
15. Click Add
New Level 1 Element (Dues, Chapters, etc).
A row is added to the table and the Level 1 Membership Structure fields
are enabled.
16. Enter a Level 1 structure.
17. Select a Record Type from the drop-down.
18. Enter a Description of the structure.
19. Check the appropriate checkboxes. Valid choices include:
· Active
· Primary
· Include Zip Links
· Zip Linked
20. Click Save.
Screen Element |
Description |
|---|---|
Member Group Structure |
|
Member Group Acronym |
Text box. This is the designation for the member group, i.e. ACP, AAOS, etc. |
Name |
Text box. The long name for the member group acronym. |
Active |
Checkbox. When checked, it signifies the member group is active. |
Primary |
Checkbox. When organizations want to differentiate between multiple organizations, this checkbox indicates whether the member group is primary for this system. Only one group can be primary per organization unit. Primary group is used in all reports. If an individual is only a member of a non-primary group, then in the Essential Information section of the Customer Central screen, the non-primary group displays.
On the web for group management, in order for a value to display on the Membership column on the Roster control for Committee Management and Chapter Management and in the Status column for Corporate and Staff Management, on the General Setup screen define the following: 1. From the Parent Product drop-down, select a Membership Group that was defined as "Primary" on the Membership Structure Maintenance screen. 2. From the Level 1 drop-down, select "National Membership". 3. Enter a Description. This is the name that displays in the Membership column.
See the Roster control for more information. |
Defaults used for Product Creation |
|
Can Change Start Date |
Checkbox. When checked, indicates that you can change the default start date on the Product Specifics tab of the Line Item Details screen (in the Order Entry subsystem). When unchecked, the date is locked and cannot be changed. |
Can Change End Date |
Checkbox. When checked, indicates that you can change the default end date on the Product Specifics tab of the Line Item Details screen (in the Order Entry subsystem). When unchecked, the date is locked and cannot be changed. |
Prorate Amount |
Checkbox. When checked, indicates that if the date range is changed from the default, or a short year is defined, the price should be prorated accordingly. If checked, you must select the Prorate Interval. |
Proration Interval |
Drop-down. Enabled only if the Prorate Amount is checked. This tells the system at what interval to prorate the amount. If you select "DAY", the system will calculate the actual number of days.
Values in the drop-down are populated based on the fixed codes defined for the MBR "PRORATION_INTERVAL" system type. |
Start Mask |
Drop-down. This tells the system how the organization wants start dates on memberships to be set.
The following values are populated based on the fixed codes defined for the MBR "DEF_START_MASK" system type: · BEG[month]: All memberships start on the beginning of the selected month. For example, BEGAUG memberships begin on the first of August.
· BEGMY: All memberships start on the first day of the current month. · CUTOFFMON: All memberships start on the month after the calendar day specified in Option 1 of the system types and codes. For example, if Option 1 is ‘15’, all memberships joining on the 16th or later will start the next month. · CUTOFFYEAR: All memberships start on the next year after the month specified in Option 1 of the system types and codes. For example, if Option 1 is ‘6’, all memberships joining after June will start the next year. · NEXTMONTH: All memberships start on the first of the next month. For example, if your order is entered on February 1st or February 28th, the membership will start March 1st. · TODAY: All memberships start on the day the order is entered. |
End Mask |
Drop-down. This tells the system how the organization wants end dates on memberships to be set. You can override this at the product level.
The following values are populated based on the fixed codes defined for the MBR "DEF_END_MASK" system type: · 1YEAR: All memberships end one day and one full calendar year after the membership start date. For example, if the membership started on March 14th, the membership will end on March 13th of the next year. · 1YRMINUS: All memberships end on the last day of the month prior to the current month. For example, if the membership starts on January 1st of the current year, the membership will end on December 31st of the current year. Or if the membership starts on March 15th, the membership will end on February 28th of the next year. · 1YRPLUS: If the membership starts in the middle of a month, for instance January 15, the cycle end date will be January 31. This is one year plus the partial month at the beginning. Note that when revenue recognition is done, there is an option to recognize the short month as the first of 12 months or the final month as the 12th month.
· END[month]: All memberships end on the last day of the selected month. For example, ENDAUG memberships end on August 31st.
|
Grace Months |
Text box. The default number of months for continuing member benefits prior to cancelling a membership for non-renewal. You can override this at the rate code level. When reporting membership counts, the memberships in grace months are included in the count.
For a membership product order with sub-lines, if the sub-line has a different number of grace month than the master product, the sub-line retains its grace months. If the number of grace months for the sub-line is greater than the master product, the master product will be set to the grace months of the sub-line. |
Membership Structure and Products |
|
Add New Level 1 Element (Dues, Chapters, etc) |
Button. When clicked, a row is added to the Membership Structure and Products table and the corresponding fields are enabled to add a Level 1 Membership Structure. |
Level 1 Membership Structure |
|
Level 1 |
Text box. Defines the highest level of the structure. Level 1 represents the major categories of membership. For example, Individuals, Companies, Chapters. |
Record Type |
Drop-down. This defines what kind of membership record that a specific Level 1 references. Examples include dues, chapter, etc.
The following values are populated based on the fixed codes defined for the MBR "RECORD_TYPE" system type: · Chapter · Donation · National · SIG (Special Interest Group) |
Description |
Text box. The description of the Level 1 structure. |
Active |
Checkbox. When checked, it signifies the membership structure is active. |
Primary |
Checkbox. Within a structure, it is convenient to designate one value as being primary when describing a customer. For example, a member is known by his national dues designation more than his special interest groups. The system will ensure only one Level 1 is marked as primary. |
Include in CRM360 |
Checkbox. This option gives organizations a way to identify memberships of non-primary member groups that should be displayed in the Involvement section on the CRM360® and Donor360® screens. In addition, this flag is used to limit output for the MBR700 batch process. When checked, the MBR700 batch process will generate member count records (stored in the MBR_COUNT table) for memberships in the member group. As of 7.5.2, this checkbox is defaulted as checked for ALL new member groups (primary and non-primary). By defaulting this checkbox to checked, there is less risk that expected data will be missing when running MBR700. |
Include Zip Links |
Checkbox. When this product is purchased, the system automatically includes a zipped mapped products with the same parent product code. This checkbox can only be selected if Zip Linked is not selected.
|
Checkbox. This product contains a zip mapping to allow an automatic population of the order record with an appropriate chapter. This checkbox can only be selected if Include Zip Links is not selected. See example above. |
|
Delete Unused Level 1 |
Button. When clicked, the highlighted row from the table and the information entered in the Level 1 Membership Structure fields are deleted. |
Products within Selected Membership Structure |
|
Master Product |
Checkbox. When checked, indicates this product can stand alone. When unchecked, it implies that the product cannot be entered directly without already having another product with the same parent product but different product code. |
Recalculate |
Checkbox. Determines if the renewal should be recalculated from the dues schedules or if it should simply accept last years amounts. This is important for negotiated rates in trade association situations. When a product is renewed and this checkbox is checked, the system looks for the new pricing and calculates it. |
 If the selected month has already
passed for the current year, the system will set the Begin Date
of the membership to the first of the month for the next year.
For example, if the current month/year is October 2014 and the
Start Mask selected is "BEGMAY", the Begin Date of the
membership will be set to May 1, 2015.
If the selected month has already
passed for the current year, the system will set the Begin Date
of the membership to the first of the month for the next year.
For example, if the current month/year is October 2014 and the
Start Mask selected is "BEGMAY", the Begin Date of the
membership will be set to May 1, 2015.