Membership Renewal .NET Control Overview
The Membership Renewal .NET control allow your constituents to renew
their existing memberships. This control is designed to simplify the membership
renew process, by presenting the options for renewal in summary form and
your constituent can choose to either update the select information or
quickly process a payment.
 In order for the renewal workflow to begin, the following two conditions
must be met: there must a proforma order and there must be a national
membership available for renewal. See Configuring
the Back Office Settings for the Membership Renewal Control for more
information.
In order for the renewal workflow to begin, the following two conditions
must be met: there must a proforma order and there must be a national
membership available for renewal. See Configuring
the Back Office Settings for the Membership Renewal Control for more
information.
The membership renew process will vary for each of your constituents
depending on the options they selected during the membership join process.
The following scenarios may occur:
1. The renewing individual is both the ship-to and bill-
to customer.
This membership renewal process allows your constituent to review his/her
contact information, membership information, and make a payment.
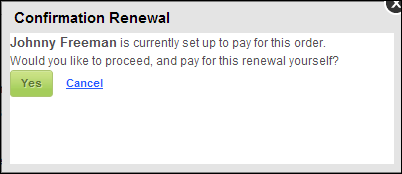
2. The renewing individual is NOT the bill-to customer.
This membership renew process takes your constituents through the same
process as the first scenario above; however, when they click Renew
Now, the Confirmation Renewal window displays to prompt the constituent
that another constituent is set up to pay for his/her membership. The
constituent can continue with the renewal process and make the payment
themselves.
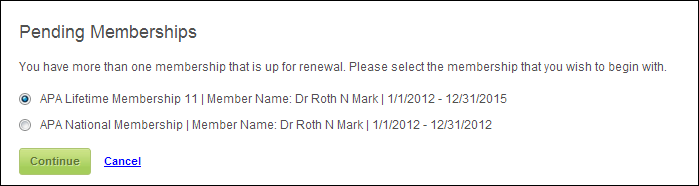
3. The renewing individual has multiple memberships to select
from.
This membership renew process is set up to allow your constituent to select
which membership he/she would like to renew, as shown below. After selecting
the appropriate radio button and clicking Continue,
your constituent will be taken through the same process as the first scenario
above. In order to renew more than one membership, your constituent
will have to complete the membership renew workflow for each membership
that he/she wants to renew.
To get started with the Membership Renew control,
the following tasks must be completed:
1. Configuring
the Back Office Settings for the Membership Renewal Control
2. Configuring
the Web Settings for the Membership Renewal Control
Customer Impact
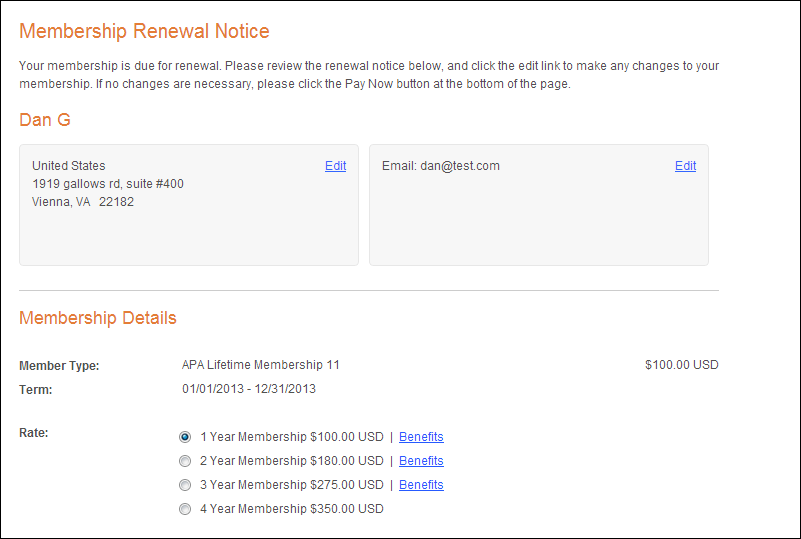
After setting up the Membership Renewal control, your customers will
see the control similar to the one displayed below. The information displayed
in the Membership Renewal control is numbered in the image below. See
the numbered list that follows for more information.


If
a constituent moves from an area with numerous local/regional chapters
to an area that does not have the same number of choices, the extraneous
chapters would be removed automatically. For instance, if the constituent
lived in the DC Metro area, he/she might be auto-assigned to either DC
Metro or Mid-Atlantic; then, he/she moves to Ohio where his/her only option
for regional chapter is Midwestern. The regional chapters DC Metro and
Mid-Atlantic would be removed automatically. In order for this logic to
work, ALL chapter products must be web-enabled.
The following section explains what tasks users can
perform on the Membership Renewal control:
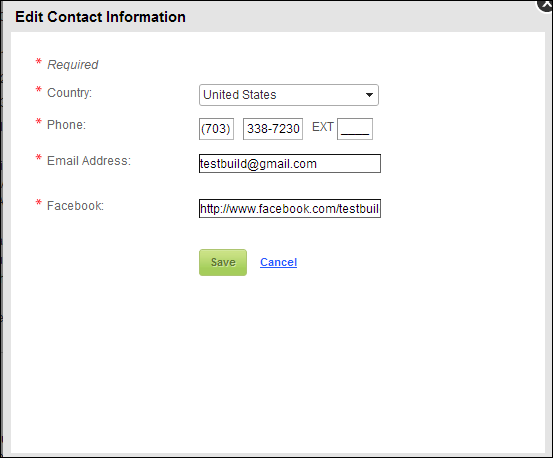
1. Edit Link for Address Information:
When the user clicks the edit link in the address contact information section,
he/she is able to edit his/her primary address information and contact
information (i.e., last name, title, etc.), as shown below.
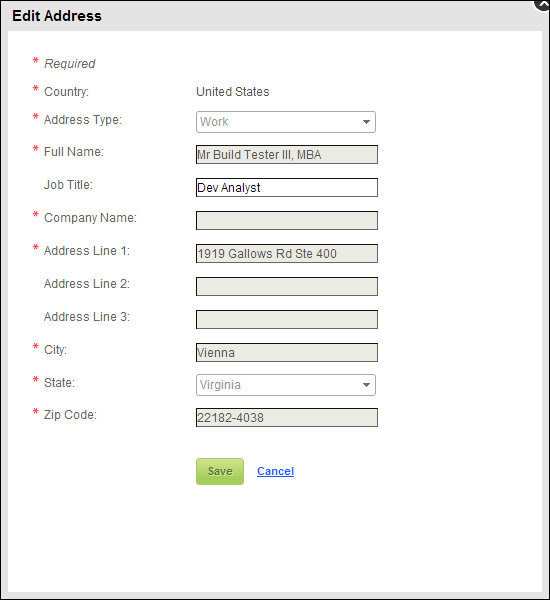
Users are
unable to change his/her bill to or ship to address information from this
control.
2. Edit Link for Email, Phone, and Web Section:
When the user clicks the edit link in the edit link for email, phone, and
web section, he/she is able to edit his/her primary phone number, email
address, and any web sites (e.g., Facebook, LinkedIn, Twitter, etc) associated
with his/her contact information.
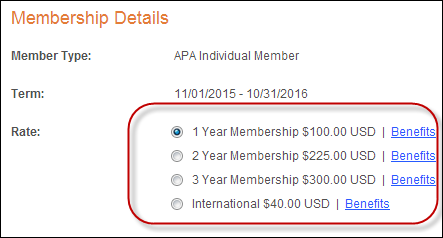
3. Membership Type:
Users are unable to change their membership product, as shown below (e.g.,
APA Individual Membership,

4. Rate:
Users are able to select which term (rate code) of membership they want,
as highlighted below.
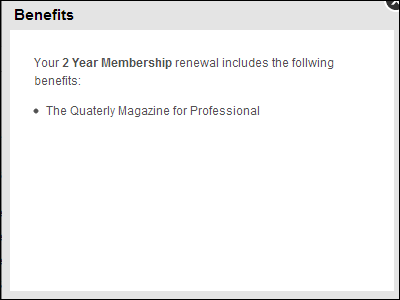
In addition, when the user click the benefits link in the benefits link
for membership section, the Benefits window displays, as shown below.
Here the user can see what benefits are associated with membership.
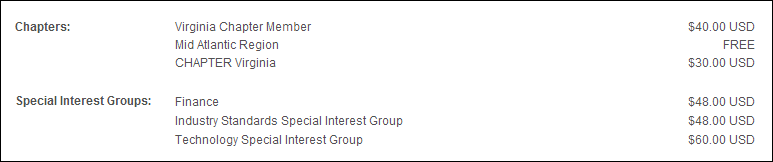
5. Chapters and Special Interest Groups:
Users are unable to change their chapter(s) and special interest group(s),
as shown below.
6. Additional Benefits:
Users can opt in/out of subscription benefits that are included as a part
of membership. In addition, the users can select whether or not they want
to receive the subscription in digital or print form, if applicable, as
shown below.

This is
not the same opt in/out functionality used in the back office.
7. Auto-renew:
By default, the Auto-renew checkbox is going to display on this control;
there is NO configuration to suppress it. However, if the user already
checked the Auto-renew checkbox, it will be suppressed.
On the web, it displays as shown below, and it gives users the option to
renew their Membership. By default, users will have to check this check
box and when checked, in the back office, the credit card is saved on
the order, Order_Detail. RENEW_TO_CC_FLAG is set to "Y", and
the payment will be processed next time the order is picked up by ORD650.
Please note that in order for the membership product to be renewed, you
must run ORD650, which is an application that looks for current products
that expire between specific dates and have not yet been renewed. This
process then creates a new order for those products for a new year. Please
refer to ORD650-
Renewal Processing for more information. In addition, when the user
checks this checkbox, the credit card is saved on the order and displays
on the web as a saved credit card on the Saved
Credit Card control, as well as on
step 3 of the Checkout control.

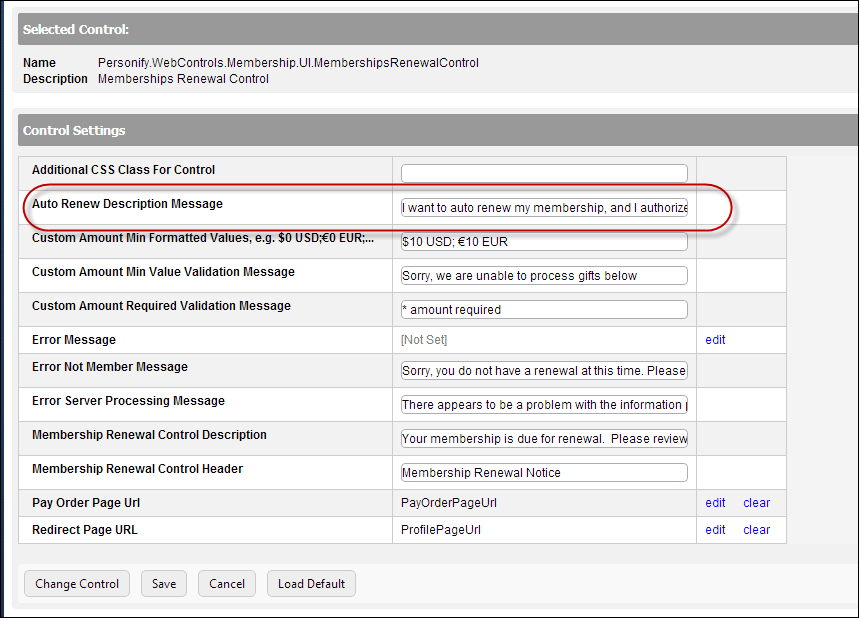
In order to change the description displayed in the auto-renew checkbox,
enter the new text in the Auto Renew Description Message text box on the
control settings screen, as highlighted below. See Configuring
the Web Settings for the Membership Listing Control for more information.
8. Contribution:
The user can select the amount of money that he/she wishes to donate. See
Configuring
the Back Office Settings for the Membership Listing Control for more
information.
 Regarding
the membership renewal order created in the back office when initiated
from the web, the optional contribution line item(s) will only be added
to the order when the web user clicks Pay Now.
Regarding
the membership renewal order created in the back office when initiated
from the web, the optional contribution line item(s) will only be added
to the order when the web user clicks Pay Now.
9. Pay Now Button:
When the user selects the pay now button, he/she is taken to a place where
he/she can pay for only his/her membership. Users will have to pay entire
membership balance.
Pay Now is
the only option to process the payment for this control; users cannot
combine the membership renewal with any other items in their shopping
cart, because it is not added to the shopping cart.
Items already
included in the user's cart will not be included in the membership payment.