Configuring the
Web Settings for the Navigation Bar Control
It is up to each client to determine the appropriate location of this
page, and to create the menu item that will lead web users to this page.
The section below details how to set up this control on your website.
The instructions are intended for a web user with web admin/host privileges.
In addition, this is NOT a standalone control, which means that in order
for it to function, it needs to be incorporated into the Online
Store workflow on the web. For more information, refer to the Standalone
Controls section.
 As of 7.5.1 FP1, this control can be
configured to be responsive
to mobile users. After adding the responsive CSS to this page, your mobile
phone user will see the control on the responsive page similar to the
one shown below. For more information
about using this control on a responsive page, please see Making
a Page Responsive.
As of 7.5.1 FP1, this control can be
configured to be responsive
to mobile users. After adding the responsive CSS to this page, your mobile
phone user will see the control on the responsive page similar to the
one shown below. For more information
about using this control on a responsive page, please see Making
a Page Responsive.
To configure
the web settings for the Navigation Bar control:
1. Add the
"NavigationBarControl" to the desired page. For more information,
please see Adding a .NET Web Control
to a Page.
The following Control Settings display for this control, as shown below.
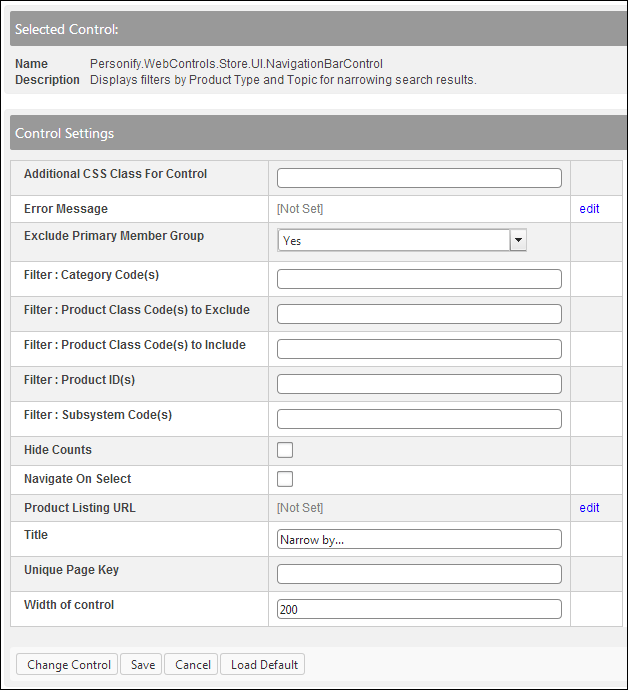
2. In the Additional CSS Class for Control field, enter
the CSS class, if necessary.
This option allows you to add additional layout to the skin by developing
a new DOTNETNUKE style, which requires an advanced understanding of HTML
and CSS.
3. If necessary,
select or create a new Error Message.
The error message will display on the control for the action that was being
performed at the time of the error.
a. If left
blank, the default error message, "An error occurred while performing
[Insert Action]. If the problem persists, please contact the site administrator",
will display. [Insert Action]
will be substituted with the action the control was performing at the
time of the error.
b. If you
wish to change the default error message, customize it with a PWF Parameter.
See Setting up PWF Parameters for
more information.
4. As of
7.5.0, select whether or not you want to Exclude Primary
Member Group products belonging to the organization's primary member
group from being displayed on the page.
For example, if your organization has a separate page for memberships that
takes users through a join or renew workflow, you should select to exclude
primary member group products.
5. As of
7.5.0, the product listing is configurable so that organizations can have
a particular set of filters applied to display only specific types of
products in the listing. For example, your organization may want to have
a "Bookstore" product listing and a "New Release"
product listing. These two product listing pages can be configured to
display pre-defined filters to your web users using the following parameters.
For more information, please see Filtering
the Online Store Listing by Default.
· Filter: Category Code(s)
· Filter: Product Class Code(s) to Exclude
· Filter: Product Class Code(s) to Include
· Filter: Product ID(s)
· Filter: Subsystem Code(s)
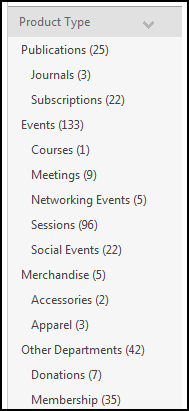
6. Check
the Hide Counts checkbox.
Select
this checkbox if you want to hide the counts in listings. This hides the
counts in parentheses that displays next to the filters in the navigation
bar, as shown below.
7. Check
the Navigate On Select checkbox.
If
selected, selecting an item from the tree will redirect the user to the
product listing page. Only enable this option if the product listing is
on another page.
8. From
the Product Listing URL line, click
edit.
The Select/Edit Personify Web Parameters
screen displays.
a. Click the select
link next to the appropriate
PWF parameter.
You should set the PWF parameter to a value that will take the user to
the URL that will display the product listings.
If this PWF parameter does
not exist or you would like to create a new one, see Setting
up PWF Parameters for more information.
9. In
the Title text box, enter the text that
will be displayed at the top of the control. If you leave it blank, no
text will display. It may be useful to have a title like “Products”, “What
we offer”, or “Shop”.
10. If you have more than one store using the navigation
bar, in order to resolve the issue of a filter not getting
cleared when the user navigate to another page, set the Unique
Page Key to the respective page.
For example, for a general store, you would set this to “store” and for
your book store page, you would set this to “bookstore” to distinguish
the difference between both the pages.
11. As
of 7.5.1 FP1, if necessary, in the Unique Page
Key field, enter a string value.
This field is used to distinguish search terms being used in configurations
where you may have multiple product listing pages. You have a different
Unique Page Key value that drives the appropriate search terms on these
pages.
If this control has been dropped on the same page (e.g., Online Store Landing
page or Product Listing page) as either the Product
Listing control or Search
control and the Unique Page Key field has been set for either control,
then the same value must be entered here. The Unique Page Key field's
value MUST be the same for all three controls. For example, if you enter
"APAstore" in this field on the Online Store Landing page for
the Search control, then you should enter "APAstore" on this
field for the Navigation Bar control on the Online Store Landing page
and on the Product Listing control on the Product Listing page.
12. In the Width of control
text box, enter
the desired width of the
control. The field defaults to 200, the recommended width.
13. Click
Save.