Configuring the Web Settings for the Left Navigation Module
For more information about the left navigation module, please see the overview. In addition, the instructions to set up the left navigation panel only apply if you are using the Content Management Systems (CMS) DotNetNuke (DNN).
To configure the left navigation module:
1. Log into your site as host.
2. Create the "home" page.
3. Create all the subpages (e.g., Biography, Address, Name and Demographics, etc.) that you want to be displayed in the left navigation of the "home" page.
 Make sure to check the Include In Menu checkbox in the Page Details section so that you can navigate to the subpage before configuring the links in the left navigation panel for My Profile controls, as highlighted below. See Configuring Pages, Modules, and Skin Settings for information on how to add a page to your website.

4. Drop all the controls on the respective subpages.
See Adding a .NET Web Control to a Page for more information.
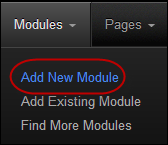
5. On the Control Bar, from the Modules drop-down, select "Add New Module", as highlighted below.
A list of all the modules displays.
6. Select the Links module, and drag it to where you want it to be located on your page, as shown below.

The Links module displays on your page, as shown below.

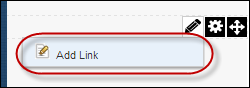
7. From the pencil icon, select Add Link, as highlighted below.
The Edit Links screen displays, as shown below.
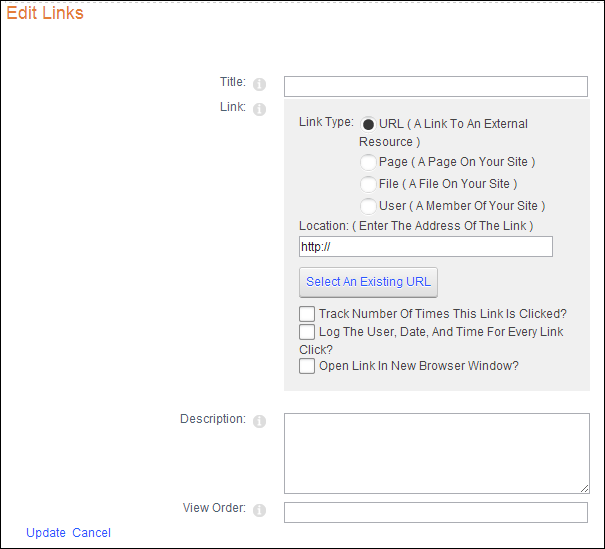
8. In the Title field, enter the name of the link.
9. In the Link section, select the Page (A Page On Your Site) radio button as the Link Type, as highlighted below.
.png)
10. From the Select a Web Page from Your Site drop-down, select the page that you want to display in the link module.
11. If necessary, check the Track Number Of Times This Link Is Clicked? checkbox.
12. If necessary,check the Log The User, Date, And Time For Every Link Click? checkbox.
13. If necessary,check the Open Link In New Browser Window? checkbox.
14. If necessary, in the Description field, enter a description of the link.
15. If necessary, in the View Order field, enter a number representing the position on the list for this link.
16. Click Update.
17. Repeat steps 7-16 for each subpage that you want a link to be created in that link module.
The steps described above need to be repeated for every link that you want displayed in the left navigation panel .
18. After creating all the links for the subpages, hide each of the subpages on the main menu by performing the following:
Make sure to wait until after you are done adding a link for each subpage in the left navigation panel, before unchecking the "Include In Menu" checkbox.
a. Select the link of the subpage you want hidden.
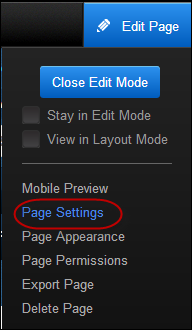
b. From the Edit Page section, click Page Settings, as highlighted below.
The Page Details screen displays.
c. Uncheck the Include In Menu? checkbox, as highlighted below.
The page will no longer display in the main menu.
d. Repeat for each page that is listed in the main menu.
 As a best practice, make sure to test each link before releasing it to your constituents in order to ensure that all settings are configured properly.
Propagating Changes
This section provides more information on how to make a change to a link in the left navigation have the change propagate to all other pages.
1. Select the Settings option for the desired links module, as shown below.

2. Navigate to the Advanced Settings.
3. Check the Display Module On All Pages.
4. Click Update Page.