Viewing a Constituent's Order and Donation History in CRM360®
From the Order and Donation History screen in CRM360, you can view an individual's order or a company or employees' orders. When viewing individual or company orders, the system selects all orders where the individual or company is the bill-to customer. When viewing employee orders, the system selects all employee orders for constituents that have an Employer/Employee employment relationship to the company. The employment relationship does not need to be current when viewing order history, but the employment relationship must have been current on the order date of the order line. Also, the company is not the bill-to customer, because those orders are shown as company orders. The employment relationship does not need to be primary.
 If you are using Chapter Management on the web and you need to change the ship-to line on a membership order midway through the cycle, do NOT simply change the ship-to line customer ID. This would NOT result in a true picture of what happened for a chapter manager. Rather, the proper process is to cancel the first customer’s order line and create a new line. Any payment on the first line can be transferred to the new line if desired. See Group Management for more information.
To view a constituent’s order and donation history:
1. From the Financial Data task category in CRM360, click Order and Donation History.
The Order and Donation History screen displays, as shown below. The Order and Donation History screen displays orders in which the current customer is referenced as either the bill-to or ship-to customer. The dates in the Filter by Order Date section automatically populate based on the "ORDERVIEWMONTHLIMIT" application parameter.

 For company records, the Orders and Gifts filter section displays, as shown below. These radio buttons allow you to filter orders for the company and employees.

2. To filter the grid, perform the following:
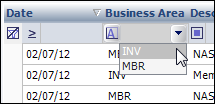
a. Click the drop-down in the first row column header to display a filter to sort the available records, as shown below. Select the appropriate option to filter the orders and donation by the selection.
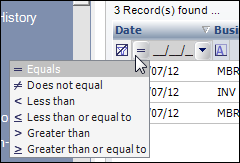
b. Click the icon in the column header to display filter criteria, as shown below. For example, if you want to filter the records by all orders and donations created before 01/01/12, select the Less than filter criteria and click the drop-down to the right to select 01/01/12 as the date.
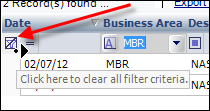
c. To clear a filter, click the funnel icon, as shown below.
3. Use the scroll bar at the bottom of the grid to scroll left and right to view more information about the order or donation.
4. To export the grid to Excel, perform the following:
a. Click Export to Excel to save the grid as an ".xls" document, as shown below.

The Open window displays to save the “.xls” file.
b. Select the appropriate location where you want this file to be saved.
c. Click Save.
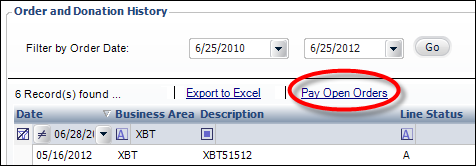
5. Click Pay Open Orders to open the Receipt Entry screen.
6. To perform specific actions on the grid, perform the following as necessary:
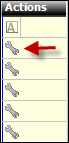
a. To view/edit actions, click the Wrench icon in the Actions column, as shown below.
b. list box of the following options will appear:
· Print Invoice - opens the ORD660_A invoice report.
· Print Acknowledgement - opens the ORD660_B acknowledgement report. An acknowledgement letter is a document sent to the customer informing them that their order has been received and entered.
· Order Analysis- opens the Order Financial Analysis screen for the selected order.
· Make a payment - opens the Quick Pay screen to create a new receipt for the selected order.
· View Receipts (if any) - opens the Receipt Review screen for the selected order.
· View/Edit Record - opens the Order Entry screen for the selected order or the Donation Entry screen for the selected donation.
· View Issues Serve - opens the Issues Fulfillments screen.
7. Click the Main Page link to return to the overview page, as shown below.
