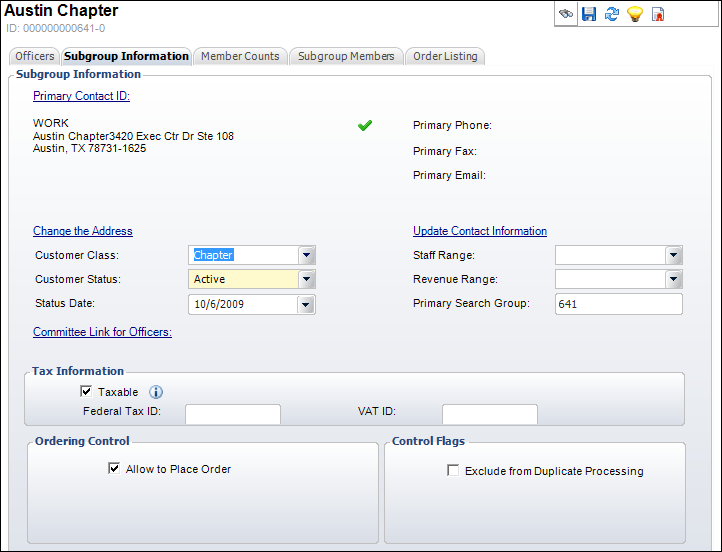
The Subgroup Information tab displays, as shown below.

The Subgroup Central screen displays information specific to subsidiaries, companies, and other user-defined subgroups that are important to your organization. The Subgroup Information tab displays all information about the specified customer.
To edit subgroup demographic information:
1. From the Common Tasks task category, click Subgroup Demographics.
The Subgroup Information tab displays, as shown below.

2. Click the Primary Contact ID to change the primary contact for the subgroup, if necessary.
 If you change the Primary Contact, the system will create a new address link(s) to the selected new primary contact's address(es). A dialog will display and you can choose whether or not you want to mark the previous linked address of the previous primary contact as "Bad". If you select "Yes", the previous primary address linked to the previous primary contact will be marked as "Bad". If you select "No", the previous primary address linked to the previous primary contact will NOT be marked as "Bad" and will display as an Additional Address.
3. Change the Customer Class or Customer Status, if necessary.
4. Select the date the demographics were last changed from the Status Date.
5. To provide a committee link for officers, click the Committee Link for Officers link.
The Customer Chooser window displays. Search for and double-click a record to select it.
 The committee will default to the committee chosen on the Officers tab. Changing the committee on the Subgroup Information tab will also change the committee selected on the Officers tab.
6. To change the address for the subgroup, click Change the Address.
For more information, please see Changing a Customer Address.
7. To update the contact information for the subgroup, click Update Contact Information.
For more information, please see Changing a Customer's Contact Information.
8. Select the Staff Range from the drop-down menu.
The values are populated based on the codes defined for the non-fixed CUS STAFF_RANGE system type.
9. Select the Revenue Range from the drop-down menu.
The values are populated based on the codes defined for the non-fixed CUS REVENUE_RANGE system type.
10. Enter the Primary Search Group. Please see the Primary Search Group section for more information.
11. Enter the following tax information:
· Taxable
· Federal Tax ID
· VAT ID
 As of 7.5.0, the Federal Tax ID and VAT ID fields also display on the Tax Information screen in CRM360. Changes made on one screen will automatically change on the other. For more information, please see Adding Tax Information.
12. If necessary, check the Allow to Place Order checkbox.
When checked, the subgroup can place an order.
13. If necessary, check the Exclude from Duplicate Processing checkbox.
When checked, indicates this subgroup will be excluded when processing duplicate customer records.
14. Click Save.