The Approved Transcript Program Definition screen displays, as shown below.
The Approved Transcript Program (TRN000) screen allows you to define approved programs and the Continuing Education (CE) credits allowed for those programs, which will then be listed on a member’s transcript. You can enter records manually, upload records based on the purchase of products, and/or upload records based on an ASCII file from a scanner.
Using the Approved Transcript Program screen, you can define transcript programs that will later be linked to Certification requirements.
In Personify360, approved programs include:
· Program – generally not related to a product purchased by the member. Credits are entered manually or uploaded through an ASCII file.
· Course – a method through which you can define multiple meeting or session events as being the same topic or requirement. Registering for this type of program fulfills a course requirement.
· Product – indicates a direct relationship with the purchase of a specific product or course (such as a self-assessment exam sold as a product).
· Exam – indicates that credit is received as a result of taking an exam. Credit can be assigned for purchasing the exam or for later upload of exam results.
A transcript program can be linked to a course, exam, or product in the application, as long as the items belong to the same organization and organization unit as the transcript program. If a transcript program is linked to a product, the Product Code of the linked product is recorded on this screen. When a customer purchases the product linked to the transcript program, if the product is flagged to record CE credit on purchase, the customer will automatically have a transcript record created. Otherwise, the transcript record will be created when the customer meets another condition that is required, such as achieving a certain grade.
To define transcript programs:
1. Perform one of the following:
· From the Personify360 main toolbar, select Transcript Setup > Transcript Program Definition.
· On the Transcript Central screen, click Define Courses and Exams to be used in defining TRN Programs.
· On the Transcript Central screen, click Define Transcript Programs.
· On the Transcript Central screen, click Upload Customer Transcript Activities.
2. Click
Create New Transcript Program.
The Approved Transcript Program Definition screen displays, as shown below.
![]()
3. If necessary, change the Program ID.
 As of 7.4.1SP1,
the Program ID supports the inclusion of a dash and underscore. Spaces
are not supported.
As of 7.4.1SP1,
the Program ID supports the inclusion of a dash and underscore. Spaces
are not supported.
4. Enter the Program Title.
5. If the transcript program is approved, check the Approved Program checkbox.
6. Enter the Begin Date of the transcript program.
7. If necessary, enter an End Date and a Valid thru date.
8. On the General Setup tab, perform the following:
a. Click the Sponsor link and search for a sponsor related to the transcript program. You can also enter a name if the sponsor is not in the system.
b. Click the Joint Sponsor link and search for a joint sponsor related to the transcript program. You can also enter a name if the joint sponsor is not in the system.
c. Click the Location link and search for a location related to the transcript program. You can also enter a location name if the location is not in the system.
d. Select the Activity Type from the drop-down.
e. Select the Content Type from the drop-down.
f. Select the Passing Grade from the drop-down.
g. Select
the Related Product Type from the drop-down
and enter the related information.
The related information options change depending on the Related Product
Type selected.
h. Enter the related information based on the Related Product Type selected.
i. Check the appropriate checkboxes.
9. On the
Program Participants tab (shown
below), perform the following to add participants to the transcript program:
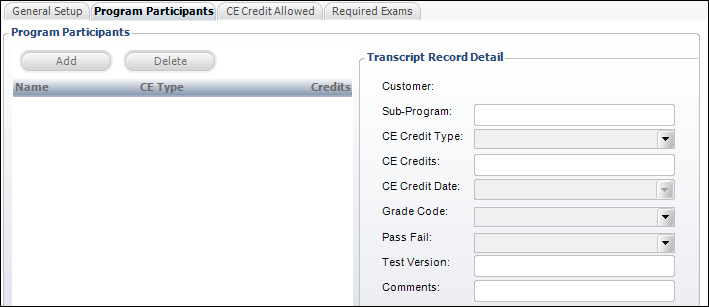
a. Click Add.
b. Search for and select a customer to add as a participant.
c. Enter the Sub-Program name.
d. Select the CE Credit Type from the drop-down.
e. Enter the number of CE Credits earned.
f. Select the CE Credit Date.
g. Select the Grade Code needed to receive credit.
h. If necessary, select the Pass Fail code.
i. Enter the Test Version.
j. Enter any Comments.
If the fields
on this tab are disabled, verify you have entered at least the Program
name, Program Title, and Begin Date.
10. On the
CE Credit Allowed tab (shown below),
perform the following to define more types of CE credits for the transcript
program:

a. Click Add.
b. Select the CE Credit Type from the drop-down.
c. Select the Credit Method from the drop-down.
d. Enter the Credits per Method number.
If no course
or exam is linked to the transcript program, this tab is disabled.
11. On the
Required Exams tab (shown below),
perform the following to add an exam that receives credit for this program:

a. Click Add and select the exam that receives credit for this program.
b. Select the Passing Grade from the drop-down.
This is for
informational purposes only and does not effect a report.
12. Click Save.
Screen Element |
Description |
|---|---|
Program |
Text box. A unique code for the transcript program. This ID is system-generated, but it can be changed. The system-generated number is in a TRNxxxxx format, where the x’s are replaced with the next sequential number. For example, TRN00001 is the first generated number. |
Program Title |
Text box. The title or long name for the transcript program. |
Approved Program |
Checkbox. When checked, indicates the transcript program is approved. Approved programs are either sponsored by the organization or recognized by the organization. The organization typically verifies that CE credits for approved programs have an educational value and that the member attended the event. If unchecked, this is considered an “unapproved” transcript program, which includes transcript activities not sanctioned or validated by the organization. |
Begin Date |
Drop-down. The start date for the transcript program. Transcript records cannot be uploaded or created for this program unless the transcript activity date is within the date range for the transcript program availability. |
End Date |
Drop-down. The end date for the transcript program. If this date is changed, only new transcript records are affected. Transcript records cannot be uploaded or created for this program unless the transcript activity date is within the date range for the transcript program availability. |
Valid thru |
Drop-down. Members can return answer sheets for processing or requests for credit up till this date. This date is typically later than the end date. If this date is changed, only new transcript records are affected. |
General Setup |
|
Sponsor |
Link and text box. When clicked, the Customer Chooser screen displays. Search for a sponsor for the transcript program. You can also enter the sponsor’s name in the text box if the sponsor is not in the database. This is for informational purposes only and does not display on the transcript. |
Joint Sponsor |
Link and text box. When clicked, the Customer Chooser screen displays. Search for a joint sponsor for the transcript program. You can also enter the joint sponsor’s name in the text box if the joint sponsor is not in the database. This is for informational purposes only and does not display on the transcript. |
Location |
Link and text box. When clicked, the Customer Chooser screen displays. Search for a location for the transcript program. You can also enter the location name in the text box if the location is not in the database. This is for informational purposes only and does not display on the transcript. |
Activity Type |
Drop-down. The secondary classification code describing the transcript program. For example, Lecture or Meeting.
Values are populated based on the non-fixed TRN "ACTIVITY_TYPE" system type. |
Content Type |
Drop-down. An optional user-defined system code characterizing the content of the transcript program. For example, Credit, Exam, or Program.
Values are populated based on the non-fixed TRN "CONTENT_TYPE" system type. |
Passing Grade |
Drop-down. The passing grade for the transcript program. This value is used by the updated program to determine who should receive credit. If participation in the program is graded, the value entered here governs the grade that must be achieved for participation.
Values are populated based on the non-fixed TRN "GRADE" system type. Numeric values assigned to grade codes in the Option 1 field are evaluated by the system to determine grades that are higher than the minimum required passing grade. For example, A (90+) would be given an Option 1 of "90". Whereas, D (60-69) would be given an Option 1 of "60". |
Related Product Type |
Drop-down. Select the associated product, course, or exam for the transcript program. The program will automatically validate that the customer requesting credit has purchased the product. Options include: · Course – click the Course Code link and search for an associated course. · Exam – click the Exam Code link and search for an associated exam. Also select a Test Code (subtest or answer sheet). · None – no product is associated with the transcript program. · Product – click the Product link and search for an associated product. The product cannot be expired.
Values are populated based on the non-fixed codes defined for the TRN "RELATED_PRODUCT_TYPE" system type. |
Record CE on Purchase |
Checkbox. When checked, indicates the order line is activated and customers receive CE credit when they purchase the product. If this checkbox is checked and a product is linked to a transcript program via the Product Maintenance > Transcript Link screen, the Transcript Link field is set to “Purchase” and cannot be changed.
When unchecked, customers do not automatically receive CE credit when they purchase the product. Instead, customers must achieve the minimal grade defined with the program or attend a conference to receive credit. |
Include Sub-Products |
Checkbox. When checked, customers who will receive CE credit for the product defined for the transcript program will also receive credit for any subproducts of that product. For example, is a meeting is defined as the product for the transcript program and this checkbox is checked, then the customer will receive a transcript record for attending any sessions of that meeting as well. |
Program Participants |
|
Add |
Button. When clicked, a participant is added to the transcript program. |
Delete |
Button. When clicked, the highlighted participant is deleted from the transcript program. |
Customer |
Link. The customer that is a participant for the transcript program. When clicked, the customer opens in CRM360. |
Sub-Program |
Text box. The sub-program the participant is in. |
CE Credit Type |
Drop-down. The Continuing Education credit type that will be awarded to the participant upon completion of the program.
Values are populated based on the non-fixed codes defined for the TRN "CE_CREDIT_TYPE" system type. |
CE Credits |
Text box. The number of credits that will be awarded to the participant upon completion of the program. |
CE Credit Date |
Drop-down. Continuing Education credits will not be awarded after this date. |
Grade Code |
Drop-down. The grade that the participant must achieve to receive credit.
Values are populated based on the non-fixed codes defined for the TRN "GRADE" system type. |
Pass Fail |
Drop-down. Indicates whether or not the customer passed or failed. Values in the drop-down are populated based on the codes defined for the non-fixed codes defined for the TRN "PASS_FAIL" system type. |
Test Version |
Test box. The version number of the test. |
Comments |
Test box. A free-form field to enter any comments about the participant or transcript record. |
CE Credit Allowed |
|
Add |
Button. When clicked, the Credit Detail fields are enabled to add allowed CE credit information. |
Delete |
Button. When clicked, the highlighted row from the table is deleted. |
CE Credit Type |
Drop-down. The continuing education credit type. For example, CEU, CLE, or CME.
Values are populated based on the non-fixed codes defined for the TRN "CE_CREDIT_TYPE" system type. |
Credit Method |
Drop-down. Identifies whether the credit should be given per program or exam. This is only relevant if more than one exam is assigned to the transcript program. Options include: · Exam – customers receive the CE credit when earning a passing grade for each of the required exams. If the exam has subtests, the CE credit is only awarded when all subtests are completed. · Program – customers receive the CE credit for the program, which may include passing a course or an exam.
Values are populated based on the non-fixed codes defined for the TRN "CREDITT_METHOD" system type. |
Credits Per Method |
Text box. Enter the credits allowed per the Credit Method selected. The number entered here restricts the number of credits that can be assigned for the selected CE Credit Type. Changes made to this number only affect future transcript records. |
Required Exams |
|
Add |
Button. When clicked, the Transcript Exam Chooser screen displays. Search for an exam to make a required exam. |
Delete |
Button. When clicked, the highlighted row from the table is deleted. |
Passing Grade |
Drop-down. Select the passing grade associated with the required exam. If customers do not meet this grade, they do not receive credit for the transcript.
Values are populated based on the non-fixed codes defined for the TRN "GRADE" system type. |