You can enter payment information quickly on the Quick Pay tab and view order information on the Order Information tab. The Quick Pay screen can be accessed across multiple subsystems, using multiple screens. This is simply a quick way to enter payment information for an order. For example, from the Customer Financial Analysis screen, you can click Pay Selected Order and enter payment information for the selected order.
To enter payment information quickly:
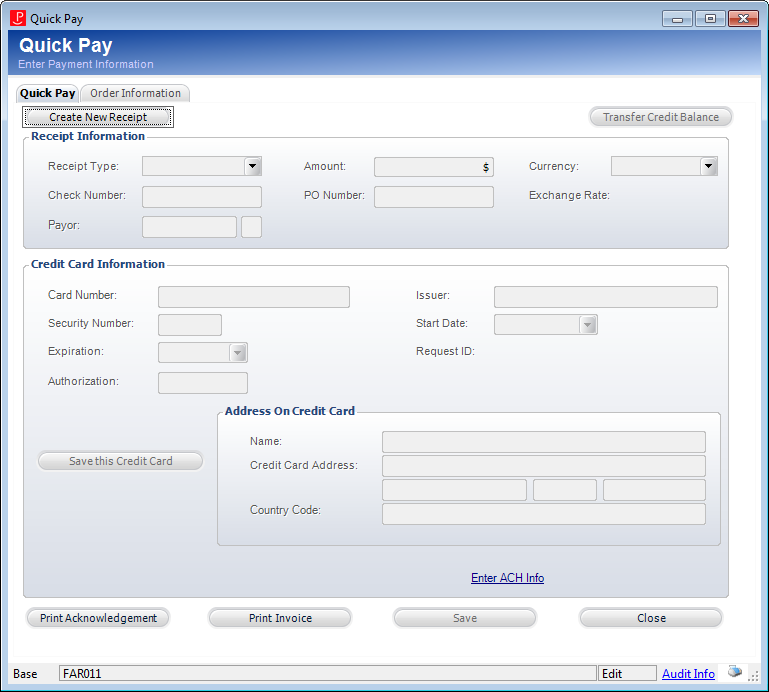
1. From the
Quick Pay screen, click Create New Receipt.
 If
applicable, click Transfer Credit Balance to
view any unapplied receipts or credit balances for the bill-to customer
and apply the amount(s) available to the order. Only posted receipts will
display.
If
applicable, click Transfer Credit Balance to
view any unapplied receipts or credit balances for the bill-to customer
and apply the amount(s) available to the order. Only posted receipts will
display.
2. From the Receipt Information section, enter the appropriate information:
a. Select the Receipt Type from the drop-down.
b. Verify the Amount is correct.
c. Change
the Currency, if necessary.
Please note that changing the Currency may result in a change to the Amount.
d. If you selected “Check”, enter the Check Number.
e. If you selected “Check” or “Cash”, enter the PO Number.
f. Enter the Payor or click the link and search for a payor. The payor is the individual, customer, company, or committee who pays for the order, who may not necessarily be the customer.
You
can change the bill-to customer on the Step 2: Shipping Information tab
instead. This changes the Payor automatically.
3. If a credit card was selected as the Receipt Type, enter payment information in the Credit Card Information section:
As of 7.6.2,
if a magnetic stripe reader device is hooked up, place your cursor in
the Card Number field, swipe the credit card, and the system will read
and process the credit card number. This functionality is available for
all payment gateways. Additionally, a new Vantiv
merchant parameter has been added in 7.6.2. If this parameter is enabled,
the system will send the track data from the credit card to Vantiv, letting
them know that the credit card is physically present, which will qualify
the transaction for a better transaction rate.
a. Verify that the appropriate credit card is selected as the Receipt Type in the Receipt Information section above.
b. Enter the Card number or click the link to select a saved credit card.
c. Enter the Issuer.
d. Enter
the Security Number.
This number is typically three digits and is located on the back of the
credit card.
 As of 7.6.0,
if the IGNORE_CVV parameter
for your payment handler is set to "N" and you want to require
the security number (CVV) in the back office, you MUST add the "NULL"
value to the REJECT_CVV_RESULT_CODES parameter
for your payment handler. If so, if the credit card security number
is NOT entered in the back office, the following error message will display:
Your credit card cannot be charged at
this time. You may have left the CVV2 number blank. Please try again making
sure you entered the correct CVV2 number.
As of 7.6.0,
if the IGNORE_CVV parameter
for your payment handler is set to "N" and you want to require
the security number (CVV) in the back office, you MUST add the "NULL"
value to the REJECT_CVV_RESULT_CODES parameter
for your payment handler. If so, if the credit card security number
is NOT entered in the back office, the following error message will display:
Your credit card cannot be charged at
this time. You may have left the CVV2 number blank. Please try again making
sure you entered the correct CVV2 number.
e. Select the Start Date and Expiration date from the drop-downs.
f. Enter the Authorization number.
g. Verify the Address on Credit Card is correct. If not, then modify it.
h. Click Save this Credit Card to save it. For more information on saved credit cards, refer to Managing Credit Card Information.
4. If an electronic check was selected as the Receipt Type, enter payment information in the Bank Account Information section:
 Electronic
checks (eChecks) should NOT be used as a payment method for FND pledges
or recurring gifts.
Electronic
checks (eChecks) should NOT be used as a payment method for FND pledges
or recurring gifts.
a. Enter the Routing Number.
b. Enter the Account Number.
c. Enter the Check Number.
d. Select the Personal Identifier from the drop-down.
e. If you selected "Social Security Number" as the Personal Identifier, enter the SSN and Date of Birth.
f. If you selected "Driver's License" as the Personal Identifier, enter the Drivers License No and State Issued.
g. Change the Name on Account, if necessary.
h. Change the CC Address, if necessary.
i. Enter a Email address.
j. Enter a Phone Number.
5. Click Save.
6. Access
the Order Information tab.
You can view the order information by product.
7. Highlight the appropriate line to view the order details information on the right-hand side of the screen.
8. Click Close and Open in Order Entry to close the Quick Pay screen and open the order in the Order Entry screen.