Add Mapping Function Information to a List Mapping Template
Once you have created
a new list mapping template, the Mapping tab defines how data will
be mapped into the Personify360 tables. In general, the mapping process
transfers a set of objects or data from one location to another. In this
case, from the source file to the MKT_Prospect table. The mapping involves
the transfer of the field sequence in a source file to a specific column
in the Prospect table. You can also map a specific source field value
to another specific value.
Mapping functions include two types:
· Range – allows you to translate
a value (e.g., revenue) into a coded field that represents ranges of values.
For example, if the source file quotes revenue in dollars, then you can
map this to a coded field that represents a range of revenue.
· Value – allows a mapping of a specific
value into another specific value. For example, the source data file may
use the code “H” for home address type whereas the system uses “HOME.”
The value mapping provides the following options:
· For delimited
source files, you can map the field sequence in the source file to a specific
column in the Marketing Prospect database table.
· For a
fixed length record format, you can map the start and end position in
the source record to a specific column in the Prospect table.
· For a
specific source field value, you can map this value to another specific
value.
· For any
column in the Prospect table, you map it to a fixed value.
 The
mapping should have a name field (e.g., First Name, Last Name, Company
Name, etc.), address 1 (if this field is not included in your mapping
file, assign a Field Order of
"0" and a Fixed Value
of "[space]", address status code (if this field is not included
in your mapping file, assign a Field
Order of "0" and a Fixed
Value of "BAD"), address type code (if this field is
not included in your mapping file, assign a Field
Order of "0" and a Fixed
Value of "BLANK") at
minimum to create the mapping and the same values should exist
in the upload list.
The
mapping should have a name field (e.g., First Name, Last Name, Company
Name, etc.), address 1 (if this field is not included in your mapping
file, assign a Field Order of
"0" and a Fixed Value
of "[space]", address status code (if this field is not included
in your mapping file, assign a Field
Order of "0" and a Fixed
Value of "BAD"), address type code (if this field is
not included in your mapping file, assign a Field
Order of "0" and a Fixed
Value of "BLANK") at
minimum to create the mapping and the same values should exist
in the upload list.
To add mapping information:
1. From the
External Prospect List
Mapping screen, on the Mapping tab (shown below), click Add.
Alternatively, click Populate Table to automatically
add all Target Names to the grid. Then, you can click Delete
to remove the records that do not apply to your mapping.
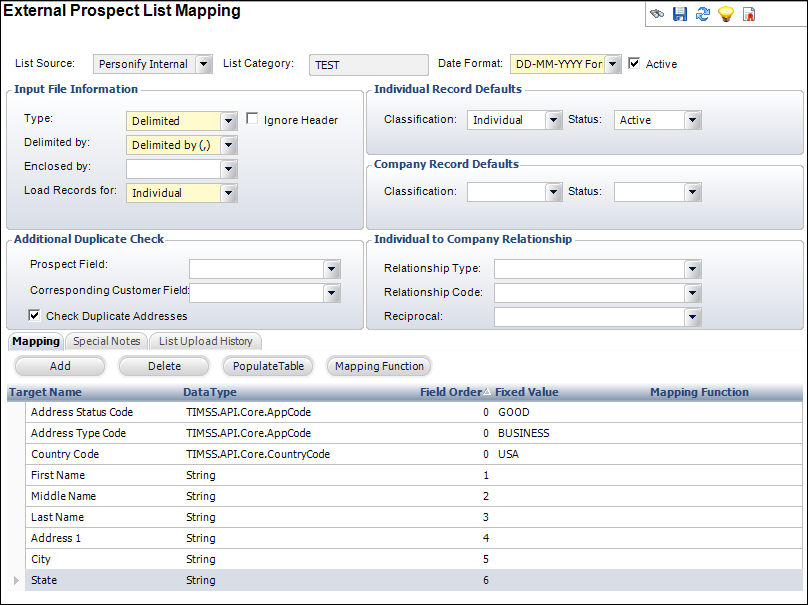
2. Click
in the Target Name cell and select the target
name.
The Data Type displays automatically.
3. Enter
the Field Order in the table cell.
 Enter a Field
Order of "0" if the field does not exist in the mapping file
but you want it to be included.
Enter a Field
Order of "0" if the field does not exist in the mapping file
but you want it to be included.
4. Enter
the Fixed Value in the table cell.
5. Click
in the Mapping Function cell and search for
the appropriate mapping function.
If no Mapping Functions exist, you need to create one by completing the
following:
a. From the
Mapping tab, click Mapping Function.
The Mapping Function Maintenance search screen displays, as shown below.
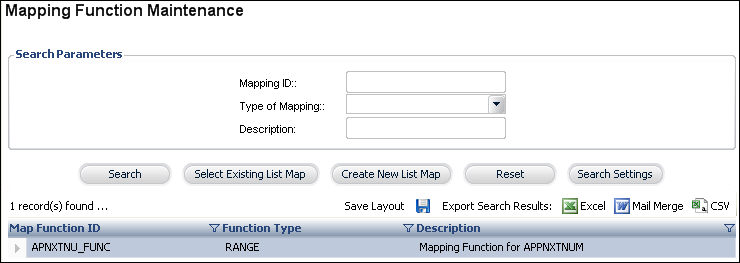
b. Click
Create New List Map.
The Mapping Function Maintenance screen displays, as shown below.
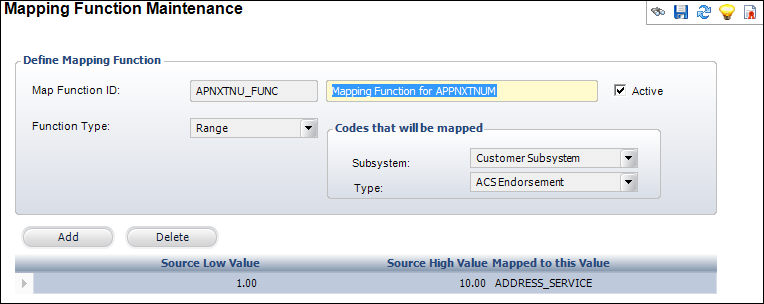
c. Enter
the Map Function ID.
d. Enter
the Map Function code in the first text box and the long name in the second
text box.
e. Select
the Function Type from the drop-down.
The table options differ depending on the Function Type selected here.
f. If necessary,
uncheck the Active checkbox.
g. Select
the Subsystem and Type
of codes that will be mapped.
h. Click
Add.
i. If you
selected “Range” for the Function Type, then
enter values in the Source Low Value and
Source High Value table cells.
j. If you
selected “Value” for the Function Type, then
enter the specific value in the Source Data Value
table cell.
k. Click
the button in the Mapped to this Value table
cell and select the appropriate value.
l. Click
Save.
m. Navigate
back to the External Prospect List Mapping.
The Mapping Function you just created appears in the Mapping Function chooser.
6. Select
the Mapping Function from the chooser.
7. Repeat
steps 1-6 for any additional mapping functions.
8. Click
Save.
Screen Element |
Description |
Mapping Tab |
Add |
Button. When clicked, a row is added to
the table. |
Delete |
Button. When clicked, the highlighted
row is deleted from the table. |
Populate Table |
Button. When clicked, the table populates
with marketing prospect columns and other related information. |
Mapping Function |
Button. When clicked, the Mapping Function
Maintenance screen displays. See Add
the Mapping Function Information for more information. |
Target Name |
Table cell. The following are the minimum
columns that must be included in the mapping detail definition:
· First
Name, Last Name, Middle Name, or Company Name
· Address
1 - if this field is not included in your mapping file, assign
a Field Order of "0" and a Fixed Value of "[space]".
· Address
Type Code - if this field is not included in your mapping file,
assign a Field Order of "0" and a Fixed Value of "BLANK".
· Address
Status Code - if this field is not included in your mapping
file, assign a Field Order of "0" and a Fixed Value
of "BAD". |
Data Type |
Table cell. This populates based on the
Target Name selected and cannot be changed here. |
Field Order |
Table cell. The order in which the target
will display in relation to the other targets. |
Fixed Value |
Table cell. The optional fixed value for
the target. If the field must be fixed, then enter the value here. |
Mapping Function |
Table cell. When clicked, the Generic
Chooser displays where you can search for an existing marketing
mapping function. If the mapping function does not display in
the chooser, then you can add a mapping function using the Mapping
Function Maintenance screen. See Add
the Mapping Function Information for more information. |
Mapping Function Maintenance
screen |
Map Function ID |
Text box. Mapping Function ID is user-defined
and can be reused across multiple lists. Enter the Map Function
code in the first text box and the long name in the second text
box. Mapping helps determine what should be done with a specific
field in the source file when it is mapped to target column. |
Active |
Checkbox. When checked, indicates this
mapping function is active. |
Function Type |
Drop-down. This controls the behavior
of the mapping function. The table options differ depending on
the Function Type selected. Mapping functions include two types:
· Range
– allows you to translate a value (e.g., revenue) into a coded
field that represents ranges of values.
· Value
– allows a mapping of a specific value into another specific value.
For example, the source data file may use the code “H” for home
address type whereas the system uses “HOME.”
Values in the drop-down are populated based
on the fixed codes defined for the MKT "MAP_FUNCTION_TYPE"
system type. |
Subsystem |
Drop-down. The subsystem of the code being
mapped. |
Type |
Drop-down. The code type defined under
the subsystem for a mapping function. |
Add |
Button. When clicked, a row is added to
the table. |
Delete |
Button. When clicked, the highlighted
row is deleted from the table. |
Source Low Value |
Table cell. Only displays when “Range”
is selected as the Function Type. The data value in the source
data file is evaluated against this low value and a code is substituted. |
Source High Value |
Table cell. Only displays when “Range”
is selected as the Function Type. The data value in the source
data file is evaluated against this high value and a code is substituted. |
Source Data Value |
Table cell. The specific source value. |
Mapped to this Value |
Table cell. When clicked, the Generic
Chooser displays. Search for the appropriate field value to which
the source should be linked. |
See Also:
· Creating
a New List Mapping Template
· Adding
Special Notes about a List Mapping Template