As of the 7.3.1 release, you now have the option to modify the search settings for specific screens. This includes the possibility to:
· add fields to the search parameters
· remove fields from the search parameters
· rearrange fields in the search parameters
· modify the search results table structure
· determine the sort order for the search parameters
· enter default values for the search parameters
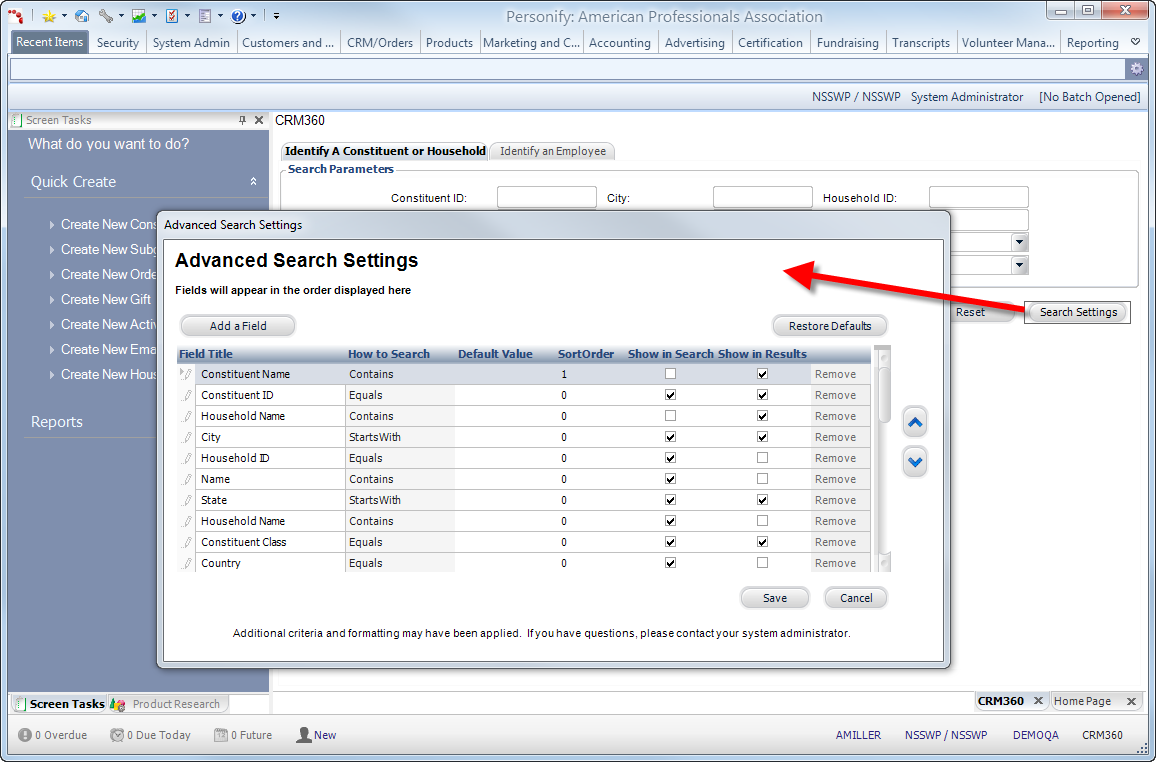
Any modifications you want to make to a screen’s search settings are done through the Advanced Search Settings screen. To access this screen, you need to click the Search Settings button displayed on the search screen you want to modify the settings for.
 If the Show in Results flag is checked for a
field where there is a child table of customer, the feature has been designed
to add the child table as inner join to the query. It will only bring
in results for those customers whose records are in the child table.
If the Show in Results flag is checked for a
field where there is a child table of customer, the feature has been designed
to add the child table as inner join to the query. It will only bring
in results for those customers whose records are in the child table.
The
Search Settings button is only available on
those search screens your system administrator has enabled for advanced
search. For more information, please see Enabling
Screens for Advanced Search Setup.
The table below explains each screen element displayed on the Advanced Search Settings screen and how it affects your search settings:
Screen Element |
Description |
|---|---|
Add a Field |
When clicked, opens the Field Chooser. From here, you can select any field your system administrator has enabled for advanced searching. The available fields display in their folders as determined by your application’s folder structure. Based on your organization’s security settings, you can explore fields three levels deep in the table structure.
By double-clicking a field, you can add it to the data grid on the bottom of the Field Chooser screen.
Once you finish adding the field(s) to the Field Chooser data grid, click Apply to add the fields to your Advanced Search Settings grid. Click Close to cancel the addition of any selected fields.
|
Restore Defaults |
When clicked, you can remove any advanced search settings you placed on the screen’s search settings and return the settings back to their defaults. Any changes you made to the search settings are lost. |
Up/Down Arrows |
By selecting a field from the Advanced Search Settings grid and clicking either the up or down arrow to the right of the grid, you can move that field’s display order on the search screen. For example, moving a field up one level makes that field appear higher in the Search Parameters section of the search screen. |
Save |
When clicked, it saves the advanced search settings you modified on the Advanced Search Settings screen and returns you to the search screen.
|
Cancel |
When clicked, any changes you made to the Advanced Search Settings screen are discarded and you return to the search screen with no changes implemented. |
Data Grid Elements |
|
Field Title |
Defaults to the field name selected from the Field Chooser. Display order of the field titles determines the display order of the fields in the Search Parameters section of the search screen and the column layout of the Search Results data grid. |
How to Search |
Defaults based on the type of field title associated and further determines how the entry into the Search Parameter affects the search results. See below for notes to keep in mind when modifying this data grid element.
|
Default Value |
Defaults to null for all. Determines the value that displays as default for the associated field name in the Search Parameters section of the search screen. |
Sort Order |
Defaults to 0 for all. Determines the order in which the fields filter out the search results. |
Show in Search |
If selected, the associated field title appears as a Search Parameter on the search screen. |
Show in Results |
If selected, the associated field title appears as a column in the Search Results data grid of the search screen. |
Remove |
If clicked, deletes the associated field title from the Advanced Search Settings grid. To add the field again, click Add a Field and select the field from the Field Chooser window. |
Notes to keep in mind when using Advanced Search:
· Any changes you save to a search screen are saved for that user ID only. Using the Application Designer, you can modify the code behind if you want to deploy changes to all users.
· The settings stay in affect for the user ID if you log out of the application.
· Once you’ve saved your Advanced Search settings, you must refresh the search screen to see the changes implemented.
· Any fields you add to the results set affect the number of records retrieved. For example, if you add the State field to a Customer Central search and a customer has 3 addresses in 3 different states, the application will retrieve 3 records for the same customer – one for each of the different addresses.
· You can specify ‘Between’ in the How to Search column for a field; be aware that this is intended for numeric fields (e.g. sales amount)
· To search for values in a range, enter as comma-separated values (e.g. for a price between $10-$100, enter ’10,100’).
· If you add a parameter that involves a drop-down of options that I dependent on another field, the parameter will not display as a drop-down. Instead, the drop-down will display as a text entry box.
· Date fields use a calendar lookup, which will not accept a comma-separated value – so if you wish to set up a date range, try adding the desired date field twice, the first with ‘Greater Than’ and the second with ‘Less Than’.
· You can change the field title so it is intuitive (e.g. the first can be ‘Registrations From’ and the second can be ‘Registrations To’).
· Any fields listed in the Advanced Search Settings as “Read-Only” were created as such by your system administrators. The ability to make changes to these fields is disabled.
For
a video demonstration, refer to Search
Functionality Video Demo.
See Also:
· Overview: Searching for Information